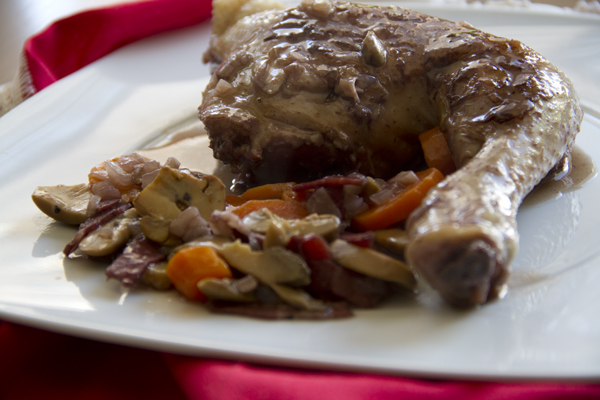
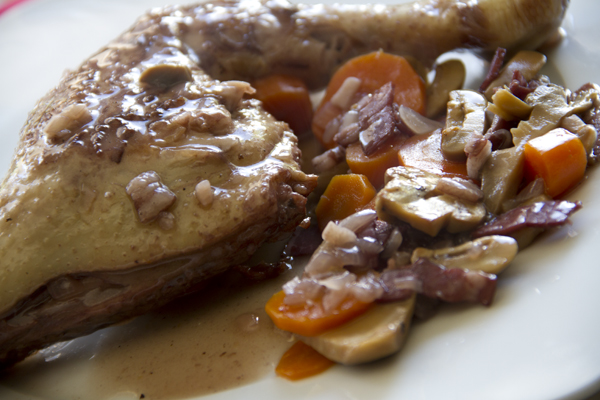
Coq au vin

Whole kitchen in their Savory Proposal for October invites us to prepare a French classic, “Coq au Vin”. Or in other words, chicken in wine — you can tell I learned French at school :p.

Pics and Cakes

What do we need?

(serves 2)

  • 2 chicken thighs

  • 1 large onion

  • 2 carrots

  • 3 slices of bacon

  • 2 cloves of garlic

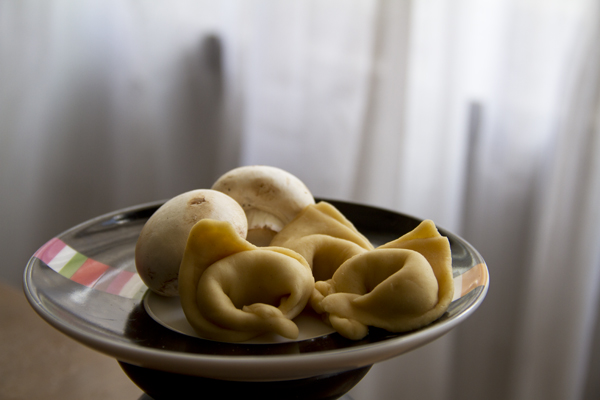
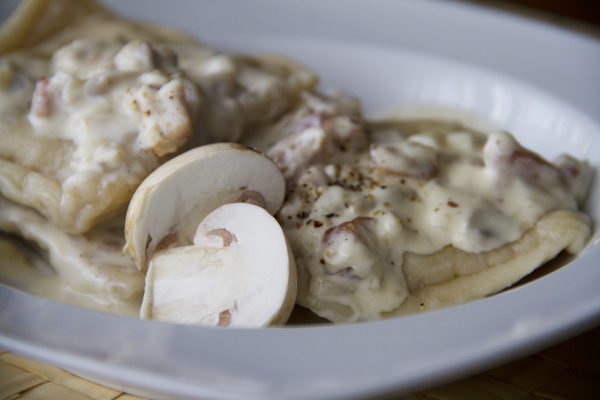
  • 50 g (1.75 oz) mushrooms

  • 2 glasses of wine

  • 4 glasses of chicken stock

  • Flour and butter

  • Salt and pepper

How do we make it?

  • Start by chopping the onion, carrot and bacon.

  • Heat a little oil over medium heat in a wide, shallow pot. Add the chopped ingredients.

  • Once they’re slightly golden, add the minced garlic, cook for a minute and set aside in a bowl.

  • In a zip-lock plastic bag, add a couple of tablespoons of flour, a pinch of salt and pepper. Drop in one of the thighs and shake to coat. Repeat with the other.

  • Once floured and seasoned, sear the thighs in a pan for about 10 minutes.

  • Remove the chicken, add the wine and let it reduce a bit.

  • Return the thighs to the pan, add the vegetables and pour in the chicken stock.

  • Simmer everything together over low heat for about 50 minutes.

  • Once the chicken is well cooked, remove the chicken and the vegetables.

  • With a tablespoon of flour and one of butter, form a smooth paste and stir it into the sauce.

  • Stirring constantly, cook over low heat for a couple of minutes until the mixture thickens.

  • In a frying pan with a little oil, sauté the mushrooms until golden.

  • Finally, return all the ingredients to the pot and let everything cook together for a couple of minutes so the flavors blend.

Tips:

  • If you have some sauce left over, you can use it to make some tasty meatballs in sauce.

  • If it doesn’t thicken enough, add a tablespoon of cornstarch dissolved in cold water.

Pics and Cakes

[English version] COQ AU VIN* *Ingredients (serving 2):

  • 2 chicken legs an thighs

  • 1 large onion

  • 2 carrots

  • 3 bacon slides

  • 2 cloves of garlic

  • 50 g mushrooms

  • 2 cups of red wine

  • *4 cups of chicken stock *

  • Flour and butter

  • Salt and pepper

  • Chop onion, carrot and bacon.

  • *Place some olive oil into a deep sauce pan and heat it. Add chopped ingredients. *

  • Cook until ingredients are slightly browned, add chopped garlic and keep cooking for one minute. Set aside.

  • *Put a couple of tbsp of flour, a pinch of salt and pepper into a plastic bag. Put the chicken inside and shake it well to create a thin layer on the chicken. *

  • Stir over a high heat for 10 minutes.

  • *Remove chicken, add red wine and simmer to reduce it. *

  • *Put the chicken back into the sauce pan, add chopped vegetables and chicken stock. *

  • *Simmer for round 50 minutes, cooking over a low heat. *

  • When chicken is soft and cooked, remove it from the sauce pan.

  • *In a different bowl, mix some flour and butter and add it to the sauce. *

  • *Keep stiring, cooking over a low heat for a couple of minutes. *

  • *In another pan, stir fry the mushrooms with a bit of olive oil until golden browned. *

  • Add all the ingredients into the sauce pan with the wine sauce and cook for a couple of minutes in order to combine all flavors.

  • Tips:**- If there is some sauce left, you can use for preparing meatballs. It will be delicious!*
    • If you want a thicker sauce, add some corn flour.*

Comments

tía pi (2012-11-18 22:03:03):

Today I made the coq au vin following your recipe — delicious! I didn’t make it with rooster, I used a free-range chicken, one of those that look like they’ve got hepatitis, and honestly it was finger-licking good. I had some sauce left over and I’m planning to poach a few eggs to keep dipping bread. Thanks, piggies.

18 de octubre de 2012 · 4 min · Cesmm

Coq au vin

**Whole kitchen en su Propuesta Salada para el mes de octubre nos invita a preparar un clásico francés “Coq au Vin”. **O lo que es lo mismo Pollo al vino, se nota que aprendí francés en el colegio :p.

Pics and Cakes


**¿Qué necesitamos? **

(2 personas)

  • 2 contramuslos de pollo

  • 1 cebolla grande

  • 2 zanahorias

  • 3 lonchas de beicon

  • 2 dientes de ajo

  • 50gr de champiñones

  • 2 vasos de vino

  • 4 vasos de caldo de pollo

  • Harina y mantequilla

  • Sal y pimienta

¿Cómo lo hacemos?

  • Empezamos cortando la cebolla, la zanahoria y el beicon.

  • Ponemos un poco de aceite a fuego medio en una cazuela baja y ancha. Incorporamos los alimentos cortados.

  • Cuando estén un poco dorados, añadimos los ajos picados, cocinamos un minuto y reservamos en un bol.

  • En una bolsa de plástico con autocierre añadimos un par de cucharadas de harina, una pizca de sal y pimienta. Introducimos uno de los contramuslos y agitamos para que se impregne. Repetimos con el otro.

  • Una vez enharinado y salpimentado marcamos en una sartén los contramuslos durante unos 10 minutos.

  • Retiramos el pollo, añadimos el vino y dejamos que reduzca un poco.

  • Volvemos a introducir los contramuslos, las verduras y agregamos el caldo de pollo.

  • A fuego lento dejamos que se vaya cociendo todo junto durante unos 50 minutos.

  • Cuando el pollo esté bien cocido sacamos el pollo y las verduras.

  • Con una cucharada de harina y otra de mantequilla formamos una masa fina que añadimos a la salsa.

  • Sin dejar de remover, cocinamos a fuego lento durante un par de minutos hasta que la mezcla espese.

  • En una sartén, con un poco de aceite, sofreímos los champiñones hasta que estén dorados.

  • Por último añadimos todos los ingredientes a la cazuela y dejamos que se cocinen todos durante un par de minutos para que se mezclen todos los sabores.

Consejos:

  • Si sobra un poco de salsa podemos aprovechar para hacer unas ricas albóndigas en salsa.

  • Si no espesa lo suficiente añadimos una cucharada de maizena diluida en agua fría.

Pics and Cakes

[English version] COQ AU VIN* *Ingredients (serving 2):

  • 2 chicken legs an thighs

  • 1 large onion

  • 2 carrots

  • 3 bacon slides

  • 2 cloves of garlic

  • 50 g mushrooms

  • 2 cups of red wine

  • *4 cups of chicken stock *

  • Flour and butter

  • Salt and pepper

* *

  • Chop onion, carrot and bacon.

  • *Place some olive oil into a deep sauce pan and heat it. Add chopped ingredients. *

  • Cook until ingredients are slightly browned, add chopped garlic and keep cooking for one minute. Set aside.

  • *Put a couple of tbsp of flour, a pinch of salt and pepper into a plastic bag. Put the chicken inside and shake it well to create a thin layer on the chicken. *

  • Stir over a high heat for 10 minutes.

  • *Remove chicken, add red wine and simmer to reduce it. *

  • *Put the chicken back into the sauce pan, add chopped vegetables and chicken stock. *

  • *Simmer for round 50 minutes, cooking over a low heat. *

  • When chicken is soft and cooked, remove it from the sauce pan.

  • *In a different bowl, mix some flour and butter and add it to the sauce. *

  • *Keep stiring, cooking over a low heat for a couple of minutes. *

  • *In another pan, stir fry the mushrooms with a bit of olive oil until golden browned.  *

  • Add all the ingredients into the sauce pan with the wine sauce and cook for a couple of minutes in order to combine all flavors.

* * *  Tips:**- If there is some sauce left, you can use for preparing meatballs. It will be delicious!*

    • If you want a thicker sauce, add some corn flour.*

18 de octubre de 2012 · 4 min · Cesmm

Piononos

Whole kitchen, in their Sweet Proposal for September, invites us to make a Spanish classic: “Piononos”. And honestly, this challenge made me really happy because I think these little pastries are an absolute delight. I’d actually come across them before, though under the popular nickname ‘Vicksvaporub’ at Confitería Rufino in Aracena. Apparently they’re typical of Granada, and legend has it they got their name because they were made in honor of Pope Pius IX. Of course, like with every recipe, the origin and authorship are still up for debate, but whoever made them first, these little pastries are wonderful.

Pics and Cakes

What do we need?

(10-12 units)

For the sponge cake:

  • 2 large eggs

  • 2 tablespoons of sugar

  • 1 tablespoon of flour

  • 1 tablespoon of cornstarch

  • 2 tablespoons of milk

  • a pinch of salt

  • Butter for greasing

For the syrup:

  • 150 g (5.3 oz) sugar

  • 150 ml (2/3 cup) water

  • A cinnamon stick

  • A splash of rum (optional)

For the yolk cream:

  • 4 egg yolks

  • The weight of the yolks in sugar

  • The volume of the sugar in water

  • A pinch of cornstarch

How do we make them?

  • We start with the yolk cream so it has time to cool down.

  • First, make a syrup with equal parts water and sugar. Put both ingredients in a small saucepan and bring to a boil. How thick the yolk cream ends up depends, in part, on how much you cook the syrup down. For a filling-cream texture, let the syrup reach the soft-ball stage (reduce it down to the original water volume — that is, if you used 250 ml (1 cup) of water and 250 ml (1 cup) of sugar, take it off the heat once it’s reduced to 250 ml (1 cup) of syrup).

  • Let the syrup cool a bit. Meanwhile, separate the yolks and whisk them lightly. Once the syrup is lukewarm, add it to the yolks slowly, whisking constantly (off the heat), until you’ve added all the syrup.

  • Put it on low heat and cook, stirring constantly, until it thickens. (The longer you cook it, the thicker it gets.) You can add half a teaspoon of cornstarch dissolved in a tablespoon of cold water.

  • Make the syrup by boiling all the ingredients for 5 minutes.

  • Line the baking tray with parchment paper and grease it with butter.

  • Preheat the oven to 180°C (355°F) and start preparing the sponge cake.

  • Whip the egg whites with a pinch of salt. Once they’re stiff, add the sugar little by little while still whisking, until it’s fully dissolved and the meringue is firm and glossy. Set aside.

  • In a bowl, combine the flour and cornstarch (sifted together), add the yolks and mix, then gradually add the milk to get a smooth, lump-free cream.

  • Add the yolk mixture to the meringue in several stages, folding gently with a spatula.

  • Carefully spread the batter on the prepared baking tray in a 4-5 mm (about 1/5 inch) thick layer. Place in the preheated oven on the middle rack. Pull it out as soon as it picks up a bit of color (about 7-8 minutes). Flip it onto another sheet of parchment paper. Let it cool slightly and brush it with the syrup.

  • Once it’s cool, spread a thin layer of yolk cream over the sponge sheet.

  • Cut strips about 3-4 cm (1.2-1.6 inches) wide and roll them up in a spiral. Place the little pastries vertically into paper cupcake liners. Add a teaspoon of cream on top of each one. Sprinkle with sugar and torch it with a kitchen blowtorch.

Pics and Cakes

Tips:

  • The sponge cake has to be very thin. These quantities worked for me with my oven, which has a square tray that’s smaller than usual. I think if you double the amounts you’ll have enough for a regular-size tray. In any case, if it’s too much batter, better not to use it all or the sponge will end up too thick.

  • In principle, the sponge doesn’t need any baking powder because the whipped egg whites give it enough volume. Even so, next time I’ll try adding a pinch to see how it turns out.

  • Don’t forget to grease the parchment paper with butter — the sponge sheet is very thin and could easily tear when you try to peel it off.

  • The recipe we followed is from Belenciaga, but using it as inspiration you can come up with all kinds of variations.

Pics and Cakes


25 de septiembre de 2012 · 4 min · Palstelera

Piononos

Whole kitchen en su Propuesta Dulce para el mes de Septiembre nos invita a preparar un clásico español, “Piononos”. Y la verdad es que este reto me ha encantado porque estos pastelitos me parecen una delicia. Lo cierto es que ya  los conocía aunque con el nombre popular de ‘Vicksvaporub’ en la Confitería Rufino de Aracena. Al parecer son típicos de Granada y cuenta la leyenda que reciben este nombre porque se hicieron en honor del papa Pío IX. Evidentemente como toda receta, el origen y la autoría siguen siendo objeto de disputa pero fuera quien fuera el que los hizo por primera vez, estos pastelitos son una maravilla.

 Pics and Cakes

¿Qué necesitamos?

(10-12 unidades)

Para el bizcocho:

  • 2 huevos grandes

  • 2 cucharadas de azúcar

  • 1 cucharada de harina

  • 1 cucharada de maizena

  • 2 cucharadas de leche.

  • una pizca de sal

  • Mantequilla para untar

Para el almíbar:

  • 150 g de azúcar

  • 150 ml agua

  • Un palo de canela

  • Un chorrito de ron (opcional)

Para la crema de yema:

  • 4 yemas

  • El peso de las yemas en azúcar

  • El volumen del azúcar en agua

  • Una pizca de maizena

¿Cómo lo hacemos?

  • Empezamos haciendo la crema de yema para que enfríe.

  • Lo primero es hacer un almíbar a partes iguales de agua y azúcar. Para ello, ponemos los dos ingredientes en una cazuela pequeña y lo llevamos a ebullición. Del grado de cocción del almíbar va a depender, en parte, lo espesa que nos quede la yema.Para una textura de crema de relleno dejamos que el almíbar alcance el punto de bola.(reducir al volumen original de agua. es decir si hemos usado 250 cc de agua y 250cc de azúcar, cuando haya reducido a 250cc de almíbar retiramos del fuego)

  • Dejamos templar el almíbar. Mientras separamos las yemas y las batimos ligeramente con las varillas. Una vez esté el almibar tibio lo vamos añadiendo a las yemas sin dejar de mover con las varillas, (fuera del fuego), hasta añadir todo el almíbar.

  • Llevamos al fuego bajo y sin dejar de remover cocemos hasta que espese. ( si prolongamos la cocción quedará más espesa). Le podemos añadir media cucharadita de maizena disuelta en una cucharada de agua fría.

  • Preparamos el almíbar hirviendo 5 minutos los ingredientes.

  • Forramos la bandeja de horno con papel vegetal y lo untamos con mantequilla.

  • Calentamos el horno a 180ºC y empezamos a preparar el bizcocho.

  • Montamos las claras con una pizca de sal. Cuando ya estén subidas añadimos el azúcar poco a poco sin dejar de batir, hasta que se disuelva bien y el merengue esté firme y brillante. Reservamos.

  • En un bol ponemos la harina y la maizena mezcladas y tamizadas, añadimos las yemas y mezclamos, vamos añadiendo la leche para conseguir una crema lisa y sin grumos.

  • Vamos añadiendo en varias veces la mezcla de yemas sobre el merengue mezclando con una espátula con movimientos envolventes.

  • Extendemos con cuidado la masa sobre la bandeja de horno preparada en una capa de 4 - 5 mm. Metemos al horno precalentado a media altura. en cuanto coja un poco de color lo sacamos ( unos 7-8 minutos). Volcamos sobre otro papel de horno. Dejamos que entibie un poco y calamos con el almíbar pincelándolo con la brocha

  • Cuando haya enfriado, extendemos una capa fina de crema sobre la plancha de bizcocho.

  • Se cortan tiras de unos 3- 4 cm y las enrollamos en espiral. Colocamos los pastelitos en cápsulas de papel, verticalmente. Se pone una cucharadita de crema encima de cada pastel. Se espolvorea con azúcar y se quema con el soplete.

Pics and Cakes

Consejos:

  • El bizcocho tiene que ser muy fino. con estas cantidades a mí me ha servido para mi horno cuya bandeja cuadrada es más pequeña de lo habitual. Creo que si dobláis las cantidades tendréis suficiente para una bandeja grande. De todas formas si es demasiada cantidad, mejor no utilizarla toda o el bizcocho quedará demasiado grueso.

  • En principio el bizcocho no necesita levadura porque al tener las claras montadas le da el volumen necesario. De todas formas, la próxima vez probaré a echarle una pizca a ver cuál es el resultado.

  • No olvidéis untar el papel de horno con mantequilla ya que la plancha de bizcocho resultante será muy fina y se os podría romper al despegarla.

  • La receta que hemos seguido es de Belenciaga pero inspirándonos en ella podemos hacer multitud de variaciones.

 Pics and Cakes

[English version] ‘PIONONOS’: YOLK-CREAM SWEET TREATS* **Ingredients (10-12 units): *For the sponge cake:

  • 2 large eggs

  • 2 tbsp sugar

  • 1 tbsp flour

  • 1 tbsp white corn flour (Maizena)

  • 2 tbsp milk

  • A pinch of salt

  • Butter

For the syrup:

  • 150 g sugar

  • 150 ml water

  • Cinnamon stick

  • A splash of rum

For the yolk cream:

  • 4 egg yolks

  • Same yolk weight in sugar

  • Same sugar volume in water

  • A pinch of white corn flour (Maizena)

* *

  • Start with the yolk cream to get it cold.

  • *Make a syrup with sugar and water. Put both ingredients in a sauce pan and cook over a high heat. We need a thick texture, so keep cooking until reducing to the original amount of water. *

  • Leave to cool. Separate the yolks and whisk them with the blender (provided with whisk attachment). Add slowly the syrup while whisking.

  • Put it again on to the heat and cook over a low heat, stirring constantly. You can add a bit of white corn flour to have a thicker cream.

  • *Let’s prepare the syrup. Simmer all the ingredients for 5 minutes and set aside. *

  • *Place bakery paper into the baking tray and butter it. *

  • *Preheat oven at 180ºC and let’s start with the sponge cake. *

  • *Whisk the egg whites with a pinch of salt until. Add progressively the sugar and whisk until the mixture is thick and glossy. Set aside. *

  • Place flour and corn flour into a large bowl, add egg yolks and stir well. Add the milk and mix thoroughly until the mixture is smooth.

  • Add slowly the yolk cream to the meringue and slowly stir.

  • Pour the mixture in the prepared baking tray creating a thin layer (4-5 mm). Bake until slightly golden brown (7-8 minutes).

  • Place into a new baking paper and remove the old one. Brush it with the syrup.

  • *Spread a thin layer of yolk cream over the sponge cake. *

  • *Cut into strips (3-4 cm) and roll them one by one. Place each sweet treat into small paper cupcakes molds in vertical position. *

  • Add a tsp of yolk cream on the top. Spread some sugar and burn it with a kitchen blowtorch.

* * * * *  Tips:*

- The sponge cake layer has to be really thin. These amounts work for a small baking tray. If you use the baking tray of a conventional oven, double the amounts. If you feel it’s too much don’t pour all the mixture. Otherwise, the resulting spong cake will be too thick.

- This spong cake doesn’t need baking powder because we have made a meringue first. However, next time I’ll try and add a pinch of it to see the result.

- Don’t forget buttering the baking paper. Otherwise, you risk to break the sponge cake when removing from it.


25 de septiembre de 2012 · 7 min · Palstelera

Fresh Stuffed Pasta

Whole Kitchen in their Savory Proposal for the month of September invites us to make an Italian classic: “Stuffed Pasta.” With this recipe we kick off a new adventure on this amazing food blog, where every month we’re challenged to make a savory dish and a sweet one. We love the idea — it’s original and pretty useful, since it pushes you to make dishes you might not normally tackle, and it also lets you check out what the other participants come up with.

Pics and Cakes

What do we need?

(Serves 4)

  • For the dough:
  •   300 g (2.5 cups) flour
    
  •   1 egg and 1 egg white
    
  •   2 tbsp olive oil
    
  •   1/2 tsp salt
    
  •   1 tsp vinegar
    
  • For the filling:
  •   2 small onions, finely chopped
    
  •   1 clove of garlic, finely chopped
    
  •   300 g (10.5 oz) mushrooms
    
  •   2 tbsp parsley
    
  •   Salt
    
  •   40 g (1.5 oz) aged cheese
    
  • For the sauce:
  •   200 ml (3/4 cup + 1 tbsp) heavy cream
    
  •   4 slices of bacon (thick-cut)
    
  •   Salt and pepper
    

Pics and Cakes

How do we do it?

  • Put the flour in a bowl, make a well in the center, and add the egg, the egg white, the salt, the oil, and the vinegar.

  • Knead until you get an elastic dough, adding a splash of water if needed.

  • Wrap the dough in plastic wrap and let it rest in the fridge for at least an hour.

  • Heat a little oil in a large pan, add the onions, garlic, and mushrooms. Cook gently over low heat until all the liquid has evaporated.

  • Stir in the parsley and season. Add the finely chopped aged cheese and mix well (with the heat off). Let it cool.

  • Once the dough has rested, divide it in two and roll out one half with a rolling pin until very thin. Ideally you’d use a pasta machine, but not everyone has one at home, so a rolling pin will do the trick.

  • Place small mounds of filling on the pasta sheet, leaving space between them.

  • Roll out the second half of the dough very thin and lay it over the first one. With your hands, press around the mounds to shape the ravioli.

  • Finally, cut out the ravioli with a round cutter (like a pizza cutter) with fluted edges. Set the ravioli aside while you prepare the sauce.

  • If instead of ravioli you’d rather make tortellini, roll out the dough very thin, fill it, and fold as shown in this [video](

{{}}

).

  • For the sauce, use the leftover filling. Sauté the bacon cut into small cubes, add the leftover filling and the cream, and bring to a boil. Simmer for a few minutes and adjust salt and pepper to taste.

  • Cook the pasta, drain it, add the sauce, and… buon appetito!

Pics and Cakes

Tips:

  • The dough has to be very thin. If you’re using a rolling pin, that means once you think it’s thin enough, roll it out at least three more times. I also recommend making your ravioli or tortellini small, since they’ll grow when cooked.
  • If you don’t have a pasta cutter, you can use a regular knife, but make sure to seal the edges well afterward or you’ll lose the filling during cooking. You can seal them with your fingers, a fork, or the edge of a serrated knife.
  • Our pasta took quite a while to cook (15 minutes) because the pieces were too big and chunky.

Pics and Cakes


18 de septiembre de 2012 · 4 min · Palstelera

Pasta fresca rellena

Whole kitchen en su Propuesta Salada para el mes de septiembre nos invita a preparar un clásico italiano “Pasta Rellena”. Y con esta receta empezamos una nueva andadura de este increíble blog culinario en el que cada mes nos retan a preparar una receta salada y una dulce. La idea nos parece original y bastante útil ya que te anima a hacer platos que, tal vez, no harías normalmente y además te permite ver los resultados de los demás participantes.

 Pics and Cakes

¿Qué necesitamos?

**(4 personas) **

  • Para la masa: -       300 g de harina -       1 huevo y 1 clara de huevo -       2 cucharadas de aceite de oliva -       1/2 cucharita de sal -       1 cucharita de vinagre

  • Para el relleno: -       2 cebollitas muy picadas -       1 diente de ajo muy picado -       300 g de champiñones -       2 cucharadas de perejil -       Sal -       40 g de queso curado

  • Para la salsa: -       200 ml de nata -       4 lonchas de bacon (grueso) -       Sal y pimienta

Pics and Cakes

¿Cómo lo hacemos?

  • Ponemos la harina en un cuenco, hacemos un hueco en el centro y añadimos el huevo, la clara, la sal, el aceite y el vinagre.

  • Amasamos hasta obtener una masa elástica y añadimos un poco de agua si fuera necesario.

  • Envolvemos la masa en film transparente y la dejamos reposar en el frigorífico al menos una hora.

  • Calentamos un poco de aceite en una sartén grande, agregamos las cebollas, ajo y los champiñones. Rehogamos a fuego lento hasta la evaporación total del líquido.

  • Incorporamos el perejil y sazonamos. Añadimos el queso curado bien picado y removemos bien (ya con el fuego apagado). Lo dejamos enfriar.

  • Pasado el tiempo de espera, dividimos la masa en dos y estiramos una mitad con un rodillo la masa hasta dejarla muy fina. Lo ideal sería hacerlo con una máquina de pasta pero no todo el mundo tiene una en casa, así que con un rodillo nos podemos apañar.

  • Ponemos pequeños montoncitos de relleno sobre la pasta dejando espacio entre ellos.

  • Estiramos muy fina la segunda mitad de la masa y la ponemos sobre la primera que hemos preparado. Con las manos, acomodamos esta segunda lámina para ir formando los ravioli.

  • Por último, cortamos los raviolis con un cortador redondo (como el cortapizzas) pero con los bordes ondulados. Dejamos reposar los ravioli mientras preparamos la salsa.

  • Si en lugar de raviolis, queremos hacer tortellini estiramos la masa muy fina y la rellenamos y plegamos como podemos ver en este [video](

{{}}

).

  • Para la salsa utilizaremos la parte del relleno que nos ha sobrado. Para ello, saltearemos el bacon cortado en taquitos,  añadiremos el relleno sobrante y la nata y lo llevaremos a ebullición. Dejamos cocer con unos minutos y rectificamos la sal y pimienta al gusto.

  • Cocemos la pasta, la escurrimos, añadimos la salsa y… buon appetito!

Pics and Cakes

Consejos:

  • La masa tiene que ser muy fina. Si lo hacéis con rodillo quiere decir que cuando creáis que ya está muy fina, la volváis a estirar al menos otras tres veces. Además recomiendo que, ya sean ravioli o tortellini, los hagáis pequeños ya que al cocerlos también aumentarán su tamaño.
  • Si no tenéis el cortador para la masa podéis hacerlo con un cuchillo normal pero aseguraos de sellar bien los bordes después porque si no perderéis el relleno durante la cocción. Podéis sellarlos con los dedos, con un tenedor o con el borde de un cuchillo de sierra.
  • Nuestra pasta tardó bastante en cocerse (15 minutos) porque eran demasiado grandes y gordos.

 Pics and Cakes

[English version] FRESH STUFFED PASTAIngredients (serves 4):* For the pasta:* -       300 g flour -       1 egg and 1 egg white -       2 tbsp olive oil -       1/2 tsp salt -       1 tsp vinegar

** For the filling:*

  • -       2 small onions* -       1 clove of garlic -       300 g mushrooms
  • -       2 tbsp persil*
  • -       Salt*
  • -       40 g mature cheese *

** For the sauce:*

  • -       200 ml cream* -       4 slices of bacon
  • -       Salt and pepper*
  • Place the flour into a large bowl, make a well in the middle and add the egg, the white, the salt, the vinegar and the oil.

  • *Knead  the dough until it is soft and pliable. Add some water if needed. *

  • *Wrap in cling film and place into fridge for 1 hour. *

  • Heat some olive oil into a sauce pan. Add onion, garlic and mushrooms. Cook slowly until all the liquid has evaporated.

  • Add persil and salt. Turn off the heat and add the cheese (finely chopped).

  • Divide the dough into two portions. If you have a pasta machine it will be perfect for the final knead. If not, use a rolling pin to roll the pasta dough very flat.

  • *Place small amounts of filling over the flat pasta dough, leaving some space between them. *

  • *Roll the second portion of pasta dough and place over the first one. *

  • Create the ravioli by cutting the filled dough into small squares. Set them aside.

  • *If you prefer tortellini, here you have a [video](

{{}}

) to learn how to fold the dough.*

  • *For the sauce, use the filling you haven’t used. Stir fry bacon (cut into small pieces) in a sauce pan, add the leftover filling and the cream. Simmer and add salt and pepper. *

  • Boil pasta as usual, add the sauce and enjoy your meal. Buon appetito!

*  Tips:**- You have to roll the dough very, very flat and try to make small ravioli or tortellini given that they will become bigger when cooked.*

    • If you don’t have a pasta cutter, you can use a knife but make sure you seal properly the edges with a fork, knife or your hands. Otherwise, the filling will be lost when boiling the pasta.*
    • Our pasta took quite a long time to cook because they were very big tortellini and ravioli (around 15 minutes).*

18 de septiembre de 2012 · 6 min · Palstelera