Scones

Whole Kitchen, in their Sweet Proposal for January, invites us to make a Scottish classic: Scones

We almost ran out of time with this recipe because — unusual for us — we made it the same day it was published. Luckily, it’s super easy and takes very little time. As usual, the baking time is what stretches the recipe out the most, but hey, the little wait is well worth it. We followed the recipe from www.joyofbaking.com

Pics and Cakes

What do we need?

  • 260 g (2 cups) all-purpose flour

  • 50 g (¼ cup) sugar

  • 1 sachet of Royal baking powder

  • a pinch of salt

  • 75 g (5 tbsp) very cold butter, cubed
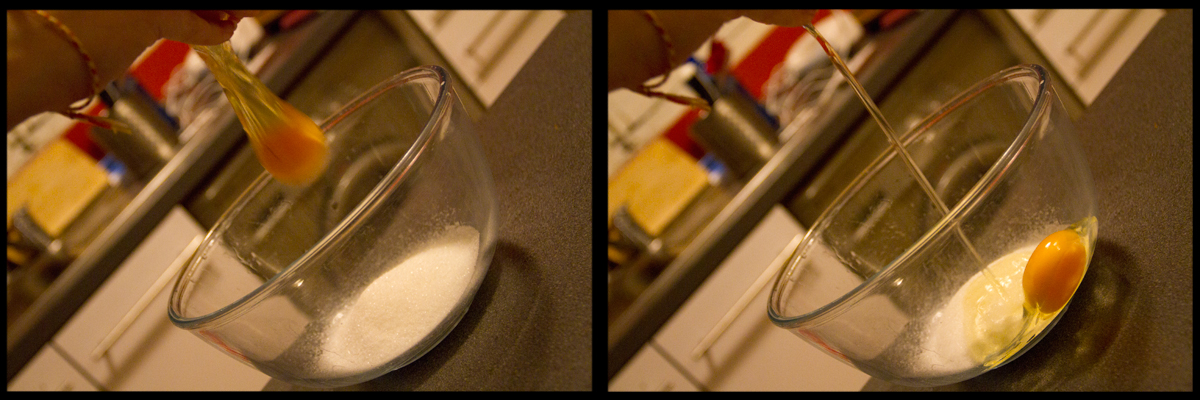
  • 1 beaten egg

  • 120 ml (½ cup) heavy cream

How do we make it?

  • Preheat the oven to 190°C (375°F).

  • In a bowl, mix the flour with the sugar, baking powder and salt. Add the butter and rub it in with your fingertips — it should look like crumbs. Set aside.

  • In a separate bowl, mix the egg with the cream.

  • Combine both mixtures until well integrated, but don’t overwork the dough.

  • Roll out lightly until you have a fairly thick dough (about 1.5 cm / ½ inch). (Our first ones came out too thin.) Using a cookie cutter or a glass, cut out circles about 6 cm (2.5 inches) wide.

  • Place them on a baking tray lined with parchment paper and brush with a little milk.

  • Bake for 15 to 18 minutes, until golden.

  • Take them out of the oven and let them cool on a wire rack.

Tips:

  • We forgot to brush the scones with milk and they still turned out delicious, so if you forget too, it’s not the end of the world.

  • You can add chocolate chips, nuts, raisins… to the dough. This time we used dried cranberries.

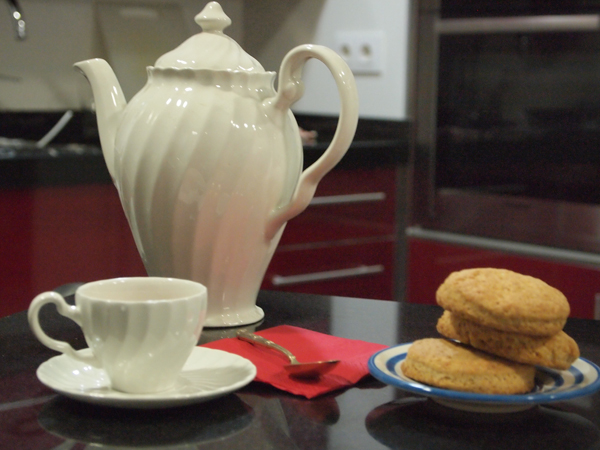
  • To eat them, just split them in half and spread on butter and jam, whipped cream, lemon curd or anything else you fancy.

Pics and Cakes

[English version] SCONES* Ingredients: *

  • 260 g all-purpose flour

  • 50 g granulated white sugar

  • *1 sachet baking powder *

  • 1/4 teaspoon salt

  • 75 g cold unsalted butter

  • 1 large egg

  • 120 ml milk, half-and-half, or heavy cream

  • *Preheat oven to 190 degrees C. Line a baking sheet with parchment paper. *

  • In a large bowl, whisk or sift together the flour, sugar, baking powder and salt. Cut the butter into small pieces and blend into the flour mixture with a pastry blender, two knives, or with your fingertips. (The mixture should look like coarse crumbs.) In a small measuring cup whisk together the milk or cream and beaten egg. Add this mixture to the flour mixture. Stir just until combined. Do not over mix.

  • Transfer to a lightly floured surface and knead the dough gently four or five times and then pat into a 1,5cm of thickness. Then, using a 6 cm round cookie cutter, cut the dough into rounds. Place the rounds on the prepared cookie sheet, spacing a few centimetres apart. Brush the tops of the scones with a little cream.(This helps to brown the tops of the scones during baking.)

  • *Bake for about 15 -18 minutes or until nicely browned and a toothpick inserted into the center of a scone comes out clean. Remove from oven and transfer to a wire rack to cool. *

Tips:

*- We forgot brushing the scones with milk before baking. The result was wonderful anyway, so in case you forget it too, don’t panic! *

- You can add to the dough chocolate chips, nuts, raisins… We used dried cranberries.

*- You can serve them with butter and jam, marmalade, whipped cream, lemon curd or anything you like. *


Comments

Marivi (2013-01-26 00:39:22):

They look fantastic, and with the filling I’m sure they were even better.

Cristina (2013-01-26 00:55:54):

I really like your version, with cranberries they must be really good ;) and judging by the photos they look delicious!

A kiss!

PIlarHG (2013-01-26 00:59:03):

The same thing happened to me! I ended up making the recipe today too! Lucky it’s a quick one! They turned out great! ;)

Apfelstrudelkuchen (2013-01-26 01:55:06):

Hi!!!

Yeah, it’s true that nothing happens if you don’t brush them, because those scones look absolutely delicious.

A little kiss, Sandra von Cake

Palstelera (2013-01-26 12:48:42):

The truth is they were really tasty, and since I used the leftover cream to whip it up with a bit of sugar, even better. :-)

Palstelera (2013-01-26 12:49:39):

So glad you like them. The cranberries were a last-minute decision and they worked out really well.

Palstelera (2013-01-26 12:50:13):

Yes! Thank goodness they were quick :-)

Palstelera (2013-01-26 12:51:02):

Although now I’ll have to make them again to make them thicker and brushed with milk to see how they turn out :-)

Gri (2013-01-28 11:20:08):

I love your scones… they look fantastic!

A hug Gri http://eltallerdelosviernes.blogspot.com.es/2013/01/hoy-toca-receta-del-cwk.html

mara (2013-01-28 16:49:19):

They turned out so well and look so good with cranberries. I made mine plain because my daughters don’t like them. Here’s my version http://masdulcequesaladopuntocom.blogspot.com.es/2013/01/scones.html

zordor (2013-01-30 05:45:23):

This had a rhyme to it, but honestly I can’t remember what it was right now… :P

guillus (2013-02-27 20:27:45):

Scones! Do we also have to explain how to eat them? :P

guillus (2013-02-27 20:28:47):

Scones! Do we also have to explain how to eat them? :P And with clotted cream they’re even better…

25 de enero de 2013 · 5 min · Palstelera

Scones

Whole Kitchen en su Propuesta Dulce para el mes de enero nos invita a preparar un clásico escocés: Scones

Casi nos pilla el toro con la preparación de esta receta porque, raro en nosotros, pero la hemos hecho el mismo día de su publicación. Por suerte, la elaboración es sencillísima y se tarda muy poco tiempo. Como de costumbre, el tiempo de horneado es lo que más alarga nuestra receta pero bueno, la pequeña espera merece la pena. Hemos seguido la receta de www.joyofbaking.com

 Pics and Cakes


¿Qué necesitamos?

  • 260 g de harina

  • 50 g de azúcar

  • 1 sobre de levadura Royal 

  • una pizca de sal 

  • 75 g de mantequilla en cubitos muy fría 

  • 1 huevo batido 

  • 120 ml de nata


¿Cómo lo hacemos?

  •  Precalentamos el horno a 190ºC.

  • En un bol mezclamos la harina, con el azúcar, la levadura y la sal. Añadimos la mantequilla y mezclamos con ayuda de los dedos, deben parecer migas. Reservamos.

  • Por otro lado mezclamos los huevos con la nata.

  • Mezclamos ambos preparados hasta que estén bien integrados pero sin amasar demasiado.

  • Estiramos ligeramente con el rodillo hasta tener una masa más bien gordita (1'5 cm aprox.). (A nosotros nos quedaron los primeros demasiado finos). Con un cortante o un vaso cortamos círculos de unos 6 cm.

  • Colocamos en la bandeja del horno forrada con el papel para hornear y pintamos con un poco de leche.

  • Horneamos de 15 a 18 minutos, hasta que esté dorado.

  • Retiramos del horno y dejamos enfriar en una rejilla.


Consejos:

  • A nosotros se nos olvidó pintar los scones con leche y quedaron igualmente ricos así que si se os olvida no es el fin del mundo.

  • A la masa podéis añadirle pepitas de chocolate, nueces, pasas… En esta ocasión le hemos puesto arándanos rojos deshidratados.

  • Para comerlos, basta con abrirlos por la mitad y untar mantequilla y mermelada, nata montada, *lemon curd *o cualquier otra cosa que os guste.

Pics and Cakes

[English version] SCONESIngredients: *

  • 260 g all-purpose flour

  • 50 g granulated white sugar

  • *1 sachet baking powder *

  • 1/4 teaspoon salt

  • 75 g cold unsalted butter

  • 1 large egg

  • 120 ml milk, half-and-half, or heavy cream

* *

  • *Preheat oven to 190 degrees C. Line a baking sheet with parchment paper. *

  • In a large bowl, whisk or sift together the flour, sugar, baking powder and salt. Cut the butter into small pieces and blend into the flour mixture with a pastry blender, two knives, or with your fingertips. (The mixture should look like coarse crumbs.) In a small measuring cup whisk together the milk or cream and beaten egg. Add this mixture to the flour mixture. Stir just until combined. Do not over mix.

  • Transfer to a lightly floured surface and knead the dough gently four or five times and then pat into a 1,5cm of thickness. Then, using a 6 cm round cookie cutter, cut the dough into rounds. Place the rounds on the prepared cookie sheet, spacing a few centimetres apart. Brush the tops of the scones with a little cream.(This helps to brown the tops of the scones during baking.)

  • *Bake for about 15 -18 minutes or until nicely browned and a toothpick inserted into the center of a scone comes out clean. Remove from oven and transfer to a wire rack to cool. *


Tips:

*- We forgot brushing the scones with milk before baking. The result was wonderful anyway, so in case you forget it too, don’t panic!  *

- You can add to the dough chocolate chips, nuts, raisins… We used dried cranberries.

*- You can serve them with butter and jam, marmalade, whipped cream, lemon curd or anything you like. *


25 de enero de 2013 · 5 min · Palstelera

Cerdo agridulce

Whole Kitchen en su Propuesta Salada para el mes de enero nos invita a preparar un clásico de la cocina china: cerdo agridulce.

** **Para nosotros es el plato por excelencia cuando tomamos comida china así que no podía faltar en nuestro blog. La receta, a decir verdad, no sé ni siquiera de dónde la saqué porque hice una fusión de diversas páginas de internet y ahora no recuerdo la fuente exacta. Pero bueno, como cualquier plato, lo suyo es probar a hacerlo y si hay algo que no nos convence, lo rectificamos a nuestro gusto, que para eso es nuestra cocina.

Pics and Cakes

¿Qué necesitamos?

  • 400 g magra de cerdo

  • 1 cebolla grande

  • 1 pimiento rojo

  • 1 zanahoria

  • 4 rodajas de piña

  • Aceite

  • Sal

Para el rebozado:

  • 3 cucharadas de harina de trigo

  • 2 cucharadas de maizena

  • 1 huevo

  • 1 cucharadita de levadura en polvo

  • Agua

Para la salsa agridulce:

  • 3/4 taza de azúcar

  • 1/3 taza de vinagre de manzana

  • 2/3 taza de agua

  • 1/4 taza de salsa de soja

  • 2 cucharadas de ketchup

  • 2 cucharadas de salsa Worcester

  • 2 cucharadas de maizena

Pics and Cakes  

¿Cómo lo hacemos?

  • En primer lugar, preparamos la salsa agridulce. Para ello ponemos todos los ingredientes en una cazuela mediana excepto la maizena y cocinamos a fuego fuerte para que se mezclen y disuelvan bien todos los ingredientes.

  • Dejamos que hierva y cocinamos a fuego medio unos minutos para que la salsa se reduzca y espese. Disolvemos la maizena en una taza con un poquito de agua y se la añadimos a la salsa. Cuando tenga la consistencia deseada, la retiramos del fuego.

  • Cortamos la cebolla y los pimientos en cuadrados de un tamaño mediano (1,5 cm aprox.)

  • Cortamos la zanahoria en rodajas finas en diagonal.

  • Cortamos la piña en trozos.

  • En una sartén con un poco de aceite salteamos toda nuestra verdura (lo último que añadiremos es la piña). No hay que cocinarla mucho ya que queremos que quede crujiente.

  • Cuando esté lista la sacamos y la incorporamos a la cazuela donde teníamos la salsa agridulce ya lista.

  • Cortamos la carne de cerdo en cubitos (del tamaño de un bocado, similar al tamaño de las verduras) y la sazonamos.

  • En un bol mezclamos bien las dos harinas y la levadura, y a continuación añadiremos el huevo y el agua muy fría. La cantidad de agua es variable. Así que es mejor ir echándola poco a poco hasta tener la textura de una bechamel suave.

  • Mientras se calienta el aceite para freír en una sartén, echamos los trozos de carne en el bol con la mezcla para el rebozado.

  • Cuando el aceite esté bien caliente, vamos echando de uno en uno los trozos de carne embadurnados. Cuando estén dorados los sacamos en un plato con papel absorbente.

  • Por último añadimos el cerdo ya frito a la cazuela con la salsa agridulce con verduras. Si en este tiempo, la salsa se ha enfriado, podemos calentarla antes de agregar la carne.

  • Servimos acompañado de arroz blanco, arroz basmati o arroz tres delicias.


Consejos:

  • Al hacer la salsa agridulce, recomiendo que no echéis todo el vinagre de golpe ya que puede resultaros muy fuerte. Es mejor ir añadiendo poco a poco en función de nuestro gusto.

  • Si la piña que habéis utilizado es de lata (en su jugo natural) podéis añadir este jugo a la salsa agridulce.

  • La carne rebozada la añadimos justo al final para que el rebozado siga crujiente. Por eso recomiendo servir y comer inmediatamente.

* [English version] SWEET&SOUR PORK** *

  • 400 g pork meat

  • 1 large onion

  • 1 red bell pepper

  • 1 carrot

  • 4 pineapple slices

  • Olive oil

  • Salt

For the coating:

  • 3 tbsp flour

  • 2 tbsp corn flour

  • 1 egg

  • 1 tsp baking powder

  • Water

For the sweet&sour sauce:

  • 3/4 cup of sugar

  • 1/3 cup of apple vinegar

  • 2/3 cup of water

  • 1/4 cup of soya sauce

  • 2 tbsp of ketchup

  • 2 tbsp of Worcester sauce

  • 2 tbsp of corn flour

  • First, prepare the sauce. Place all the ingredients (except from corn flour) into a sauce pan and cook (high heat) until all ingredients are melted and all together.

  • Simmer for several minutes to reduce the amount of sauce (the liquid will evaporate). Dissolve the corn flour in a bit of cold water and add to the sauce. When the sauce has the desired thickness, it will be ready. Set aside.

  • Cut onion and pepper in medium squares  (1,5 cm aprox.)

  • Cut the carrot into thin slices (diagonally).

  • Cut pineapple into medium pieces.

  • In a frying pan, put some olive oil and stir-fry all the veggies (the last ingredient to add will be the pineapple). No need to over cook the veggies because we want them hard and fresh).

  • Then we add all these vegetables to the sauce and mix well.

  • Now, prepare the meat. Cut the pork meat into squares (mouthful size, similar to vegetables size) and add salt.

  • In a bowl, mix both kinds of flour and baking powder. Then add the egg and very cold water. The amount of water may vary. So, add it bit by bit until having the consistency of light bechamel sauce.

  • Heat a frying pan full of oil. Put all the meat pieces into the flour-egg mix.

  • When the oil is hot, introduce the meat pieces coated with the flour-egg mix. Take them out when golden brown and place them into a plate covered by kitchen paper. .

  • Add the fried pork to the sauce and ready to eat. If the sauce is a bit cold, you can warm it before adding the meat.

  • Serve with regular rice, basmati rice or fried rice (Chinese style).

Tips: *- When preparing the sauce, you can add bit by bit the vinegar and taste it to avoid too strong flavour.*- If you have used canned pineapple, you can use the natural juice inside the can for the sauce.*

- We add the coated meat at the very end to enjoy it really crispy. So, serve and eat immediately.

18 de enero de 2013 · 5 min · Palstelera

Sweet and Sour Pork

Whole Kitchen, in their Savory Proposal for January, invites us to make a Chinese classic: sweet and sour pork.

**For us, this is THE go-to dish whenever we have Chinese food, so it couldn’t be missing from our blog. To be honest, I don’t even know exactly where I got the recipe from, because I ended up mashing together a bunch of different websites and now I can’t recall the exact source. But hey, like with any dish, the trick is to give it a go, and if there’s something you don’t love, tweak it to your taste — that’s what your own kitchen is for.

Pics and Cakes

What do we need?

  • 400 g (14 oz) lean pork

  • 1 large onion

  • 1 red bell pepper

  • 1 carrot

  • 4 pineapple slices

  • Oil

  • Salt

For the batter:

  • 3 tablespoons all-purpose flour

  • 2 tablespoons cornstarch

  • 1 egg

  • 1 teaspoon baking powder

  • Water

For the sweet and sour sauce:

  • 3/4 cup sugar

  • 1/3 cup apple cider vinegar

  • 2/3 cup water

  • 1/4 cup soy sauce

  • 2 tablespoons ketchup

  • 2 tablespoons Worcestershire sauce

  • 2 tablespoons cornstarch

Pics and Cakes

How do we make it?

  • First, we make the sweet and sour sauce. Put all the ingredients except the cornstarch into a medium saucepan and cook over high heat so that everything mixes and dissolves well.

  • Let it come to a boil and then simmer over medium heat for a few minutes so the sauce reduces and thickens. Dissolve the cornstarch in a cup with a little water and add it to the sauce. Once it has the consistency you want, take it off the heat.

  • Cut the onion and bell pepper into medium-sized squares (about 1.5 cm / 1/2 inch).

  • Slice the carrot thinly on the diagonal.

  • Cut the pineapple into chunks.

  • In a pan with a little oil, stir-fry all the veggies (add the pineapple last). Don’t overcook them — we want them to stay crunchy.

  • Once they’re ready, take them out and add them to the saucepan with the sweet and sour sauce.

  • Cut the pork into bite-sized cubes (similar in size to the veggies) and season with salt.

  • In a bowl, mix the two flours and the baking powder, then add the egg and very cold water. The amount of water varies, so it’s better to add it little by little until you get the texture of a light béchamel.

  • While the oil heats up in a frying pan, drop the pieces of pork into the bowl with the batter.

  • Once the oil is good and hot, fry the coated pieces one by one. When they’re golden, take them out onto a plate lined with paper towels.

  • Finally, add the fried pork to the saucepan with the sweet and sour sauce and veggies. If the sauce has cooled down by now, warm it back up before adding the meat.

  • Serve with white rice, basmati rice, or three delights fried rice.

Tips:

  • When making the sweet and sour sauce, I’d recommend not pouring in all the vinegar at once, as it can come out really strong. Better to add it bit by bit, to taste.

  • If the pineapple you used is canned (in its own juice), you can add that juice to the sweet and sour sauce.

  • The battered meat goes in right at the end so the coating stays crispy. That’s why I recommend serving and eating it right away.

18 de enero de 2013 · 3 min · Palstelera

Baklava

Whole kitchen, for their Sweet Proposal for the month of November, invites us to prepare a Persian classic: Baklava. Apparently this little pastry has its origins in ancient Mesopotamia, although several cultures and civilizations are still fighting over who actually invented it. Persian, Greek or Arab — it’s delicious. This time we’ve made two versions: one with dates and toasted almonds, and another with hazelnuts and chocolate. Filo pastry is a wonder of the kitchen that you really have to try, both for sweet and savory.

Pics and Cakes

What do we need?

  • 1 package of filo pastry

  • 100 g (3.5 oz) butter

For the syrup:

  • 210 ml (scant 1 cup) water

  • 180 g (about 3/4 cup) sugar

  • 30 g (1 tbsp) honey

  • Juice of half a lemon

  • A cinnamon stick

For the filling:

  • 18 dates

  • 50 g (1.75 oz) toasted almonds

  • 50 g (1.75 oz) chocolate (drops or chips)

  • 50 g (1.75 oz) hazelnuts

Pics and Cakes

How do we make it?

  • We start by making the syrup. Put all the ingredients in a saucepan and, over high heat, bring to a boil. Lower the heat a bit and let it simmer for about 15 minutes so it thickens.

  • Preheat the oven to 180°C (355°F).

  • Prepare the filling: pit the dates and cut them into small pieces. Chop the almonds and hazelnuts as well. In one bowl mix the dates with the almonds, and in another mix the hazelnuts with the chocolate.

  • Melt the butter for a few seconds in the microwave.

  • Grease the baking dish you’re going to use with butter and cut all the filo sheets to the size of your tray.

  • Lay down a sheet of filo and, with a brush or your hands, smear it with butter on one side. Add another layer and brush it with butter again. Keep going until you have 8 layers.

  • Spread half of the date-and-almond filling over the filo.

  • Add more filo on top — this time, 4 layers (always brushed with butter so they stay separate after baking).

  • Add the rest of the date-and-almond filling.

  • Make another batch of 8 filo layers (always buttered).

  • With a sharp knife, cut the baklava into squares.

  • Bake for 45 minutes total: the first 20 minutes uncovered, and the next 25 minutes with a sheet of aluminum foil over the baklava so it doesn’t brown too much.

  • As soon as you take it out of the oven, let it rest for 5 minutes, then pour the cold syrup over the hot baklava (this way it’ll stay crispy).

  • For the hazelnut-and-chocolate version you can repeat the same process in another baking dish, or make triangles. To do that, cut the filo into strips of about 5 cm by 20 cm (2 in by 8 in). Brush each layer with butter and stack 4 strips together.

  • Place a teaspoon of filling at one end and fold a corner over to form a triangle with the filling tucked inside. Take the other end and keep folding the triangle over itself. (Since it’s a bit tricky to explain, I found [this video](

{{}}

) where you can easily see how to do it.)

  • Bake them at 180°C (355°F) too, but they’ll be ready in 10–15 minutes.

  • Once out of the oven, you can dust them with powdered sugar.

Tips:

  • Filo pastry dries out very quickly, so whenever you’re not using it, keep it well wrapped in a plastic bag.

  • It’s important to add butter between each layer, but you don’t need to “drown” it either.

  • It’s quite a rich, filling sweet, so it’s better to cut the squares small.

Pics and Cakes

[English version] BAKLAVA* *Ingredients:

  • 1 package of filo pastry

  • 100 g butter

For the syrup:

  • 210 ml water

  • 180 g sugar

  • 30 g honey

  • Juice of 1/2 lemon

  • Cinnammon stick

For the filling:

  • 18 dates

  • 50 g almonds

  • 50 g chocolate (drops or chips)

  • 50 g hazelnuts

  • Combine the syrup ingredients in a medium saucepan and bring to boil. Let the syrup simmer on low heat for about 15 minutes

  • Preheat oven at 180ºC.

  • *Now prepare the filling: pit the dates and chop into small pieces. Chop almonds and hazelnuts. Mix almonds and dates into a bowl and chocolate and hazelnut in other. *

  • Melt the butter in the microwave for a few seconds.

  • Butter the baking pan and cut the filo pastry sheets into the size of the baking pan.

  • *Place a sheet of filo pastry and butter it. Place another sheet over it and butter again. Do it again until having 8 layers. *

  • *Scatter half of the dates-almonds filling. *

  • *Place more filo pastry. This time, only 4 layers but always buttered. It will make to have separate layers once the baklava is baked. *

  • *Add the other half of the filling. *

  • *Create another pack of 8 layers of filo pastry (always buttered). *

  • *With sharp knife cut baklava into small squares. *

  • *Bake for 45 minutes. The first 20 minutes uncovered and then you can cover with aluminium foil to prevent it from browning too much. *

  • When you take it out from oven, let stand for 5 minutes and then pour the cold syrup.

  • For the hazelnut-chocolate version, you can follow the same steps or make small triangles of filo pastry. For the triangles, cut the pastry into stripes (4 x 20 cm aprox.). Butter each stripe and put 4 of them together.

  • *Add a tsp of the filling in one of the sides and proceed to fold into triangle shape. You can see how to do it easily in [this video](

{{}}

).*

  • Bake at 180ºC only for 10-15 minutes.

  • You can powder some confectioners’ sugar when you take them out from oven.

Tips:

*- Filo pastry dries very fast, so when you are not using it, keep it in a plastic bag. *

- It’s important to butter every single sheet (layer) of filo pastry but don’t “over butter” (otherwise, it will be too greasy).

- It’s a filling sweet, so make small squares when cutting the baklava.


Comments

Apfelstrudelkuchen (2012-11-26 00:03:04):

Hi!!

Your baklava-as-triangles version turned out really original!! And with dates it must be amazing.

Hugs,

Mara (2012-11-26 17:34:08):

So good with the chocolate touch. I love the idea of making individual portions, because when you cut it the filo sheets tend to come apart a bit. Since everyone at home liked it so much I’ll make it again, and I’m going to do it your way, in the individual triangle version. This is my version: http://masdulcequesaladopuntocom.blogspot.com.es/

tía pi (2012-11-27 17:48:26):

This Friday I have guests over for dinner — it’s going to be a light meal, so the baklava is going to be a great dessert. I’ll let you know how it goes.

silvia (2012-11-29 22:09:14):

The little chocolate triangles were really tasty… and that’s saying something, because I’m not really one for sweets…

Palstelera (2012-12-07 19:16:00):

Mara, I’m glad you like the little-triangles version… :-)

25 de noviembre de 2012 · 6 min · Palstelera

Baklava

**Whole kitchen en su Propuesta Dulce para el mes de Noviembre nos invita a preparar un clásico persa Baklava. **Al parecer este pastelito tiene su origen en la antigua Mesopotamia aunque todavía hoy siguen disputándose varias culturas y civilizaciones su creación. Persa, griego o árabe, está buenísimo. En esta ocasión hemos preparado dos versiones; una con dátiles y almendras tostadas y otra con avellanas y chocolate. La pasta filo es una maravilla de la cocina que no podéis dejar de probar tanto para dulce como para salado.

 Pics and Cakes

¿Qué necesitamos?

  • 1 paquete de pasta filo

  • 100 g de mantequilla

Para el almíbar:

  • 210 ml de agua

  • 180 g de azúcar

  • 30 g de miel

  • Zumo de medio limón

  • Una ramita de canela

 Para el relleno:

  • 18 dátiles

  • 50 g de almendras tostadas

  • 50 g de chocolate (en gotas o perlas)

  • 50 g de avellanas

 Pics and Cakes

¿Cómo lo hacemos?

  • Empezamos haciendo ****el almíbar. Ponemos todos los ingredientes en una cazuela y, a fuego fuerte, lo llevamos a ebullición. Bajamos un poco el fuego y dejamos cocer durante 15 minutos aproximadamente para que espese.

  • Precalentamos el horno a 180ºC.

  • Preparamos el relleno: deshuesamos los dátiles y los partimos en trozos pequeños. Troceamos también las almendras y las avellanas. Mezclamos en un cuenco los dátiles con las almendras y en otro las avellanas con el chocolate.

  • Derretimos la mantequilla unos segundos en el microondas.

  • Untamos la fuente que vayamos a usar con mantequilla  y cortamos todas las láminas de pasta filo del tamaño de nuestra bandeja.

  • Ponemos una lámina de pasta filo, y con un pincel, o con las manos, la embadurnamos de mantequilla por una cara. Ponemos otra capa y volvemos a untarla con la mantequilla. Así hasta tener 8 capas.

  • Ponemos la mitad de nuestro relleno de dátiles y almendras y lo extendemos sobre la pasta filo.

  • Volvemos a poner pasta filo. Esta vez, 4 capas (siempre untándolas con mantequilla para que al hornearlas se queden separadas).

  • Echamos el resto del relleno de dátiles y almendras.

  • Hacemos otra tanda de 8 capas de pasta filo (siempre untadas con mantequilla).

  • Con un cuchillo afilado cortamos el baklava en cuadrados.

  • Horneamos 45 minutos en total, los 20 primeros destapado, y los 25 siguientes colocando papel de aluminio sobre el baklava para que no se dore demasiado.

  • Nada más sacarlo del horno, dejamos reposar 5 minutos, y vertemos el almíbar frío sobre el baklava caliente (así seguirá estando crujiente).

  • Para la versión de avellanas y chocolate podéis repetir el mismo proceso en otra fuente de horno o bien hacer triángulos. Para ello cortamos la pasta filo en tiras de 5 cm por 20 cm (aproximadamente). Embadurnamos con mantequilla cada capa y ponemos 4 tiras juntas.

  • Ponemos una cucharadita de relleno en un extremo y doblamos una esquina para formar un triángulo con el relleno en el interior. Cogemos el otro extremo y vamos plegando el triángulo sobre sí mismo. (Como es un tanto complicado de explicar, he encontrado [este vídeo](

{{}}

) donde podéis ver fácilmente cómo hacerlo).

  • Los horneamos también a 180ºC pero en 10-15 minutos estarán listos.

  • Al sacarlos los podemos espolvorear con azúcar glas por encima.


Consejos:

  • La pasta filo se seca enseguida así que cuando no la estés utilizando, guárdala bien en una bolsa de plástico.

  • Es importante echar la mantequilla entre cada capa pero tampoco es necesario “ahogarla”.

  • Es un dulce bastante contundente así que es preferible hacer los cuadraditos pequeños.

Pics and Cakes

[English version] BAKLAVA* *Ingredients:

  • 1 package of filo pastry

  • 100 g  butter


For the syrup:

  • 210 ml water

  • 180 g sugar

  • 30 g honey

  • Juice of 1/2 lemon

  • Cinnammon stick


For the filling:

  • 18 dates

  • 50 g almonds

  • 50 g chocolate (drops or chips)

  • 50 g hazelnuts

* *

  • Combine the syrup ingredients in a medium saucepan and bring to boil. Let the syrup simmer on low heat for about 15 minutes

  • Preheat oven at 180ºC.

  • *Now prepare the filling: pit the dates and chop into small pieces. Chop almonds and hazelnuts. Mix almonds and dates into a bowl and chocolate and hazelnut in other. *

  • Melt the butter in the microwave for a few seconds.

  • Butter the baking pan and cut the filo pastry sheets into the size of the baking pan.

  • *Place a sheet of filo pastry and butter it. Place another sheet over it and butter again. Do it again until having 8 layers. *

  • *Scatter half of the dates-almonds filling. *

  • *Place more filo pastry. This time, only 4 layers but always buttered. It will make to have separate layers once the baklava is baked. *

  • *Add the other half of the filling. *

  • *Create another pack of 8 layers of filo pastry (always buttered). *

  • *With sharp knife cut baklava into small squares. *

  • *Bake for 45 minutes. The first 20 minutes uncovered and then you can cover with aluminium foil to prevent it from browning too much. *

  • When you take it out from oven, let stand for 5 minutes and then pour the cold syrup.

  • For the hazelnut-chocolate version, you can follow the same steps or make small triangles of filo pastry. For the triangles, cut the pastry into stripes (4 x 20 cm aprox.). Butter each stripe and put 4 of them together.

  • *Add a tsp of the filling in one of the sides and proceed to fold into triangle shape. You can see how to do it easily in [this video](

{{}}

).*

  • Bake at 180ºC only for 10-15 minutes.

  • You can powder some confectioners’ sugar when you take them out from oven.

* *

Tips:

*- Filo pastry dries very fast, so when you are not using it, keep it in a plastic bag. *

- It’s important to butter every single sheet (layer) of filo pastry but don’t “over butter” (otherwise, it will be too greasy).

- It’s a filling sweet, so make small squares when cutting the baklava.


25 de noviembre de 2012 · 6 min · Palstelera

Ciabatta Bread

Whole Kitchen in their Savory Challenge for the month of November invites us to prepare an Italian classic: “Ciabatta”. I had been really wanting to make this recipe but I never thought it would turn out well, and… it turned out so well, yes indeed! It even looked like a real ciabatta. The recipe is slow because of the rising times, but it’s simple to make and the result is incredibly good.

Pics and Cakes

What do we need?

(For two loaves)

For the starter:

  • 2.5 g fresh yeast

  • 150 ml (2/3 cup) water

  • 3 tablespoons warm milk

  • 1/4 teaspoon honey or granulated sugar

  • 150 g (1.25 cups) bread flour

For the dough:

  • 2.5 g fresh yeast

  • 250 ml (1 cup) water

  • 1/2 tablespoon olive oil

  • 350 g (2.75 cups) bread flour

  • 1 and 1/2 teaspoons salt

Pics and Cakes

How do we make it?

  • First, we prepare the starter. Sprinkle the yeast into a large bowl with the water and milk. Let it sit for 5 minutes, then add the honey or sugar and stir to dissolve.

  • Add the flour and mix to form a loose dough. Cover the bowl with a kitchen towel and let it ferment for 12 hours or overnight.

  • Once the wait is over, we move on to the dough. Sprinkle the yeast into a small bowl with the water. Let it sit for 5 minutes; stir to dissolve. Add the yeast water and the olive oil to the starter and mix well.

  • Into the bowl, add the flour with the salt and mix to form a wet, sticky dough. Beat continuously with a wooden spoon for 5 minutes; the dough will turn fluffy and start to pull away from the sides, but it will still be too soft to knead.

  • Cover the dough with a kitchen towel. Let it ferment for about 3 hours, until the dough has tripled in size and is full of air bubbles. Generously flour two baking sheets and have extra flour ready to dust your hands.

  • Divide the dough in half while it’s still in the bowl. Tip half of the dough onto one of the sheets.

  • With your hands well coated in flour, shape it into a rectangular loaf about 30 cm (12 inches) long. Dust the loaf and your hands again with flour. Tidy and thicken it by running your fingers along the sides and gently tucking under the bottom of the dough. Repeat the same with the other half.

  • Uncovered, let the loaves rise for about 20 minutes; they will spread out and grow in volume.

  • Put them in the oven, preheated to 220°C (430°F), and bake for 30 minutes until the loaves have risen, are golden brown, and sound hollow when tapped on the bottom. Let cool on a wire rack.

Tips:

  • It’s a very sticky dough that you barely have to work with your hands. That’s why, in the final steps, it’s important to keep your hands well covered in flour and not handle the dough too much, since otherwise half of it will end up stuck to you.

  • I use the pressed baker’s yeast you can find in cubes in the supermarket in the bakery/pastry section, always refrigerated. I buy a bunch and freeze them, so I always have some on hand whenever I need it. That said, it’s important to keep in mind that frozen yeast loses a bit of its “power”, so you’ll need to add a little more than what the recipe calls for.

  • When baking, I put both sheets in at the same time and after 20 minutes I swapped them so that both loaves cooked evenly on both sides.

Pics and Cakes


Comments

Marisa (2012-11-22 12:51:05):

She brought a piece home for me and it’s awesome, delicious, amazing… mmm, I want more!

tía pi (2012-11-22 18:13:13):

It’s a pleasure how well you explain everything and the tips you give. I promise to make it and tell you how it turns out.

Angeles (2012-11-22 22:35:32):

It looks fantastic, just like an authentic Italian ciabatta.

marmota zampona (2012-11-24 19:27:46):

I’m going to give it a try right now.

22 de noviembre de 2012 · 4 min · Palstelera

Pan de chapata

**Whole kitchen en su Propuesta Salada para el mes de noviembre nos invita a preparar un clásico italiano “Ciabatta”. **Tenía muchas ganas de hacer esta receta pero ni de lejos pensé que me iba a quedar bien y… qué bien quedó, ¡sí, señor! Si hasta parecía una chapata de verdad. La receta es lenta por los tiempos de levado pero su elaboración es sencilla y el resultado es increíblemente bueno.

Pics and Cakes

¿Qué necesitamos?

(Para dos panes)

Para la masa madre:

  • 2,5 g de levadura fresca

  • 150 ml de agua

  • 3 cucharadas de leche tibia

  • 1/4 cucharadita de miel o azúcar granulada

  • 150 gr de harina de fuerza

Para la masa:

  • 2,5 g de levadura fresca

  • 250 ml de agua

  • 1/2 cucharada de aceite de oliva

  • 350 g de harina de fuerza

  • 1 y 1/2 cucharadita de sal

Pics and Cakes

¿Cómo lo hacemos?

  • Primero preparamos la masa madre. Esparcimos la levadura en un recipiente grande con agua y leche. Dejamos durante 5 minutos, después añadimos la miel o el azúcar y revolvemos para que se disuelva.

  • Añadimos la harina y mezclamos para formar una masa floja. Tapamos el cuenco con un paño de cocina y dejamos fermentar durante 12 horas o toda la noche.

  • Pasado el tiempo de espera, procedemos a hacer la masa. Esparcimos la levadura en un cuenco pequeño con agua. Dejamos durante 5 minutos; revolvemos para que se disuelva. Añadimos el agua con levadura y el aceite de oliva a la masa madre y mezclamos bien.

  • En el recipiente echamos y mezclamos la harina con la sal para formar una masa húmeda y pegajosa. Batimos sin parar con una cuchara de madera durante 5 minutos; la masa quedará esponjosa y empezará a despegarse, pero seguirá demasiado blanda para amasar.

  • Tapamos la masa con un paño de cocina. Dejamos fermentar durante unas 3 horas, hasta que la masa triplique su tamaño y se llene de burbujas de aire. Enharinamos generosamente dos bandejas de horno y preparamos harina adicional para echárnosla en las manos.

  • Dividimos la masa por la mitad mientras está en el cuenco. Volcamos la mitad de la masa sobre una de las bandejas.

  • Con las manos bien recubiertas de harina, formamos un pan rectangular, de aproximadamente 30 cm. de largo. Espolvoreamos el pan y las manos nuevamente con harina. Acomodamos y engrosamos recorriendo los costados con los dedos y llevando suavemente hacia adentro de la masa por debajo. Repetimos lo mismo con la otra mitad de la masa.

  • Sin tapar, dejamos fermentar los panes unos 20 min; se desparramarán y aumentarán de volumen.

  • Metemos en el horno previamente calentado a 220ºC y dejamos 30 minutos hasta que los panes se hinchen, adquieran un color dorado y suenen a hueco cuando los golpeemos en la base. Dejamos enfriar sobre una rejilla metálica.

Consejos:

  • Es una masa muy pegajosa que apenas hay que trabajar con las manos. Por eso, en los últimos pasos es importante tener las manos bien cubiertas de harina y no manosear mucho la masa ya que sólo conseguiríamos que se nos quedase la mitad de ella pegada a nosotros.

  • Yo utilizo la levadura de panadería prensada que podemos encontrar en cubitos en el supermercado en la parte de panadería/pastelería pero siempre refrigerada. Compro muchos y los congelo, así cada vez que lo necesito lo tengo a mano. Eso sí, es importante tener en cuenta que la levadura congelada pierde un poco de su “poder” así que habrá que echar un poquito más de cantidad de la que nos indica la receta.

  • A la hora de hornear, yo metí las dos bandejas a la vez y pasados 20 minutos las intercambié para que se hicieran bien los dos panes por las dos caras.

 Pics and Cakes

[English version] CIABATTA BREAD* *Ingredients:

(for two loaves)

For the sourdough (starter):

  • 2,5 g fresh yeast

  • 150 ml water

  • 3 tbsp warm milk

  • 1/4 tsp honey or sugar

  • 150 gr strong flour

  • For the dough:*
  • 2,5 g fresh yeast

  • 250 ml water

  • 1/2 tbsp olive oil

  • 350 g strong flour

  • 1 y 1/2 tsp salt

* *

  • *First, start by preparing the sourdough. Put the yeast into a large bowl with water and milk. Let the dough stand for 5 minutes and then add sugar/honey and stir well. *

  • Add the flour until having a loose dough. Cover with a clean cloth and let ferment for 12 hour or the whole night.

  • *After fermentation time, make the dough. Put yeast into a bowl with water. Let it stand for 5 minutes; stir well. Add this water with yeast and the olive oil to the sourdough. Stir well. *

  • *Add flour and salt and stir well using a wooden spoon. The result will be a wet and sticky dough. Keep beating for 5 minutes until getting a fluffy dough a bit less sticky (but still too much to knead). *

  • Cover with a kitchen cloth and let stand for 3 hours (the size will triple and some bubbles will appear inside). Scatter flour into two baking pans and in your hands.

  • Split the dough into two halves. Put one of the part into one baking pan.

  • *With hands covered by flour, shape the ciabatta bread (30 cm long) creating a rectangle. Repeat the same steps with the other half of dough. *

  • *Let it stand uncovered for 20 minutes. They will become bigger and lose its perfect shape. *

  • *Put into oven (preheated to 220ºC) and bake for 30 minutes until they are golden brown and bigger. Tap the bottom of the bread with your fingers and the bread will sound hollow when it’s done. Leave cool on a rack. *

* *

Tips:

*- It’s a very sticky dough very difficult to knead. It’s needed to have hands covered by flour and not kneading the dough too much. *

-  I usually use fresh yeast in cubes (sold in supermarkets). I buy several cubes and freeze them to use them whenever I want. However, you should take into account that frozen yeast will lose part of its “power” so you will need to use an amount slightly bigger than the amount indicated in the recipe.

*- For baking, I put both baking pans at the same time. After first 20 minutes I swaped their positions to have both loaves well done. *


22 de noviembre de 2012 · 6 min · Palstelera

Brownie

Whole Kitchen’s Sweet Proposal for October invites us to make an American classic: brownies

And what a treat, seriously. I’ve made dozens of brownies in my life and I have to confess I almost always pull out a different recipe and they all turn out delicious. The secret is that a brownie is a compact but fluffy cake (sometimes even moist), since it usually doesn’t have any leavening and therefore doesn’t rise. I read somewhere that the brownie was actually discovered thanks to someone forgetting to add the leavening to a chocolate cake. All I can say is… blessed mistake!

Pics and Cakes

What do we need?

  • 200 g (7 oz) baking chocolate

  • 100 g (3.5 oz / 7 tbsp) butter

  • 2 eggs

  • 100 g (1/2 cup) regular sugar

  • 1/2 teaspoon baking soda

  • 1/2 teaspoon salt

  • 80 g (2/3 cup) flour

  • 100 g (3.5 oz / about 1 cup) walnuts

Pics and Cakes

How do we make it?

  • Chop the chocolate and put it in a microwave-safe bowl together with the butter. Melt in 20-30 second intervals, stirring each time so it doesn’t burn.

  • In another large bowl, whisk the eggs with the sugar until you get a foamy mixture.

  • Add the chocolate to this foamy mixture and stir well.

  • Mix the flour with the salt and baking soda. Sift it and add it to the previous mixture.

  • Stir well and add the walnuts.

  • Prepare a baking pan, greasing and flouring it so the cake doesn’t stick, and pour the mixture into it.

  • Put it in the oven (preheated to 180°C / 350°F) and bake for about 30 minutes.

  • It’ll be ready when you see a light brown crust has formed on top. Remember that the toothpick won’t come out perfectly clean since this is a moist cake. The important thing is that it’s not completely liquid.

Pics and Cakes

Tips:

  • Even though brownie batter is pretty dense and it’s usually not necessary, a trick to keep the walnuts from sinking to the bottom of the pan is to coat them in flour or cocoa first.

  • To turn the brownie into a proper dessert, serve it with a scoop of vanilla ice cream and hot chocolate sauce on top.

Pics and Cakes

[English version] BROWNIES* *Ingredients:

  • 200 g chocolate

  • 100 g butter

  • 2 eggs

  • 100 g sugar (sugar or confectioners’ sugar)

  • 1/2 tsp baking soda

  • 1/2 tsp salt

  • 80 g flor

  • *100 g walnuts *

  • Cut chocolate into chunks and put into a microwave bowl with butter. Melt it slowly (stop every 20-30 seconds and stir with a spoon).

  • *In a large bowl, whisk the eggs and the sugar together to get a fluffy mix. *

  • Add chocolate cream and stir well.

  • *Mix flour, salt and baking soda. Sift the flour mix and add to the previous cream. *

  • *Stir well and add walnuts. *

  • *Prepare the baking pan (butter and flour it!) and pour the mixture on it. *

  • *Put into oven (preheated at 180ºC) and bake for 30 minutes. *

  • *It will be ready when you see a brown crust created on the top. If you insert a needle or knife to check the baking, it might not be clean because it’s supposed to be a ‘wet’ cake. *

  • ** Tips:- Normally this tip is not needed with brownies recipe because the dough is very thick. However, when you add nuts to a cake and you don’t want to have all of them at the bottom of your baking pan, you can coat the walnuts in flour or cocoa powder. *- For a perfect dessert result, serve the brownie with a scoop of vanilla ice-cream and hot chocolate sauce over it!

25 de octubre de 2012 · 4 min · Palstelera

Brownie

Whole Kitchen en su Propuesta Dulce para el mes de octubre nos invita a preparar un clásico estadounidense: brownies

Y qué cosa más rica, por favor. He hecho decenas de brownies en mi vida y he de confesar que casi siempre rescato una receta diferente y todas salen riquísimas. El secreto es que el brownie es un bizcocho compacto pero esponjoso (en ocasiones, incluso húmedo) ya que no suele llevar levadura y por tanto no crece. En algún he leído que el descubrimiento del brownie fue precisamente gracias a haberse olvidado echar la levadura a un bizcocho de chocolate. Sólo me queda decir… ¡bendito error!

Pics and Cakes


¿Qué necesitamos?

  • 200 g de chocolate para postres

  • 100 g de mantequilla

  • 2 huevos

  • 100 g de azúcar normal

  • 1/2 cucharadita de postre de bicarbonato

  • 1/2 cucharadita de sal

  • 80 g de harina

  • 100 g de nueces

Pics and Cakes

¿Cómo lo hacemos?

  • Troceamos el chocolate y lo ponemos junto con la mantequilla en un bol apto para microondas. Lo derretimos en intervalos de 20-30 segundos, removiendo cada vez para evitar que se nos queme.

  • En otro bol grande, batimos los huevos con el azúcar con ayuda de unas varillas para que nos quede una mezcla espumosa.

  • Agregamos el chocolate a esta mezcla espumosa y removemos bien.

  • Mezclamos la harina con la sal y el bicarbonato. Lo tamizamos y echamos sobre la mezcla anterior.

  • Removemos bien y añadimos las nueces.

  • Preparamos un molde de horno, engrasándolo y enharinándolo para que no se nos pegue y vertemos la mezcla en él.

  • Lo introducimos al horno (precalentado a 180º) y lo horneamos durante 30 minutos aproximadamente.

  • Estará listo cuando veamos que se ha formado una costra por encima de color marrón claro. Recordad que la aguja no saldrá perfectamente limpia ya que se trata de un bizcocho húmedo. Lo importante es que no esté completamente líquido.

 Pics and Cakes

Consejos:

  • Aunque la masa del brownie es bastante densa y no suele hacer falta, un truco para que las nueces no se vayan al fondo del molde consiste en rebozarlas antes en harina o cacao.

  • Para hacer del brownie un auténtico postre se puede servir con una bola de helado de vainilla y chocolate caliente por encima.

Pics and Cakes

 [English version] BROWNIES* *Ingredients:

  • 200 g chocolate

  • 100 g butter

  • 2 eggs

  • 100 g sugar (sugar or confectioners’ sugar)

  • 1/2 tsp baking soda

  • 1/2 tsp salt

  • 80 g flor

  • *100 g walnuts *

* *

  • Cut chocolate into chunks and put into a microwave bowl with butter.  Melt it slowly (stop every 20-30 seconds and stir with a spoon).

  • *In a large bowl, whisk the eggs and the sugar together to get a fluffy mix. *

  • Add chocolate cream and stir well.

  • *Mix flour, salt and baking soda. Sift the flour mix and add to the previous cream. *

  • *Stir well and add walnuts. *

  • *Prepare the baking pan (butter and flour it!) and pour the mixture on it. *

  • *Put into oven (preheated at 180ºC) and bake for 30 minutes. *

  • *It will be ready when you see a brown crust created on the top. If you insert a needle or knife to check the baking, it might not be clean because it’s supposed to be a ‘wet’ cake. *

* **  Tips:- Normally this tip is not needed with brownies recipe because the dough is very thick. However, when you add nuts to a cake and you don’t want to have all of them at the bottom of your baking pan, you can coat the walnuts in flour or cocoa powder. *- For a perfect dessert result, serve the brownie with a scoop of vanilla ice-cream and hot chocolate sauce over it!


25 de octubre de 2012 · 4 min · Palstelera