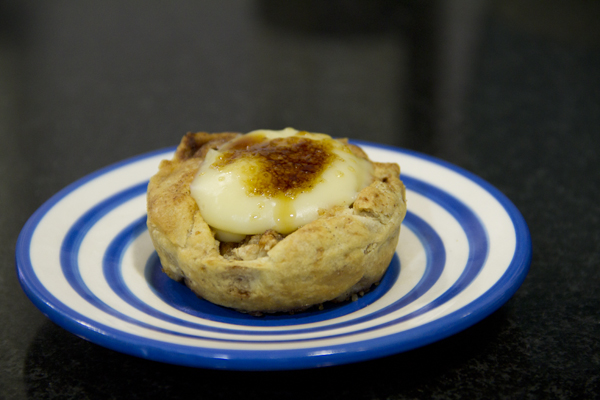
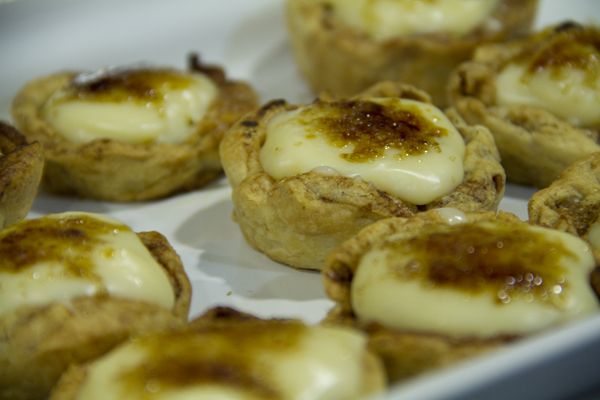
Custard Cream Tartlets

As strange as it sounds, this recipe could pass as an express one, even though we have to make a custard cream. And the secret of today’s recipe lies precisely in making that cream fast, easy, delicious, and in just 10 minutes. The trick: the microwave, that great forgotten appliance we only ever bother with to heat up the morning milk.

Pics and Cakes

What do we need?

For the cream:

  • 100 g (1/2 cup) sugar

  • 40 g (1/3 cup) cornstarch

  • 3 egg yolks

  • 1/2 liter (2 cups) milk

  • 1 tablespoon butter

For the tartlet:

  • 1 sheet of puff pastry

  • Sugar

  • Cinnamon

Pics and Cakes

How do we make it?

  • First we prepare the custard cream. Whisk the sugar and cornstarch together in one bowl, and the egg yolks with the milk in another.

  • Then mix everything together and pop it in the microwave for 8 minutes at max power, stopping every 2 minutes to stir.

  • Once the 8 minutes are up, add the butter, stir, and you’re done.

  • Next, roll the puff pastry sheet out a bit with a rolling pin and sprinkle it with sugar and cinnamon.

  • Roll the dough into a log, pressing it with your fingers so it doesn’t end up too uniform.

  • Cut it into several pieces and flatten each one to form a sort of mini-pizza.

  • Use a muffin tin (the kind with several holes, like little flan molds). Place each circle into one of the cavities and press it in to form a tartlet.

  • Pop it in the oven, preheated to 180°C (350°F), for about 12 minutes.

  • Keep an eye on it and press the dough down every now and then to keep the hollow where the cream will go.

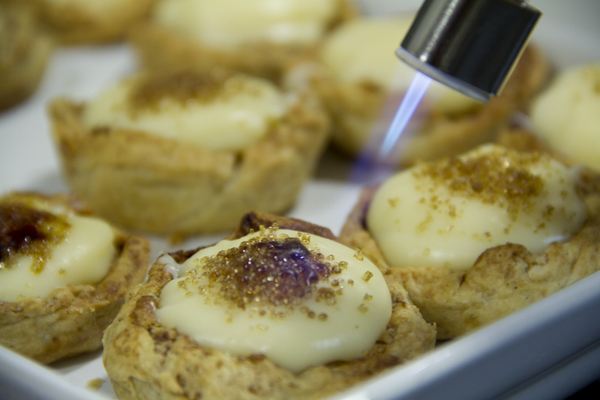
  • Once baked, fill them with the cream, sprinkle with sugar, and brown them in the oven or with a blowtorch.

Tips:

  • Microwaves come in different wattages so the cooking time may vary. As you heat the cream, you’ll see it thicken until it reaches the consistency you want.

  • If you want to use the custard cream for another recipe that calls for a thinner cream, just cut down on the amount of cornstarch.

Pics and Cakes

25 de marzo de 2013 · 2 min · Palstelera

Pasteles de crema

Por raro que parezca, esta receta podría calificarse de exprés, incluso teniendo que preparar una crema pastelera. Y es que el secreto de la receta de hoy está precisamente en preparar esta crema de forma rápida, fácil, con resultados deliciosos y en sólo 10 minutos. El truco: el microondas, ese gran olvidado al que sólo dejamos el privilegio de calentar la leche por las mañanas.

Pics and Cakes


¿Qué necesitamos?

Para la crema:

  • 100 g de azúcar

  • 40 g maizena

  • 3 yemas

  • 1/2 litro de leche

  • 1 cucharada de mantequilla

Para la tartaleta:

  • 1 plancha de hojaldre

  • Azúcar

  • Canela


Pics and Cakes


¿Cómo lo hacemos?

  • En primer lugar preparamos la crema pastelera. Batimos bien el azúcar y la maizena por un lado y por otro las yemas con la leche.

  • Después mezclamos todo y lo metemos 8 minutos en el microondas a máxima potencia parándolo cada 2 minutos para removerlo.

  • Pasados los 8 minutos añadimos la mantequilla, removemos y listo.

  • A continuación estiramos un poco la plancha de hojaldre con un rodillo y espolvoreamos con azúcar y canela.

  • Hacemos un rollo con la masa aplastándolo con los dedos para que no quede uniforme.

  • Cortamos en varios trozos y aplanamos cada uno de ellos formando una especie de minipizza.

  • Utilizamos un molde de horno para magdalenas (de esos que tienen varios agujeros como si fueran flaneras pequeñas). Colocamos cada círculo en uno de los huecos y lo acomodamos para formar una tartaleta.

  • Lo metemos al horno previamente calentado a 180 grados durante 12 minutos aproximadamente.

  • Vamos vigilándolo para ir aplastando la masa de vez en cuando y así mantener el hueco donde luego pondremos la crema.

  • Una vez horneados, rellenamos con la crema, se espolvorean con azúcar y se gratinan en el horno o con soplete.


Consejos:

  • Los microondas pueden tener distintas potencias así que tal vez el tiempo de cocción varía. A medida que vayáis calentando la crema verás que irá espesando hasta obtener la consistencia deseada.

  • Si queréis utilizar la crema pastelera para otra receta que requiera una crema menos espesa, basta con disminuir la cantidad de maizena utilizada.

 Pics and Cakes [English version]  CUSTARD CREAM TARTALETTES* *

For the cream:

  • 100 g sugar

  • 40 g corn flour

  • 3 egg yolks

  • 1/2 l milk

  • 1 tbsp butter


For the tartalette:

  • 1 sheet of puff pastry

  • Sugar

  • Cinammon

* *

  • Firt prepare the custard cream. Mix corn flour and sugar. In a different bowl, beat egg yoks with milk.

  • Mix everything and put into microwave for 8 minutes (maximum power). Stop microwave every 2 minutes to stir well the mixture and keep cooking.

  • When time is over, add butter, stir well and set aside.

  • Roll out the puff pastry with the rolling pin and sprinkle with sugar and cinammon.

  • Make a roll and press with your fingers to have irregular shapes.

  • Cut several thick slices and press with the fingers to get a flat circle.

  • Use a baking tray for muffins and place each pastry circle in a hole. Create a tartalette using your fingers.

  • Bake in the oven (preheat at 180ºC) for around 12 min.

  • Keep an eye on it to press the pastry with a spoon to keep the hole where the cream will be placed later.

  • Once baked, stuff with cream, sprinkle with some sugar and burn it with a kitchen blowtorch or in the oven.

* *

Tips:

- Microwaves have different power so time may differ. You’ll see how the cream gets thicker and thicker when cooking.

- If you want a smoother cream, reduce the amount of the corn flour used.

* *

25 de marzo de 2013 · 3 min · Palstelera

Blue Cheese Burger

Good and freezing morning. Today we’re bringing you a really simple recipe, the kind that even Jesús will be able to pull off without having to call twenty times :p The thing is, I’m a huge fan of making burgers at home. They’re usually way better than the ones you eat out, plus you make them to your own taste and load them with the ingredients you like best. This time we made the burger with blue cheese mixed right into the patty.

Pics and Cakes

What do we need?

(For each big-eater burger)

  • 200 g (7 oz) ground beef

  • 25-30 g (1 oz) blue cheese

  • 1 egg

  • Pepper

  • Salt

  • Breadcrumbs

  • Tomato

  • Lettuce

  • Onion

  • Burger bun

How do we make it?

  • Take the ground beef and dump it into a large bowl, since you’re going to be getting your hands in there.

  • Add the egg, a bit of freshly ground pepper, salt to taste, and a little breadcrumbs to give the meat some consistency.

  • Mix everything together with your hands.

  • Once all the ingredients are well combined, add the blue cheese cut into cubes. Try to work it into the meat but without pressing too hard so the cheese doesn’t break apart.

  • Wrap in cling film and shape into a burger.

  • Let the burger rest in the fridge for a couple of hours.

  • When you’re ready to eat, put a frying pan with a splash of oil over the heat and, while it’s warming up, start chopping the rest of the ingredients.

  • Cut the onion into rings, the lettuce into fairly large leaves (that way it’s easier to eat), and the tomato into slices.

  • Once the oil is hot, lower the heat a bit so the burger doesn’t burn on the outside while staying raw inside. Cook it to your liking (I like mine rare).

  • When it’s done, set it aside, wipe the pan clean with kitchen paper, and toast the bun for about half a minute.

  • Build your burger and enjoy.

Tips:

  • If you’re not going to use all the ground beef you bought, you can keep the formed patties in the freezer.

  • For me, as I said, I really enjoy a good burger, so 150 to 200 grams (5-7 oz) of ground beef is the “standard” size. Yes, that’s on the generous side, but hey, it’s a burger. Obviously you can make it with less.

  • If you want, you can dust the patty in flour before cooking it.

  • As my dad says when we play tute, “side dish requested.” A good beer or a cold Coke with fries (homemade or store-bought) is a must.

Pics and Cakes

[English version] **Ingredients:

(For each big hamburger)

  • 200 g de minced meat

  • 25-30 g de blue cheese

  • 1 egg

  • Pepper

  • Salt

  • Bread crumbs

  • Tomato

  • Salad

  • Onion

  • Hamburger bun

  • Place minced meat into a large bowl and mix well with your hands.

  • Add the egg, a bit of salt and pepper and some bread crumbs.

  • Mix well all ingredients.

  • Then chop blue cheese into small squares and add to the meat mix. Try to ‘knead’ the mix integrating the cheese but keeping it into pieces.

  • Make a ball, wrap in cling film and and flatten it with your hand to have hamburger shape.

  • Leave for a couple of hours in fridge.

  • Then, pour a bit of olive oil in the frying pan. Let it get warm and start preparing your fresh ingredients (onion, tomato and salad).

  • Cut onion into rings, tomato into slices and salad (lettuce) into big parts (it will be easier to eat).

  • Cook the hamburger according to your preferences (well done, medium or rare).

  • When it’s ready take it out from the pan, clean the frying pan with kitchen paper and toat the bread bun.

  • Prepare you hamburger sandwich with all the ingredients and enjoy it.

Tips:

  • You can freeze the prepared raw hamburgers and you will only need to defrost and cook in the pan whenever you need it.

  • This amount of minced meat is for a big hamburger but it’s up to you the size of your hamburger.

  • You can coat in flour the raw hamburger before cooking it.

  • It’s a must to serve the hamburger with a cold beer and chips or fries.


11 de diciembre de 2012 · 4 min · Cesmm

Hamburguesa con queso azul

Buenos y gélidos días. Hoy os presentamos una receta bien sencilla, de esas que hasta Jesús será capaz de hacer sin necesidad de llamar veinte veces :p El caso es que yo soy muy fan de hacer las hamburguesas en casa. Normalmente están mucho mejor que las que comes por ahí y encima las haces a tu gusto y le pones los ingredientes que más te gustan. En esta ocasión nosotros hicimos la hamburguesa integrando queso azul en ella.

Pics and Cakes

**¿Qué necesitamos? **

(Para cada hamburguesa de buen comedor)

  • 200 g de carne picada

  • 25-30 g de queso azul

  • 1 huevo

  • Pimienta

  • Sal

  • Pan rallado

  • Tomate

  • Lechuga

  • Cebolla

  • Pan de hamburguesa

¿Cómo lo hacemos?

  • Cogemos la carne picada la pasamos a un bol grande, ya que hay que manosear.

  • Añadimos el huevo, un poco de pimienta recién molida, sal al gusto y un poco de pan rallado para dar consistencia a la carne.

  • Mezclamos todo con las manos.

  • Cuando esté bien mezclado todos los ingredientes añadimos el queso azul cortado en cuadrados. Intentaremos integrarlo en la carne pero sin hacer mucha fuerza para que el queso no se rompa.

  • Envolvemos en film transparente y damos forma de hamburguesa.

  • Dejamos que la hamburguesa repose en la nevera un par de horas.

  • Cuando la vayamos a comer, ponemos una sartén con un chorrito de aceite en el fuego y mientras coge temperatura vamos cortando el resto de ingredientes.

  • Partimos la cebolla en aros, la lechuga en hojas más o menos grandes (así será más fácil de comer) y el tomate en rodajas.

  • Cuando el aceite esté caliente bajamos un poco la temperatura  para que no se nos queme mucho por fuera y se quede muy cruda por dentro. La hacemos a nuestro gusto (a mí me gusta poco hecha).

  • Cuando esté lista reservamos y limpiamos la sartén con papel de cocina y ponemos el pan medio minuto para tostarlo un poco.

  • Montamos la hamburguesa y a disfrutar.

Consejos:

  • Si no vais a consumir toda la carne picada que habéis comprado podéis conservar la hamburguesa ya hecha en el congelador.

  • Para mí, que como he dicho antes disfruto de las hamburguesas, de 150 a 200 gramos de carne picada es la medida “estándar” . Sí, es bastante tirando a mucho pero es que es una hamburguesa. Evidentemente podéis hacerla con menos cantidad.

  • Si queréis podéis pasar la hamburguesa por harina antes de hacerla en la sartén.

  • Como dice mi padre cuando jugamos al tute “se ruega acompañamiento”. Una buena cerveza o una coca-cola fría con patatas (hechas o compradas) son imprescindibles.

Pics and Cakes

[English version] **Ingredients:

(For each big hamburger)

  • 200 g de minced meat

  • 25-30 g de blue cheese

  • 1 egg

  • Pepper

  • Salt

  • Bread crumbs

  • Tomato

  • Salad

  • Onion

  • Hamburger bun

  • Place minced meat into a large bowl and mix well with your hands.

  • Add the egg, a bit of salt and pepper and some bread crumbs.

  • Mix well all ingredients.

  • Then chop blue cheese into small squares and add to the meat mix. Try to ‘knead’ the mix integrating the cheese but keeping it into pieces.

  • Make a ball, wrap in cling film and and flatten it with your hand to have hamburger shape.

  • Leave for a couple of hours in fridge.

  • Then, pour a bit of olive oil in the frying pan. Let it get warm and start preparing your fresh ingredients (onion, tomato and salad).

  • Cut onion into rings, tomato into slices and salad (lettuce) into big parts (it will be easier to eat).

  • Cook the hamburger according to your preferences (well done, medium or rare).

  • When it’s ready take it out from the pan, clean the frying pan with kitchen paper and toat the bread bun.

  • Prepare you hamburger sandwich with all the ingredients and enjoy it.

Tips:

  • You can freeze the prepared raw hamburgers and you will only need to defrost and cook in the pan whenever you need it.

  • This amount of minced meat is for a big hamburger but it’s up to you the size of your hamburger.

  • You can coat in flour the raw hamburger before cooking it.

  • It’s a must to serve the hamburger with a cold beer and chips or fries.


11 de diciembre de 2012 · 4 min · Cesmm

Paté de sardinas

Es una de esas recetas que se hace casi sin pensar, con pocos ingredientes y todos de lo más normalito. Una forma fácil de tomar un aperitivo que sabes exactamente de qué está hecho y que seguro soprenderá a más de uno. Nosotros lo hicimos como parte de un amplio menú de merienda tipo buffet para un cumpleaños. Se puede presentar ya untado, montado en unas tartaletas o, si lo preferimos, en un bonito cuenco para que cada uno se sirva a su antojo.

 Pics and Cakes

¿Qué necesitamos?

  • 1 lata pequeña de sardinas en aceite de oliva

  • 70 g de queso crema

  • ¼ de cebolleta

  • 60 ml de zumo de limón

  • Perejil picado

  • Sal y pimienta negra

¿Cómo lo hacemos?

  • Escurrimos las sardinas y, con ayuda de un cuchillo fino, les retiramos la espina central (si son sardinillas, es posible que no haga falta).

  • Picamos la cebolleta en trocitos pequeños.

  • Ponemos en un bol todos los ingredientes y los mezclamos machacándolos con un tenedor (si queremos que se noten los trozos) o con la batidora (si preferimos un paté más fino y suave).

  • Dejamos refrigerar en la nevera al menos una hora para que se unan sabores y espese.

Consejos:

  • Se puede hacer el día anterior, así cogerá más cuerpo y además adelantaremos trabajo en la cocina.

  • Para aquellos que les guste, pueden sustituir el perejil por cilantro.

*[English version]   SARDINE PÂTÉ * **Ingredients:

  • 1 small tin of sardines in olive oil

  • 70 g cream cheese

  • ¼ spring onion

  • 60 ml fresh lemon juice

  • Chopped parsley

  • Salt and black pepper

  • Drain sardines and remove the central bone with a sharp knive.

  • Finely chop the spring onion.

  • Put all the ingredients together into a bowl and mix smashing them with a fork (if you want to feel the ingredients) or with a mixer (if you prefer a thinner and smoother pâté).

  • Leave cool in the fridge for at least 1 hour. It will unify flavours and become thicker.

Tips:

  • You can prepare it the day before. It will be tastier and you’ll save time in the kitchen.

  • If you like, you can use coriander instead of parsley.


7 de diciembre de 2012 · 2 min · Palstelera

Sardine pâté

This is one of those recipes that comes together almost without thinking, with just a few totally everyday ingredients. An easy way to put out an appetizer where you know exactly what’s in it and that’s bound to surprise more than one guest. We made it as part of a big buffet-style spread for a birthday. You can serve it already spread, piped into little tartlets, or, if you prefer, in a pretty bowl so everyone can help themselves.

Pics and Cakes

What do we need?

  • 1 small tin of sardines in olive oil

  • 70 g (2.5 oz) cream cheese

  • ¼ spring onion

  • 60 ml (¼ cup) lemon juice

  • Chopped parsley

  • Salt and black pepper

How do we make it?

  • Drain the sardines and, with the help of a thin knife, remove the central bone (if they’re baby sardines, you probably won’t need to).

  • Finely chop the spring onion.

  • Put all the ingredients in a bowl and mix, mashing them with a fork (if you want to feel the chunks) or with a blender (if you’d rather have a smoother, finer pâté).

  • Refrigerate for at least an hour so the flavors meld and it thickens up.

Tips:

  • You can make it the day before — it’ll firm up nicely and you’ll get a head start on the kitchen work.

  • For those who like it, you can swap the parsley for cilantro.

*[English version] SARDINE PÂTÉ

  • **Ingredients:
  • 1 small tin of sardines in olive oil

  • 70 g cream cheese

  • ¼ spring onion

  • 60 ml fresh lemon juice

  • Chopped parsley

  • Salt and black pepper

  • Drain sardines and remove the central bone with a sharp knive.

  • Finely chop the spring onion.

  • Put all the ingredients together into a bowl and mix smashing them with a fork (if you want to feel the ingredients) or with a mixer (if you prefer a thinner and smoother pâté).

  • Leave cool in the fridge for at least 1 hour. It will unify flavours and become thicker.

Tips:

  • You can prepare it the day before. It will be tastier and you’ll save time in the kitchen.

  • If you like, you can use coriander instead of parsley.


Comments

cris (2013-01-02 18:27:57):

This pâté is sooooo good! and super easy to make! we made it for New Year’s Eve and it was a hit. Don’t go thinking you’re about to eat a tin of sardines — between the onion, the bit of lemon and the cheese, it’s a super tasty mousse!!

Thanks so much to you both

xx

Palstelera (2013-01-05 00:16:37):

So glad you made it for New Year’s Eve and that you all enjoyed it… :-D

7 de diciembre de 2012 · 3 min · Palstelera

Mango and Duck Ham Mille-Feuille

Between one thing and another, this delicious recipe seemed to have been forgotten. Luckily, now that we’re getting back into our routine, our weekly posts will too. This recipe, although it sounds fancy and complicated, is really just a salad with slightly unusual ingredients that will delight anyone who tries it.

Pics and Cakes

What do we need?

(serves 4)

  • 2 ripe mangoes

  • 150 g (5.3 oz) duck ham

  • Arugula

  • Pine nuts

  • Oil, salt, and vinegar

How do we make it?

  • Lightly toast the pine nuts in a hot pan, without oil.

  • Peel and slice the mangoes into thin layers.

  • Build the mille-feuilles by alternating mango slices with duck ham and arugula.

  • Prepare a vinaigrette to taste and drizzle it on top right before serving.

  • Sprinkle a few toasted pine nuts over each mille-feuille.

Tips:

  • For a more budget-friendly version, you can swap the duck ham for serrano ham and the pine nuts for toasted hazelnuts.

  • Fruit in salads adds a sweet, fresh touch, so feel free to throw mango, pineapple, apple… into your everyday salads.

[English version] SALAD WITH MANGO AND DUCK HAM Ingredients (serving 4):

  • 2 large mangos

  • 150 g duck ham

  • rocket salad

  • pine nuts

  • olive oil, vinegar and salt

  • Grill the pine nuts in a saucepan.

  • Peel and cut into thin slices the mangos.

  • Create the individual salads by alternating layers of mango, rocket salad and duck ham.

  • Make a vinaigrette and pour it over the salad before serving.

  • Add some pine nuts.

    Tips:- For the economic version of this recipe, use cured (pork) ham instead of duck ham and hazelnuts instead of pine nuts.- You can use mango or any other fruit for your ordinary salads, the taste will be fresh and sweet!


22 de octubre de 2012 · 2 min · Palstelera

Milhoja de mango y jamón de pato

Entre unas cosas y otras, esta exquisita receta parecía haber caído en el olvido. Por suerte, ahora que parece que volvemos  a la rutina también lo harán nuestras publicaciones semanales. Esta receta, aunque suene extravagante y complicada, no es más que una ensalada con ingredientes un poco fuera de lo común pero que haran las delicias de aquel que la pruebe.

 Pics and Cakes

¿Qué necesitamos?

(4 personas)

  • 2 mangos maduros

  • 150 g de jamón de pato

  • Rúcula

  • Piñones

  • Aceite, sal y vinagre


¿Cómo lo hacemos?

  • Tostamos ligeramente los piñones en una sartén caliente, sin aceite.

  • Pelamos y cortamos los mangos en láminas finas.

  • Montamos las milhojas alternando las láminas de mango con el jamón de pato y la rúcula.

  • Preparamos una vinagreta al gusto y la echamos por encima justo antes de servir.

  • Echamos algunos piñones tostados sobre cada milhoja.


Consejos:

  • Para una versión más económica se puede sustituir el jamón de pato por jamón serrano y los piñones por avellanas tostadas.

  • Las frutas en las ensaladas dan un toque dulce y fresco, así que os podéis animar a utilizar mango, piña, manzana… en vuestras ensaladas habituales.


[English version] SALAD WITH MANGO AND DUCK HAM Ingredients (serving 4):

  • 2 large mangos

  • 150 g duck ham

  • rocket salad

  • pine nuts

  • olive oil, vinegar and salt


  • Grill the pine nuts in a saucepan.

  • Peel and cut into thin slices the mangos.

  • Create the individual salads by alternating layers of mango, rocket salad and duck ham.

  • Make a vinaigrette and pour it over the salad before serving.

  • Add some pine nuts.


  Tips:- For the economic version of this recipe, use cured (pork) ham instead of duck ham and hazelnuts instead of pine nuts.- You can use mango or any other fruit for your ordinary salads, the taste will be fresh and sweet!


22 de octubre de 2012 · 2 min · Palstelera

Hummus

When Palstelera first told me she was going to make hummus, I had no idea what she was even talking about. She had tried it in Edinburgh and told me it was some kind of chickpea purée. Chickpea purée? Well, yes — and a really tasty one. Since then we’ve made it loads of times for parties, because it’s a super easy appetizer to put together and it’s absolutely delicious.

Pics and Cakes

What do we need?

  •   1 large can of cooked chickpeas
    
  •   2-3 cloves of garlic
    
  •   1 tablespoon of tahini (sesame seed paste)
    
  •   1 teaspoon of ground cumin
    
  •   1 teaspoon of salt
    
  •   100 ml (scant 1/2 cup) of olive oil
    
  •   100 ml (scant 1/2 cup) of lemon juice
    
  •   Sweet paprika
    

How do we make it?

  • Rinse and drain the chickpeas.

  • Add all the ingredients except the paprika to a blender jug and blend until smooth.

  • Once it’s ready, taste and adjust the salt if needed.

  • Serve in a bowl, sprinkle a little sweet paprika on top and add a drizzle of olive oil.

  • Serve with breadsticks, grissini, toasted bread, pita, etc.

Tips:

  • If you’d rather, you can swap the canned chickpeas for some you cook fresh for the occasion, or leftovers from a delicious Cocido Madrileño/Maragato.

  • If it turns out too thick, you can add a bit more lemon juice or a splash of water.

    Pics and Cakes [English version] HUMMUS **Ingredients:- 1 can of chickpeas

  • 2-3 cloves of garlic

  • 1 tsp tahini (sesamo seed paste)

  • 1 tsp cumin- 1 tsp salt- 100 ml olive oil

  • 100 ml lemon juice

  • Paprika

  • Wash and drain chickpeas.

  • Put all the ingredients into a bowl except sweet paprika and combine them in blender or food processor.

  • Taste and add some extra salt if need it.

  • Place in a serving bowl, and add a small amount of paprika and a bit of olive oil.

  • Serve with small toasts, grilled bread, pita bread, etc.

    Tips:- Instead of canned chickpeas you can boil chickpeas for this recipe or use some you have from previous stews.

  • If the hummus is too dry, you can add some more lemon juice or even a bit of water.


Comments

zordor (2012-09-13 18:14:16):

Mmmh so good! Seriously, you didn’t know it? Come on, you really didn’t?! Hehe, that said… it gives you some terrible farts :P

13 de septiembre de 2012 · 2 min · Cesmm

Hummus

Cuando Palstelera me dijo por primera vez que iba a hacer hummus no sabía ni de qué hablaba. Ella lo había probado en Edimburgo y me dijo que era una especie de puré de garbanzos ¿Puré de garbanzos? Pues sí, y bien rico que estaba. Desde entonces lo hemos preparado en muchas ocasiones para fiestas, ya que es un aperitivo muy fácil de hacer y además está buenísimo.

Pics and Cakes

¿Qué necesitamos?

-       1 bote grande de garbanzos cocidos

  •       2-3 dientes de ajo
  •       1 cucharada de tahina (pasta de semillas de sésamo)
  •       1 cucharadita de comino molido
  •       1 cucharadita de sal
  •       100 ml de aceite
  •       100 ml de zumo de limón
  •       Pimentón dulce

¿Cómo lo hacemos?

  • Lavamos y escurrimos los garbanzos.

  • Añadimos todos los ingredientes menos el pimentón en un vaso batidor y trituramos.

  • Cuando esté listo, rectificar la sal si fuera necesario.

  • Servimos en un cuenco espolvoreamos un poco de pimentón dulce encima y un chorrito de aceite de oliva.

  • Acompañar con picos, colines, pan tostado, pita, etc.

Consejos:

  • Si queréis podéis sustituir los garbanzos de bote por unos cocidos para la ocasión o que os hayan sobrado de un riquísimo Cocido Madrileño/Maragato.
  • Si veis que queda muy espeso podéis añadir más zumo de limón o un poco de agua.

  Pics and Cakes  [English version] HUMMUS **Ingredients:- 1 can of chickpeas

  • 2-3 cloves of garlic

  • 1 tsp tahini (sesamo seed paste)

  • 1 tsp cumin- 1 tsp salt- 100 ml olive oil

  • 100 ml lemon juice

  • Paprika 

  • Wash and drain chickpeas.

  • Put all the ingredients into a bowl except sweet paprika and combine them in blender or food processor. 

  • Taste and add some extra salt if need it. 

  • Place in a serving bowl, and add a small amount of paprika and a bit of olive oil.

  • Serve with small toasts, grilled bread, pita bread, etc. 

  Tips:- Instead of canned chickpeas you can boil chickpeas for this recipe or use some you have from previous stews.

  • If the hummus is too dry, you can add some more lemon juice or even a bit of water.

13 de septiembre de 2012 · 2 min · Cesmm