Ensalada de espinacas, feta y semillas de amapola

Las chicharras cantando, coger el coche a 46°C, sudar como un pollo y no abrir más ventanas por la noche porque tu casa no las tiene son claros síntomas de que el verano ha llegado y con mucha fuerza. Así que, ante estos calores, vamos a contraatacar con comidas fresquitas para resistir a la época estival. Inaugurando la temporada de ensaladas, hoy os traemos una ensalada de espinacas. Se trata de una receta tan sencilla que no podría ni denominarse receta, simplemente sugerencia de combinación de ingredientes para que os sirvan de inspiración en vuestras próximas ensaladas.

Pics and Cakes


¿Qué necesitamos?

  • 1 bol de espinacas frescas y lavadas
  • 1/2 cebolla morada
  • 1 tomate
  • 1/2 pepino
  • 4 tomates secos
  • Semillas de amapola
  • Queso tipo feta
  • Aceite
  • Vinagre
  • Sal


 ¿Cómo lo hacemos?

  1. Cortamos el pepino en rodajas, la cebolla en juliana, los tomates en cuadraditos y lo ponemos sobre las hojas de espinacas frescas (si son muy grandes, las cortamos con las manos), añadimos queso feta al gusto desmenuzado con las manos.
  2. Por último, añadimos semillas de amapola y aliñamos al gusto.


Consejos:

– Se puede preparar una vinagreta mezclando 1 parte de vinagre con 3 de aceite y un poquito de sal. Se mete en un bote que cierre bien, agitamos con energía para emulsionarlo y listo para aliñar. A las vinagretas se le puede añadir cualquier especia, hierba, mostaza o lo que se os ocurra.

– Cuidado con los tomates secos porque tienen tanto sabor que a veces podemos prescindir de la sal.

Pics and Cakes

28 de julio de 2016 · 2 min · Palstelera

Spinach, Feta and Poppy Seed Salad

Cicadas singing, getting into a car that's 46°C (115°F), sweating like a pig, and not being able to open more windows at night because your house simply doesn't have any — clear signs that summer has arrived and with a vengeance. So, faced with this heat, we're going to fight back with cool, refreshing meals to survive the summer season. Kicking off salad season, today we're bringing you a spinach salad. It's such a simple recipe that you couldn't even call it a recipe — just a suggested combination of ingredients to inspire your next salads.

Pics and Cakes


What do we need?

  • 1 bowl of fresh, washed spinach
  • 1/2 red onion
  • 1 tomato
  • 1/2 cucumber
  • 4 sun-dried tomatoes
  • Poppy seeds
  • Feta-style cheese
  • Oil
  • Vinegar
  • Salt


How do we make it?

  1. Slice the cucumber into rounds, julienne the onion, dice the tomatoes, and pile everything on top of the fresh spinach leaves (if they're very large, tear them with your hands). Add as much feta cheese as you like, crumbled by hand.
  2. Finally, sprinkle on the poppy seeds and dress to taste.


Tips:

– You can whip up a vinaigrette by mixing 1 part vinegar with 3 parts oil and a pinch of salt. Pop it into a jar that seals tightly, shake it vigorously to emulsify, and it's ready to dress your salad. You can add any spice, herb, mustard, or whatever else you can think of to a vinaigrette.

– Watch out with the sun-dried tomatoes because they pack so much flavor that sometimes you can skip the salt altogether.

Pics and Cakes

28 de julio de 2016 · 2 min · Palstelera

Petit suisse de fresa

Para muchos es seguramente un recuerdo de infancia y apuesto que, de vez en cuando, tenéis la tentación de volver a comprarlos y comeros dos sin que vuestra madre os regañe. Pues bien, si os digo que los podéis hacer en casa y que el tamaño depende de vosotros, creo que ya estáis tardando en ir a comprar unos buenos fresones.

Pics and Cakes

¿Qué necesitamos?

  • 500 g de fresas
  • 250 g de queso crema (tipo Philadelphia)
  • 100 g de nata de montar
  • 150 g de azúcar
  • 2 cucharaditas de cuajada en polvo


 ¿Cómo lo hacemos?

  1. En primer lugar, lavamos las fresas y les quitamos el rabito. Las trituramos bien con la batidora hasta obtener un puré de fresas.
  2. En un vasito ponemos un poco del puré de fresas y disolvemos la cuajada. Reservamos.
  3. Ponemos el resto del puré de fresas en un cazo y lo calentamos hasta que hierva.
  4. Lo retiramos del fuego, añadimos la parte del puré donde habíamos disuelto la cuajada y lo removemos bien.
  5. Lo ponemos de nuevo al fuego, unos dos minutos sin dejar de remover. (CUIDADO en este paso ya que si ponéis muy fuerte el fuego  puede salpicaros el puré de fresas y quemaros. Os aseguro que el maldito es peor que el agua porque, al ser más denso, se te pega con ganas).
  6. Dejamos templar el puré un poquito y añadimos el resto de ingredientes (azúcar, queso y nata).
  7. Batimos todo bien con la batidora y vemos que ya habrá adquirido un bonito color de petit suisse.
  8. Solo nos queda verterlo en los vasitos que queramos servirlo y lo dejamos en la nevera toda la noche.

Pics and Cakes

Consejos:

– Nosotros utilizamos vasos de chupito, quedan muy bien y es una medida perfecta ya que tenemos que admitir que se trata de un postre consistente (ahora entiendo porque las madres no nos dejaban comer muchos…:-P). También podéis usar los vasos de cristal de yogures o cualquier vasito que tengáis.

– No puedo deciros a ciencia cierta cuánto tiempo nos pueden durar en la nevera pero con los ingredientes que lleva calculo que una semana aguantan sin problema.

 
4 de junio de 2015 · 2 min · Palstelera

Strawberry Petit Suisse

For many of you, this is probably a childhood memory, and I bet that every once in a while you get tempted to buy them again and eat two in a row without your mom scolding you. Well, if I tell you that you can make them at home and that the size is up to you, I think you should already be on your way out to buy some good ripe strawberries.

Pics and Cakes

What do we need?

  • 500 g (1.1 lb) strawberries
  • 250 g (9 oz / about 1 cup) cream cheese (Philadelphia type)
  • 100 g (about 1/2 cup) heavy whipping cream
  • 150 g (3/4 cup) sugar
  • 2 teaspoons powdered cuajada (rennet-based setting mix)


How do we make it?

  1. First, wash the strawberries and remove the stems. Blend them well with a hand blender until you get a strawberry purée.
  2. In a small glass, put a bit of the strawberry purée and dissolve the cuajada in it. Set aside.
  3. Put the rest of the strawberry purée in a saucepan and heat it until it boils.
  4. Remove from the heat, add the portion of purée with the dissolved cuajada, and stir well.
  5. Put it back on the heat for about two minutes, stirring constantly. (BE CAREFUL at this step because if the heat is too high the strawberry purée can splatter and burn you. Trust me, the stuff is worse than water — being denser, it really sticks to you.)
  6. Let the purée cool down a little and then add the rest of the ingredients (sugar, cheese, and cream).
  7. Blend everything well with the hand blender and you'll see it has already taken on a lovely petit suisse color.
  8. All that's left is to pour it into whatever little glasses you want to serve it in and leave it in the fridge overnight.

Pics and Cakes

Tips:

– We used shot glasses — they look really cute and it's the perfect portion size, since we have to admit this is a pretty rich dessert (now I understand why our moms wouldn't let us eat too many… :-P). You can also use the little glass yogurt jars or any small cup you have around.

– I can't tell you for sure how long they'll keep in the fridge, but with these ingredients I'd estimate they'll last a week without any problem.

4 de junio de 2015 · 2 min · Palstelera

Camembert con caramelo y nueces

Dicen que todo lo bueno se hace esperar y parece que esto es lo que hemos querido hacer con esta nueva receta. Pero bueno, por fin, volvemos a publicar y traemos una sugerencia de aperitivo fácil, rápida y exquisita, una vez más sacada de La Receta de la Felicidad, quien nos invita a utilizarlo como regalo navideño. Pero vamos, que para disfrutar un buen queso nos da igual que sea Navidad, Semana Santa o pleno mes de agosto, ¿verdad?

Pics and Cakes


¿Qué necesitamos?

  • 1 queso camembert

  • Varias nueces peladas

  • 100 g de azúcar

  • 2 cucharadas de mantequilla


¿Cómo lo hacemos?

  • Ponemos el queso camembert entero sobre un plato y colocamos las nueces encima.

  • Ponemos en un cazo o sartén el azúcar a fuego medio y dejamos que se vaya derritiendo poco a poco sin remover (aunque sintamos la tentación de hacerlo).

  • Cuando veamos que se ha derretido el azúcar y que tenemos una especie de sirope muy espeso y claro, podemos remover y lo dejaremos cocinar un poco más hasta que alcance el tono dorado del caramelo.

  • Apagamos el fuego, añadimos las dos cucharadas de mantequilla y removemos bien.

  • Vertemos inmediatamente el caramelo sobre el camembert con nueces, intentando hacer una capa fina o incluso hilos con el caramelo.


Consejos:

  • Hay que tener cuidado y evitar dejar demasiado tiempo el caramelo en el fuego ya que se nos podría quemar y el resultado sería un caramelo muy oscuro y amargo.

  • Se pueden cortar las porciones de queso en cuanto hayamos echado el caramelo. Si no, al solidificarse podría resultarnos muy complicado (por eso también es importante que la capa de caramelo sea fina).

________________ [English version] CAMEMBERT CHEESE WITH NUTS AND CARAMEL* *Ingredients: 

  • 1 Camembert cheese

  • Several nuts

  • 100 g sugar

  • 2 tbsp butter

* *

  • Place the cheese into a dish and put the nuts over it.

  • Place the sugar into a sauce pan and cook over medium low heat. Let it melt slowly.

  • When the sugar is totally melt you can use a spoon to stir.

  • Keep cooking until golden brown. Add the butter and stir well.

  • Pour immediately over the cheese with the nuts. Try to create a thin layer.

Tips:- Do not overcook the sugar or you’ll get a dark and bitter caramel.* - Cut the cheese into portions right after pouring the caramel. Otherwise, when caramel is hard it could be very difficult (that’s why you have to try to make a thin layer).


20 de junio de 2013 · 3 min · Palstelera

Camembert with Caramel and Walnuts

They say good things come to those who wait, and it seems that’s exactly what we’ve been trying to do with this new recipe. But anyway, we’re finally back to posting, and we’re bringing you an easy, quick, and delicious appetizer suggestion, once again borrowed from La Receta de la Felicidad, who recommends it as a Christmas gift. But hey, when it comes to enjoying a good cheese, who cares if it’s Christmas, Easter, or the middle of August, right?

Pics and Cakes

What do we need?

  • 1 Camembert cheese

  • A handful of shelled walnuts

  • 100 g (1/2 cup) sugar

  • 2 tablespoons butter

How do we make it?

  • Place the whole Camembert cheese on a plate and arrange the walnuts on top.

  • In a small saucepan or skillet, heat the sugar over medium heat and let it melt slowly without stirring (even if you feel tempted to).

  • Once the sugar has melted into a kind of thick, pale syrup, you can stir it and let it cook a little longer until it reaches a golden caramel color.

  • Turn off the heat, add the two tablespoons of butter, and stir well.

  • Immediately pour the caramel over the Camembert with walnuts, trying to make a thin layer or even caramel threads.

Tips:

  • Be careful not to leave the caramel on the heat for too long, as it could burn and result in a very dark, bitter caramel.

  • You can cut the cheese into portions right after pouring on the caramel. Otherwise, once it solidifies it can get tricky (that’s another reason why the caramel layer should be thin).

________________ [English version] CAMEMBERT CHEESE WITH NUTS AND CARAMEL* *Ingredients:

  • 1 Camembert cheese

  • Several nuts

  • 100 g sugar

  • 2 tbsp butter

  • Place the cheese into a dish and put the nuts over it.

  • Place the sugar into a sauce pan and cook over medium low heat. Let it melt slowly.

  • When the sugar is totally melt you can use a spoon to stir.

  • Keep cooking until golden brown. Add the butter and stir well.

  • Pour immediately over the cheese with the nuts. Try to create a thin layer.

  • Tips:- Do not overcook the sugar or you’ll get a dark and bitter caramel.* - Cut the cheese into portions right after pouring the caramel. Otherwise, when caramel is hard it could be very difficult (that’s why you have to try to make a thin layer).

20 de junio de 2013 · 3 min · Palstelera

Quiche Lorraine

As part of the campaign “No newly-independent young adult shall go hungry, even if they don’t like cooking,” here’s another easy recipe — one of those that almost everyone knows, but just in case, I don’t want to hear that you’re not eating well just because you couldn’t be bothered to do a couple of little things in the kitchen.

Pics and Cakes

What do we need?

For the shortcrust pastry:

  • 200 g (1 ⅔ cups) flour

  • 100 g (7 tbsp) cold butter

  • 1 egg

  • A pinch of salt

  • A pinch of sugar

For the filling:

  • 200 g (7 oz) bacon

  • 100 g (3.5 oz) emmental cheese

  • 50 g (1.75 oz) mushrooms

  • 200 ml (¾ cup) heavy cream

  • 4 medium eggs

  • Half an onion

  • Salt and pepper.

How do we make it?

  • As you know, for the shortcrust pastry you can check here.

  • While we’re making the dough, preheat the oven to 180°C (350°F).

  • Once the dough is ready, place it in a baking pan and pop it in the oven for about fifteen minutes. Before putting it in the oven, prick it with a fork so it doesn’t puff up.

  • With the pastry in the oven, heat a frying pan with a splash of oil. When it’s hot, add the onion and mushrooms, all sliced beforehand. Once they’ve softened a bit, add the bacon cut into strips and cook to your liking. Set aside.

  • Beat the eggs in a large bowl and mix them with the cream. Season with salt and pepper.

  • Add the sautéed ingredients to the bowl.

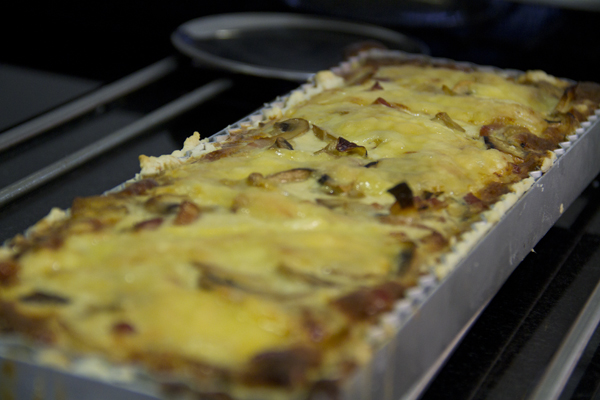
  • When the pastry is partially cooked, take it out of the oven and pour in the mixture. Spread it evenly across the surface and sprinkle the cheese on top.

  • Put it back in the oven and bake for around half an hour.

Tips:

  • Just like we mentioned here, you can pick any kind of cheese you like or whatever you have at home.

  • Shortcrust pastry isn’t hard to make, but if you’d rather, you can buy it pre-made at any supermarket. That way we make sure “No newly-independent young adult goes hungry, even if they don’t like cooking.”

Pics and Cakes

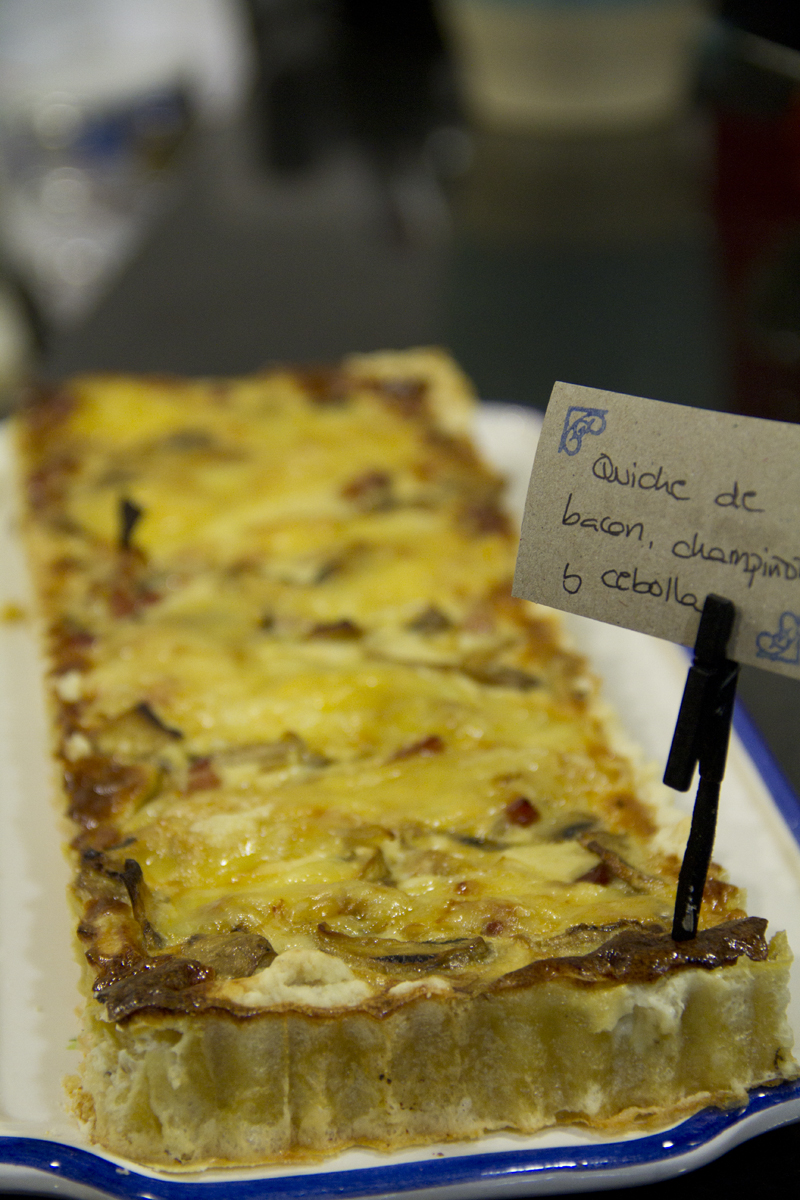
[English version] QUICHE LORRAINE* Ingredients: *Shortbread pastry:

  • 200 g flour

  • 1oo g cold butter

  • 1 egg

  • A pinch of salt

  • A pinch of sugar


Filling:

  • 200 g bacon

  • 100 g emmental cheese

  • 50 g mushrooms

  • 200 ml cream

  • 4 eggs

  • 1/2 onion

  • Salt and pepper

  • *Prepare the shortbread pastry. You can see here our recipe. *

  • Preheat oven at 180º C.

  • Roll out the pastry and place into a baking pan. Bake for 15 minutes. If we bake directly with the filling on it, the pastry will be underdone. To avoid the pastry to ‘grow’ in the oven, you can place a baking paper and fill up with baking beans. You can also pierce the pastry with a fork.

  • While the pastry is baking in the oven, heat a bit of olive oil in a frying pan. Chop onion and mushrooms and place them into the hot frying pan. After a few minutes, add the bacon cut into strips and keep stir frying for a few extra minutes. Take it out from heat and set aside.

  • In a large bowl, beat eggs and cream together. Add salt and pepper.

  • Add the stir fried ingredients and mix well.

  • The pastry will be already slightly cooked, so take it out from oven and pour evenly the cream mix inside. Sprinkle with some cheese on the top.

  • Bake into the oven for around 30 minutes.

Tips:

*- As we said before here you can choose any kind of cheese you like. *

- Shortbread pastry is not a difficult task but you can also buy it in any supermarket.


Comments

yolanda del pozo (2013-04-19 09:44:08):

All the recipes on this site are easy, cheap, quick and tasty — what more could you ask for? And the photos are amazing too, just looking at them makes you want to make the dish and, above all, eat it. Congrats, great work!

silvia (2015-01-14 20:34:14):

The other day I bought shortcrust pastry by mistake… so checking out this great website, I’m bookmarking this recipe.

Just one question: what’s that about pricking the pastry before baking… do you have to pierce it? And what kind of pan works best? Like a non-stick one?

Kisses

16 de abril de 2013 · 4 min · Cesmm

Quiche Lorraine

Dentro de la campaña “Que ningún emancipado pase hambre aunque no le guste cocinar” os presento una nueva receta sencilla, de esas de las que casi todos sabemos, pero por si acaso, que no me entere yo que por no hacer dos cositas en la cocina no te vas a alimentar bien.

Pics and Cakes


¿Qué necesitamos?

Para la masa quebrada:

  • 200 gr de harina

  • 100 gr de mantequilla fría

  • 1 huevo

  • Una pizca de sal

  • Una pizca de azúcar

Para el relleno:

  • 200 gr de bacon

  • 100 gr de queso emmental

  • 50 gr de champiñones

  • 200 ml de nata

  • 4 huevos medianos

  • Media cebolla

  • Sal y pimienta.

¿Cómo lo hacemos?

  • Ya sabéis, para hacer la masa quebrada podéis consultarlo aquí.

  • Mientras vamos haciendo la masa ponemos el horno a precalentar a 180º C.

  • A continuación, una vez terminada la masa, la ponemos en un molde y la metemos en el horno unos quince minutos. Antes de ponerla en el horno la pinchamos con un tenedor para que no se levante la masa.

  • Con la masa en el horno, calentamos una sartén con un chorrito de aceite. Cuando esté caliente echamos la cebolla y los champiñones, previamente todo cortado en láminas. Cuando estén un poco hechos añadimos el bacon cortado en tiras y hacemos al gusto. Reservamos.

  • Batimos los huevos en un bol grande y los mezclamos con la nata. Salpimentamos.

  • Incorporamos los ingredientes pochados al bol.

  • Cuando la masa esté un poco cocida, la sacamos del horno y añadimos la mezcla. Repartimos por toda la superficie y añadimos el queso encima.

  • Volvemos a poner en el horno y dejamos hornear en torno a media hora.

Consejos:

  • Al igual que os dijimos aquí podéis elegir cualquier tipo de queso que os guste o que tengáis por casa.

  • La masa quebrada no es difícil de hacer pero si queréis la podéis comprar hecha en cualquier supermercado. Así nos aseguramos “Que ningún emancipado pase hambre aunque no le guste cocinar”.

 Pics and Cakes

[English version] QUICHE LORRAINEIngredients: *Shortbread pastry:

  • 200 g flour

  • 1oo g cold butter

  • 1 egg

  • A pinch of salt

  • A pinch of sugar

* ** * Filling:

  • 200 g bacon

  • 100 g emmental cheese

  • 50 g mushrooms

  • 200 ml cream

  • 4 eggs

  • 1/2 onion

  • Salt and pepper

* * * *

  • *Prepare the shortbread pastry. You can see here our recipe. *

  • Preheat oven at 180º C.

  • Roll out the pastry and place into a baking pan. Bake for 15 minutes. If we bake directly with the filling on it, the pastry will be underdone. To avoid the pastry to ‘grow’ in the oven, you can place a baking paper and fill up with baking beans. You can also pierce the pastry with a fork.

  • While the pastry is baking in the oven, heat a bit of olive oil in a frying pan. Chop onion and mushrooms and place them into the hot frying pan. After a few minutes, add the bacon cut into strips and keep stir frying for a few extra minutes. Take it out from heat and set aside.

  • In a large bowl, beat eggs and cream together. Add salt and pepper.

  • Add the stir fried ingredients and mix well.

  • The pastry will be already slightly cooked, so take it out from oven and pour evenly the cream mix inside. Sprinkle with some cheese on the top.

  • Bake into the oven for around 30 minutes.

* *

Tips:

*- As we said before here you can choose any kind of cheese you like. *

- Shortbread pastry is not a difficult task but you can also buy it in any supermarket.


16 de abril de 2013 · 4 min · Cesmm

Croquetas de gorgonzola y muesli

Estas croquetas las preparé por primera vez como aperitivo de una Nochevieja y la verdad es que encantaron a todo el mundo. Incluso a aquellos que torcían un poco la nariz al ver que llevaban muesli por fuera, les gustó el contraste tan fuerte entre el exterior crujiente y el relleno cremoso. Ya sea para estas fechas o para un día cualquiera, os animamos a que las preparéis porque es una receta que merece la pena.

Pics and Cakes


¿Qué necesitamos?

  • 4 cucharas de harina

  • Medio litro de leche

  • 100g de queso gorgonzola

  • 2 cucharadas de aceite de oliva

  • 2 cucharadas de mantequilla

  • Sal

  • Pimienta negra

  • **2 huevos

  • Pan rallado

  • Muesli sin frutas

  • Aceite de oliva para freír


¿Cómo lo hacemos?

  • En primer lugar, preparamos la bechamel. Para ello ponemos el aceite y la mantequilla en una sartén.

  • Cuando se haya disuelto la mantequilla y esté bien caliente, añadimos la harina. Removemos bien y dejamos que se cocine un poco (para que luego no sepa a a crudo).

  • A continuación vamos añadiendo la leche poquito a poco y removiendo constantemente de forma enérgica para evitar que se formen grumos. La bechamel que queremos hacer es bastante espesa ya que la utilizaremos para croquetas y además va a llevar un queso muy cremoso.

  • Echamos el queso cortado en trozos y seguimos removiendo hasta que se disuelva por completo y salpimentamos.

  • Vertemos la bechamel en una fuente amplia para que quede bien extendida. Tiene que enfriar al menos durante dos horas, terminando en la nevera para que endurezca bien.

  • Una vez fría la masa, formamos las bolas. Como es un sabor intenso, intentaremos no hacerlas muy grandes.

  • Rebozamos las bolas en pan rallado.

  • Preparamos tres recipientes: un con los huevos batidos, otro con el muesli y otro con pan rallado. Vamos pasando nuestras bolas por los tres recipientes y siguiendo ese orden (huevo-muesli-pan).

  • Preparamos una sarten con aceite y cuando esté bien caliente, vamos echando nuestras croquetas y las freímos hasta que estén doradas.

  • Al sacarlas las ponemos en un plato con papel de cocina para que absorba el exceso de aceite.


Consejos:

  • Se recomienda freírlas justo antes de comer para que el rebozado esté crujiente y el relleno cremoso. Si queréis podéis prepararlas con antelación y dejarlas en la nevera o incluso congelarlas para freírlas justo cuando las queráis degustar.

  • Si la bechamel se os resiste y finalmente quedan grumos, podéis eliminarlos con ayuda de la batidora antes de añadir el queso. No es el método apropiado pero qué se le va a hacer, a veces pasan estas cosas y una batidora a tiempo nos ahorrará muchos problemas :-)

Pics and Cakes

[English version] GORGONZOLA CROQUETTES WITH MUESLIIngredients:-*

  • 4 tbsp flour

  • 1/2 l milk

  • 100g gorgonzola cheese

  • 2 tbsp olive oil

  • 2 tbsp butter

  • Salt

  • Black pepper

  • 2 egg

  • Breadcrumbs

  • Fruitless muesli

  • Olive oil (for frying)

* *

  • *First step, prepare the bechamel sauce. Add butter and oil into a sauce pan. *

  • When butter is melted and hot, add the flour. Mix well and cook for a while to avoid the taste of uncooked flour.

  • Add the milk little by little. Keep stiring to avoid lumps. We need to have quite a thick bechamel given that it will be used to form croquettes.

  • Add cheese, salt and pepper. Keep stiring until completely disolved.

  • Pour the bechamel into a big plate and leave cool for at least 2 hours (at the end, in the fridge).

  • When the dough is cold and solid, create small balls.

  • Coat in breadcrumbs.

  • Prepare three different bowls: one with whisked eggs, other with muesli and other with breadcrumbs. Coat the balls in three of them in this order: eggs-muesli-breadcrumbs.

  • Prepare the fryingpan with the olive oil and when it is very hot, add the croquettes and deep fry them until golden brown.

  • Take them out and place them into a plate covered by kitchen paper (it will absorb the remaining oil).

* *

Consejos:

*- Fry the croquettes just before serving so the muesli will be crusty and the bechamel creamy.  You can prepare them in advance and leave in the fridge or even in the freezer. *- If you have some problems when preparing the bechamel and some lumps unfortunately appear, you can use a mixer. It’s not the proper way but it’s better than having disgusting lumps in our wonderful croquettes.


30 de diciembre de 2012 · 4 min · Palstelera

Gorgonzola and Muesli Croquettes

I made these croquettes for the first time as an appetizer for a New Year’s Eve dinner, and honestly, everyone loved them. Even the ones who wrinkled their noses a bit when they saw the muesli coating ended up enjoying the strong contrast between the crispy outside and the creamy filling. Whether for the holidays or any random day, we encourage you to give these a try because the recipe is absolutely worth it.

Pics and Cakes

What do we need?

  • 4 tablespoons of flour

  • Half a liter of milk (about 2 cups)

  • 100g (3.5 oz) of gorgonzola cheese

  • 2 tablespoons of olive oil

  • 2 tablespoons of butter

  • Salt

  • Black pepper

  • 2 eggs

  • Breadcrumbs

  • Muesli without fruit

  • Olive oil for frying

How do we make it?

  • First, we make the béchamel. To do this, put the oil and butter in a frying pan.

  • Once the butter has melted and the pan is good and hot, add the flour. Stir well and let it cook for a moment (so it doesn’t taste raw later).

  • Next, gradually pour in the milk little by little, stirring constantly and energetically to prevent lumps from forming. We want a fairly thick béchamel since it’s going to be used for croquettes and will also have a very creamy cheese mixed in.

  • Toss in the cheese cut into chunks and keep stirring until it’s fully melted, then season with salt and pepper.

  • Pour the béchamel into a wide dish so it spreads out nicely. It needs to cool for at least two hours, finishing in the fridge so it firms up properly.

  • Once the mixture is cold, shape it into balls. Since the flavor is intense, try not to make them too big.

  • Roll the balls in breadcrumbs.

  • Set up three bowls: one with the beaten eggs, another with the muesli, and another with breadcrumbs. Pass each ball through the three bowls in this order (egg-muesli-breadcrumbs).

  • Heat a frying pan with oil, and once it’s nice and hot, drop the croquettes in and fry them until golden brown.

  • Once they’re out, place them on a plate lined with paper towel to soak up the excess oil.

Tips:

  • It’s best to fry them right before serving so the coating stays crispy and the filling stays creamy. If you want, you can prep them ahead of time and leave them in the fridge, or even freeze them and fry them whenever you fancy a bite.

  • If the béchamel gets the better of you and lumps end up forming, you can blitz them out with a hand blender before adding the cheese. It’s not the proper method, but hey, sometimes these things happen, and a well-timed blender can save you a lot of trouble :-)

Pics and Cakes


30 de diciembre de 2012 · 3 min · Palstelera