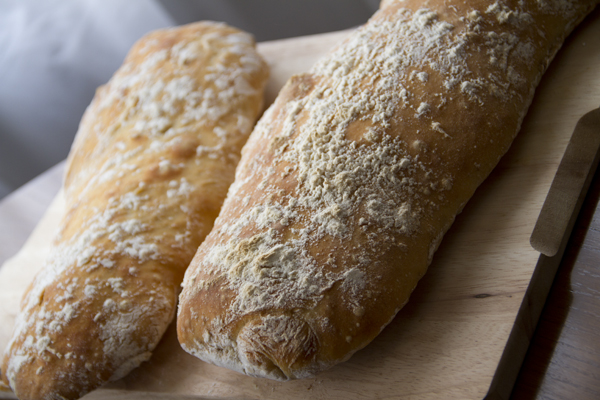
Ciabatta Bread

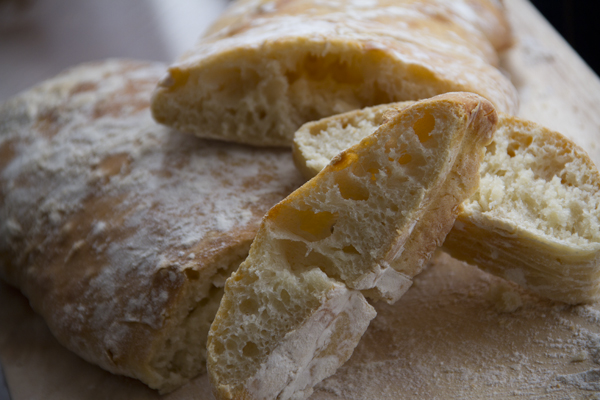
Whole Kitchen in their Savory Challenge for the month of November invites us to prepare an Italian classic: “Ciabatta”. I had been really wanting to make this recipe but I never thought it would turn out well, and… it turned out so well, yes indeed! It even looked like a real ciabatta. The recipe is slow because of the rising times, but it’s simple to make and the result is incredibly good.

Pics and Cakes

What do we need?

(For two loaves)

For the starter:

  • 2.5 g fresh yeast

  • 150 ml (2/3 cup) water

  • 3 tablespoons warm milk

  • 1/4 teaspoon honey or granulated sugar

  • 150 g (1.25 cups) bread flour

For the dough:

  • 2.5 g fresh yeast

  • 250 ml (1 cup) water

  • 1/2 tablespoon olive oil

  • 350 g (2.75 cups) bread flour

  • 1 and 1/2 teaspoons salt

Pics and Cakes

How do we make it?

  • First, we prepare the starter. Sprinkle the yeast into a large bowl with the water and milk. Let it sit for 5 minutes, then add the honey or sugar and stir to dissolve.

  • Add the flour and mix to form a loose dough. Cover the bowl with a kitchen towel and let it ferment for 12 hours or overnight.

  • Once the wait is over, we move on to the dough. Sprinkle the yeast into a small bowl with the water. Let it sit for 5 minutes; stir to dissolve. Add the yeast water and the olive oil to the starter and mix well.

  • Into the bowl, add the flour with the salt and mix to form a wet, sticky dough. Beat continuously with a wooden spoon for 5 minutes; the dough will turn fluffy and start to pull away from the sides, but it will still be too soft to knead.

  • Cover the dough with a kitchen towel. Let it ferment for about 3 hours, until the dough has tripled in size and is full of air bubbles. Generously flour two baking sheets and have extra flour ready to dust your hands.

  • Divide the dough in half while it’s still in the bowl. Tip half of the dough onto one of the sheets.

  • With your hands well coated in flour, shape it into a rectangular loaf about 30 cm (12 inches) long. Dust the loaf and your hands again with flour. Tidy and thicken it by running your fingers along the sides and gently tucking under the bottom of the dough. Repeat the same with the other half.

  • Uncovered, let the loaves rise for about 20 minutes; they will spread out and grow in volume.

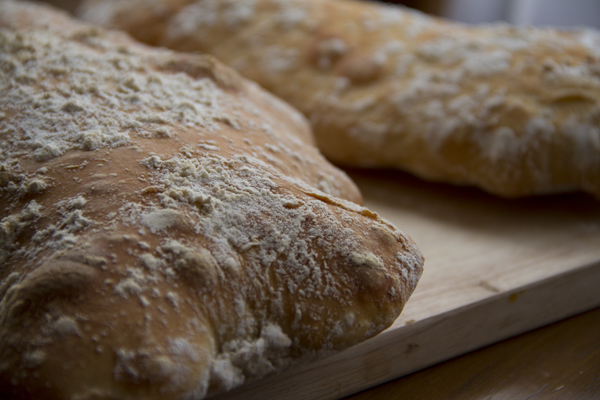
  • Put them in the oven, preheated to 220°C (430°F), and bake for 30 minutes until the loaves have risen, are golden brown, and sound hollow when tapped on the bottom. Let cool on a wire rack.

Tips:

  • It’s a very sticky dough that you barely have to work with your hands. That’s why, in the final steps, it’s important to keep your hands well covered in flour and not handle the dough too much, since otherwise half of it will end up stuck to you.

  • I use the pressed baker’s yeast you can find in cubes in the supermarket in the bakery/pastry section, always refrigerated. I buy a bunch and freeze them, so I always have some on hand whenever I need it. That said, it’s important to keep in mind that frozen yeast loses a bit of its “power”, so you’ll need to add a little more than what the recipe calls for.

  • When baking, I put both sheets in at the same time and after 20 minutes I swapped them so that both loaves cooked evenly on both sides.

Pics and Cakes


Comments

Marisa (2012-11-22 12:51:05):

She brought a piece home for me and it’s awesome, delicious, amazing… mmm, I want more!

tía pi (2012-11-22 18:13:13):

It’s a pleasure how well you explain everything and the tips you give. I promise to make it and tell you how it turns out.

Angeles (2012-11-22 22:35:32):

It looks fantastic, just like an authentic Italian ciabatta.

marmota zampona (2012-11-24 19:27:46):

I’m going to give it a try right now.

22 de noviembre de 2012 · 4 min · Palstelera

Pan de chapata

**Whole kitchen en su Propuesta Salada para el mes de noviembre nos invita a preparar un clásico italiano “Ciabatta”. **Tenía muchas ganas de hacer esta receta pero ni de lejos pensé que me iba a quedar bien y… qué bien quedó, ¡sí, señor! Si hasta parecía una chapata de verdad. La receta es lenta por los tiempos de levado pero su elaboración es sencilla y el resultado es increíblemente bueno.

Pics and Cakes

¿Qué necesitamos?

(Para dos panes)

Para la masa madre:

  • 2,5 g de levadura fresca

  • 150 ml de agua

  • 3 cucharadas de leche tibia

  • 1/4 cucharadita de miel o azúcar granulada

  • 150 gr de harina de fuerza

Para la masa:

  • 2,5 g de levadura fresca

  • 250 ml de agua

  • 1/2 cucharada de aceite de oliva

  • 350 g de harina de fuerza

  • 1 y 1/2 cucharadita de sal

Pics and Cakes

¿Cómo lo hacemos?

  • Primero preparamos la masa madre. Esparcimos la levadura en un recipiente grande con agua y leche. Dejamos durante 5 minutos, después añadimos la miel o el azúcar y revolvemos para que se disuelva.

  • Añadimos la harina y mezclamos para formar una masa floja. Tapamos el cuenco con un paño de cocina y dejamos fermentar durante 12 horas o toda la noche.

  • Pasado el tiempo de espera, procedemos a hacer la masa. Esparcimos la levadura en un cuenco pequeño con agua. Dejamos durante 5 minutos; revolvemos para que se disuelva. Añadimos el agua con levadura y el aceite de oliva a la masa madre y mezclamos bien.

  • En el recipiente echamos y mezclamos la harina con la sal para formar una masa húmeda y pegajosa. Batimos sin parar con una cuchara de madera durante 5 minutos; la masa quedará esponjosa y empezará a despegarse, pero seguirá demasiado blanda para amasar.

  • Tapamos la masa con un paño de cocina. Dejamos fermentar durante unas 3 horas, hasta que la masa triplique su tamaño y se llene de burbujas de aire. Enharinamos generosamente dos bandejas de horno y preparamos harina adicional para echárnosla en las manos.

  • Dividimos la masa por la mitad mientras está en el cuenco. Volcamos la mitad de la masa sobre una de las bandejas.

  • Con las manos bien recubiertas de harina, formamos un pan rectangular, de aproximadamente 30 cm. de largo. Espolvoreamos el pan y las manos nuevamente con harina. Acomodamos y engrosamos recorriendo los costados con los dedos y llevando suavemente hacia adentro de la masa por debajo. Repetimos lo mismo con la otra mitad de la masa.

  • Sin tapar, dejamos fermentar los panes unos 20 min; se desparramarán y aumentarán de volumen.

  • Metemos en el horno previamente calentado a 220ºC y dejamos 30 minutos hasta que los panes se hinchen, adquieran un color dorado y suenen a hueco cuando los golpeemos en la base. Dejamos enfriar sobre una rejilla metálica.

Consejos:

  • Es una masa muy pegajosa que apenas hay que trabajar con las manos. Por eso, en los últimos pasos es importante tener las manos bien cubiertas de harina y no manosear mucho la masa ya que sólo conseguiríamos que se nos quedase la mitad de ella pegada a nosotros.

  • Yo utilizo la levadura de panadería prensada que podemos encontrar en cubitos en el supermercado en la parte de panadería/pastelería pero siempre refrigerada. Compro muchos y los congelo, así cada vez que lo necesito lo tengo a mano. Eso sí, es importante tener en cuenta que la levadura congelada pierde un poco de su “poder” así que habrá que echar un poquito más de cantidad de la que nos indica la receta.

  • A la hora de hornear, yo metí las dos bandejas a la vez y pasados 20 minutos las intercambié para que se hicieran bien los dos panes por las dos caras.

 Pics and Cakes

[English version] CIABATTA BREAD* *Ingredients:

(for two loaves)

For the sourdough (starter):

  • 2,5 g fresh yeast

  • 150 ml water

  • 3 tbsp warm milk

  • 1/4 tsp honey or sugar

  • 150 gr strong flour

  • For the dough:*
  • 2,5 g fresh yeast

  • 250 ml water

  • 1/2 tbsp olive oil

  • 350 g strong flour

  • 1 y 1/2 tsp salt

* *

  • *First, start by preparing the sourdough. Put the yeast into a large bowl with water and milk. Let the dough stand for 5 minutes and then add sugar/honey and stir well. *

  • Add the flour until having a loose dough. Cover with a clean cloth and let ferment for 12 hour or the whole night.

  • *After fermentation time, make the dough. Put yeast into a bowl with water. Let it stand for 5 minutes; stir well. Add this water with yeast and the olive oil to the sourdough. Stir well. *

  • *Add flour and salt and stir well using a wooden spoon. The result will be a wet and sticky dough. Keep beating for 5 minutes until getting a fluffy dough a bit less sticky (but still too much to knead). *

  • Cover with a kitchen cloth and let stand for 3 hours (the size will triple and some bubbles will appear inside). Scatter flour into two baking pans and in your hands.

  • Split the dough into two halves. Put one of the part into one baking pan.

  • *With hands covered by flour, shape the ciabatta bread (30 cm long) creating a rectangle. Repeat the same steps with the other half of dough. *

  • *Let it stand uncovered for 20 minutes. They will become bigger and lose its perfect shape. *

  • *Put into oven (preheated to 220ºC) and bake for 30 minutes until they are golden brown and bigger. Tap the bottom of the bread with your fingers and the bread will sound hollow when it’s done. Leave cool on a rack. *

* *

Tips:

*- It’s a very sticky dough very difficult to knead. It’s needed to have hands covered by flour and not kneading the dough too much. *

-  I usually use fresh yeast in cubes (sold in supermarkets). I buy several cubes and freeze them to use them whenever I want. However, you should take into account that frozen yeast will lose part of its “power” so you will need to use an amount slightly bigger than the amount indicated in the recipe.

*- For baking, I put both baking pans at the same time. After first 20 minutes I swaped their positions to have both loaves well done. *


22 de noviembre de 2012 · 6 min · Palstelera

Bocadillitos de roastbeef y rúcula

Hace no mucho os explicábamos cómo hacer unos ricos panes de leche. Ésta es la base para preparar unos riquísimos bocadillitos de roastbeef, rúcula y miel mostaza. Aunque suene complicado, de eso no tiene nada. El* roastbeef*, procedente de la cocina inglesa, ya se ha integrado tanto en nuestro país que hasta**** el vocablo ha sido adaptado al idioma español y nuestra RAE admite sin reparos la palabra ‘rosbif’.

Pics and Cakes

¿Qué necesitamos?

Para preparar 16 panecillos mirad aquí.

Para el relleno:

  • 800 gr de lomo de ternera

  • Romero seco

  • Orégano

  • Sal y pimienta

  • 1 cucharadita de salsa Perrins

  • 2 cucharadas de aceite de oliva

  • 1 bolsa de rúcula

  • Salsa miel mostaza


¿Cómo lo hacemos?

  • Precalentamos el horno a 200º C.

  • Mezclamos en un bol el romero, el orégano, la pimienta y la sal, con un par de cucharadas de aceite de oliva y la salsa Perrins.

  • Pintamos la carne con la mezcla y marcamos la pieza en la sartén para que el exterior se dore.

  • Ponemos el lomo en una bandeja de horno y colocamos otra debajo con agua.

  • Horneamos durante unos 30 minutos.

  • Transcurrido el tiempo envolvemos la pieza en papel de aluminio y dejamos que se enfríe.

  • Mientras lavamos la rúcula y reservamos.

  • Cuando la pieza esté fría cortamos en finas lonchas.

  • Montamos el bocadillito abriendo el pan a la mitad y colocamos el roastbeef, la rúcula y la salsa de mostaza miel.


Pics and Cakes

Consejos:

  • Siguiendo la receta de panes de leche podéis cambiar de forma final. Nosotros optamos por hacer estos panecillos redondos en lugar de darles pequeños cortes a la masa para que tuviesen el característico aspecto de pan de leche.

  • Nosotros compramos lomo de ternera pero para preparar un roast (rostir o asar) beef (ternera) vale cualquier otra pieza siempre que sea lo suficientemente grande como para que se quede dorada por fuera y poco hecha por dentro.


Pics and Cakes

[English version] SANDWICHES OF ROASTBEEF, ROCKET SALAD AND HONEY-MUSTARD* *For the milk bread buns follow this previous recipe. Ingredients:

  • 800 g veal loin

  • Rosemary

  • Oregano

  • Salt and pepper

  • 1 tsp Perrins sauce

  • 2 tbsp olive oil

  • 1 bag of rocket salad

  • Honey-mustard sauce

* *

  • Preheat oven at 200º C.

  • *In a bowl mix the rosemary, oregano, salt, pepper, olive oil and Perrins sauce. *

  • Brush the meat with this mixture and place it on a very hot pan and sear it.

  • Place the prepared meat into a baking tray and place another tray (or any other container) full of water.

  • Roast for 30 minutes.

  • Take it out from the oven and wrap the whole piece into aluminium foil. Let it cool.

  • Wash rocket salad and set aside.

  • When the roastbeef is cold, cut into thin slices.

  • Prepare the sandwich: open the bread, place roastbeef, rocket salad and honey-mustard sauce.

 *  Tips:- You can choose the size and shape of your bread buns when making them.-  We have used veal loin but you can use any big piece of meat that you can roast and the result is golden brown in the outside and tender in the inside. *


30 de octubre de 2012 · 3 min · Cesmm

Mini Roast Beef and Arugula Sandwiches

Not too long ago we showed you how to make some delicious milk bread buns. They’re the perfect base for these tasty little roast beef sandwiches with arugula and honey mustard. It might sound fancy, but it really isn’t. Roast beef, originally from English cuisine, has become so common in Spain that even the word has been adapted into Spanish — our Royal Academy now accepts “rosbif” without any objections.

Pics and Cakes

What do we need?

To make 16 little buns, check here.

For the filling:

  • 800 g (1.75 lb) veal loin

  • Dried rosemary

  • Oregano

  • Salt and pepper

  • 1 teaspoon Worcestershire sauce

  • 2 tablespoons olive oil

  • 1 bag of arugula

  • Honey mustard sauce

How do we make it?

  • Preheat the oven to 200°C (390°F).

  • In a bowl, mix the rosemary, oregano, pepper, and salt with a couple of tablespoons of olive oil and the Worcestershire sauce.

  • Brush the meat with the mixture and sear it in a hot pan so the outside browns.

  • Place the loin on a baking tray and put another tray underneath filled with water.

  • Bake for about 30 minutes.

  • Once the time is up, wrap the meat in aluminum foil and let it cool.

  • Meanwhile, wash the arugula and set aside.

  • When the meat is cold, cut it into thin slices.

  • Assemble the little sandwich by slicing the bun in half and adding the roast beef, arugula, and honey mustard sauce.

Pics and Cakes

Tips:

  • Following the milk bread recipe, you can change the final shape. We went for round buns instead of making small cuts in the dough to give them the classic milk bread look.

  • We bought veal loin, but to make a roast (to roast) beef, any other cut works as long as it’s big enough to brown on the outside while staying rare on the inside.

Pics and Cakes

[English version] SANDWICHES OF ROASTBEEF, ROCKET SALAD AND HONEY-MUSTARD* *For the milk bread buns follow this previous recipe. Ingredients:

  • 800 g veal loin

  • Rosemary

  • Oregano

  • Salt and pepper

  • 1 tsp Perrins sauce

  • 2 tbsp olive oil

  • 1 bag of rocket salad

  • Honey-mustard sauce

  • Preheat oven at 200º C.

  • *In a bowl mix the rosemary, oregano, salt, pepper, olive oil and Perrins sauce. *

  • Brush the meat with this mixture and place it on a very hot pan and sear it.

  • Place the prepared meat into a baking tray and place another tray (or any other container) full of water.

  • Roast for 30 minutes.

  • Take it out from the oven and wrap the whole piece into aluminium foil. Let it cool.

  • Wash rocket salad and set aside.

  • When the roastbeef is cold, cut into thin slices.

  • Prepare the sandwich: open the bread, place roastbeef, rocket salad and honey-mustard sauce.

  • Tips:- You can choose the size and shape of your bread buns when making them.- We have used veal loin but you can use any big piece of meat that you can roast and the result is golden brown in the outside and tender in the inside. *

30 de octubre de 2012 · 3 min · Cesmm

Milk Bread Buns

We were putting together a surprise afternoon snack where we wanted everything to be absolutely homemade, so we couldn’t even allow ourselves to buy the bread. One of the things we wanted to make was little savory sandwiches and, once again, we turned to the La Receta de la Felicidad blog to follow their steps and make some great milk bread buns. Honestly, we thought it would be pretty complicated, but how wrong we were…

Pics and Cakes

What do we need?

(16 buns)

  •   500 g (about 4 cups) bread flour
    
  •   25 g (about 1 oz) fresh yeast (or two sachets of dry baker's yeast)
    
  •   250 ml (1 cup) milk
    
  •   70 g (about 5 tbsp) butter, softened (i.e. nice and soft)
    
  •   40 g (about 3 tbsp) sugar
    
  •   1 egg
    
  •   2 tablespoons of honey
    
  •   A pinch of salt
    

How do we do it?

  • Mix the flour and yeast in a large bowl and add the egg and milk.

  • Add the sugar, honey and salt, and mix well using a spoon or fork.

  • Add the butter, and knead for 10-15 minutes, until you get a soft, pliable, slightly shiny dough.

  • Form the dough into a ball by turning it and folding it inwards, and let it rest in a lightly floured bowl, covered with a cloth, for about two hours so it doubles in volume.

  • Take the dough out of the bowl and lightly press it down with your fingers to ‘deflate’ it.

  • Cut the dough into 16 portions, and shape them into buns.

  • To do this, we have two methods. The first one is to take each piece of dough and roll it on itself, as if the bun were swallowing itself up. (Since my explanation leaves a lot to be desired, you can watch it in this video). The second method is to roll out each piece of dough into a rectangular shape. On one of the ends, make three or four cuts with a sharp knife to create some fringes. Finally, roll up the dough starting from the side opposite the fringes, so that when you finish, the fringes end up on the outside and give that distinctive look of milk buns.

  • Brush the buns with a little milk, let them rest on a baking tray lined with parchment paper for about 20 minutes, and meanwhile preheat the oven to 180°C (355°F).

  • Bake the buns for 10-12 minutes, and let them cool to room temperature on a wire rack.

Tips:

  • If you let the dough rest longer, nothing happens except that it might grow out of control (like what happened to us, when we discovered a mutant dough trying to escape from the bowl).
  • To shape the buns, we used the two methods we found at La Receta de la Felicidad, since we made two batches of dough and one of them (despite following the same steps) came out stickier, so the first method was easier for us.
  • The flavor in my opinion isn’t exactly the same as store-bought milk buns, but they are delicious, very fluffy, and you can fill them with both sweet and savory fillings.

Pics and Cakes

*[English version] MILK BREAD BUNS ** *Ingredients:

- 500 g strong bread flour - 25 g fresh yeast (or two sachets dry yeast) - 250 ml milk - 70 g butter, room temperature - 40 g sugar - 1 egg - 2 tbs honey - A pinch of salt

  • Combine flour and yeast in a bowl. Add the egg, honey, milk, sugar and salt and mix well.

  • Add butter and use a large spoon or fork to mix everything together.

  • Take the dough out of the bowl and knead. You will feel the dough become elastic after kneading for about 5 minutes. Knead the dough for 5-10 minutes more or until the dough is soft, pliable, smooth and slightly shiny-

  • Put the dough into a lightly floured bowl and cover with a cloth. Let the dough rise in a warm place until its size doubles (aprox. two hours)

  • Take the dough out of the bowl, deflate it by touching lightly.

  • Cut the dough into 16 pieces, and roll each of them into an oval shape. Or alternatively, roll out each piece of dough forming a rectangle 1 cm thick. Cut 1/3 the length of the rectangle into 4/5 strips of equal width and roll up the dough similar to a Swiss roll.

  • Preheat oven to 180ºC and let the milk buns rest for 20 minutes.

  • Glaze the buns with some milk, and bake them for 10-12 minutes. Let them cool on a wire rack

  • Tips:**- Nothing wrong if you leave the dough more time covered with a cloth, it will just rise even more! * - We made the bun shape following the two different methods. For sticky doughs is easier the first method (just forming the oval shape). *- You won’t achieve exactly the same flavor than the milk buns of the supermarket but it is absolutely delicious, spongy and can be filled with sweet or savory ingredients. *


Comments

marmota zampona (2012-09-12 08:16:25):

we’ll make them. thanks

8 de septiembre de 2012 · 4 min · Palstelera

Panes de leche

Estábamos preparando una merienda sorpresa en la que queríamos que todo fuese absolutamente casero, así que no podíamos permitirnos comprar ni siquiera el pan. Una de las cosas que queríamos hacer eran pequeños bocadillitos salados y, una vez más, recurrimos al blog de La Receta de la Felicidad para seguir sus pasos y hacer unos estupendos panes de leche. Lo cierto es que pensábamos que sería bastante complicado pero qué equivocados estábamos…

Pics and Cakes

¿Qué necesitamos?

(16 panecillos)

  •       500 g de harina de fuerza
  •       25 g de levadura fresca (o dos sobres de levadura seca de panadería)
  •       250 ml de leche
  •       70 g de mantequilla, en pomada (o sea, blandita)
  •       40 g de azúcar
  •       1 huevo
  •       2 cucharadas de miel
  •       1 pizca de sal

¿Cómo lo hacemos?

  • Mezclamos la harina con la levadura en un bol grande y añadimos el huevo y la leche.

  • Agregamos azúcar, miel y sal, mezclamos bien con la ayuda de una cuchara o tenedor.

  • Agregamos la mantequilla, y amasamos 10-15 minutos, hasta que obtengamos una masa suave, plegable, y ligeramente brillante

  • Formamos una bola con la masa, girándola y doblándola hacia el interior, y la dejamos reposar en un bol ligeramente enharinado, tapada con un paño, durante unas dos horas para que duplique su volumen.

  • Sacamos la masa del bol, y la aplastamos un poco con los dedos para ‘desinflarla’.

  • Cortamos la masa en 16 porciones, y les damos forma de panecillo.

  • Para ello, tenemos dos métodos. El primero consiste en coger cada porción de masa e ir enrollando la masa sobre sí misma como si el propio bollo se auto-engullese. (Como mi explicación deja mucho que desear podéis verlo en este vídeo). El segundo método consistiría en estirar cada porción de masa hasta tener una forma rectangular. En uno de los extremos, hacemos tres o cuatro cortes con un cuchillo afilado para crear unos flecos. Por último enrollamos la masa empezando por el lado contrario a los flecos para que al acabar sean éstos los que queden hacia afuera y den ese aspecto tan característico de los panes de leche.

  • Pincelamos los panecillos con un poco de leche, los dejamos reposar sobre una bandeja de horno forrada de papel de hornear unos 20 min, y mientras precalentamos el horno a 180 ºC.

  • Horneamos los panecillos entre 10-12 minutos, y dejamos enfriar a temperatura ambiente sobre una rejilla.

Consejos:

  • Si dejáis reposar más tiempo la masa, no pasa nada excepto que puede crecer desmesuradamente (como nos pasó a nosotros que descubrimos una masa mutante tratando de escaparse del cuenco).
  • Para formar los panecillos, seguimos los dos métodos que encontramos en La Receta de la Felicidad, ya que hicimos dos medidas de masa y una de ellas (pese a seguir los mismos pasos) nos quedó más pegajosa así que nos resultó más fácil el primer método.
  • El sabor conseguido en mi opinión no es exactamente igual que el de los panes de leche comprados pero es están deliciosos, son muy esponjosos y los podéis rellenar tanto de dulce como de salado.

Pics and Cakes

*[English version] MILK BREAD BUNS ** *Ingredients:

- 500 g strong bread flour - 25 g fresh yeast (or two sachets dry yeast) - 250 ml milk - 70 g butter, room temperature - 40 g sugar - 1 egg - 2 tbs honey - A pinch of salt

* *

  • Combine flour and yeast in a bowl. Add the egg, honey, milk, sugar and salt and mix well.

  • Add butter and use a large spoon or fork to mix everything together.

  • Take the dough out of the bowl and knead. You will feel the dough become elastic after kneading for about 5 minutes. Knead the dough for 5-10 minutes more or until the dough is soft, pliable, smooth and slightly shiny-

  • Put the dough into a lightly floured bowl and cover with a cloth. Let the dough rise in a warm place until its size doubles (aprox. two hours)

  • Take the dough out of the bowl, deflate it by touching lightly.

  • Cut the dough into 16 pieces, and roll each of them into an oval shape. Or alternatively, roll out each piece of dough forming a rectangle 1 cm thick. Cut 1/3 the length of the rectangle into 4/5 strips of equal width and roll up the dough similar to a Swiss roll.

  • Preheat oven to 180ºC and let the milk buns rest for 20 minutes.

  • Glaze the buns with some milk, and bake them for 10-12 minutes. Let them cool on a wire rack

* *

*  Tips:**- Nothing wrong if you leave the dough more time covered with a cloth, it will just rise even more! * - We made the bun shape following the two different methods. For sticky doughs is easier the first method (just forming the oval shape). *- You won’t achieve exactly the same flavor than the milk buns of the supermarket but it is absolutely delicious, spongy and can be filled with sweet or savory ingredients. *


8 de septiembre de 2012 · 4 min · Palstelera