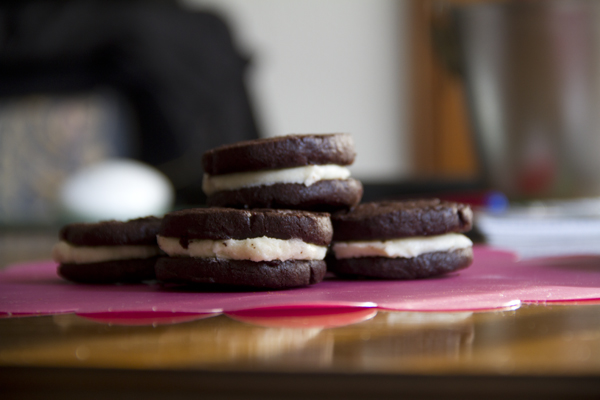
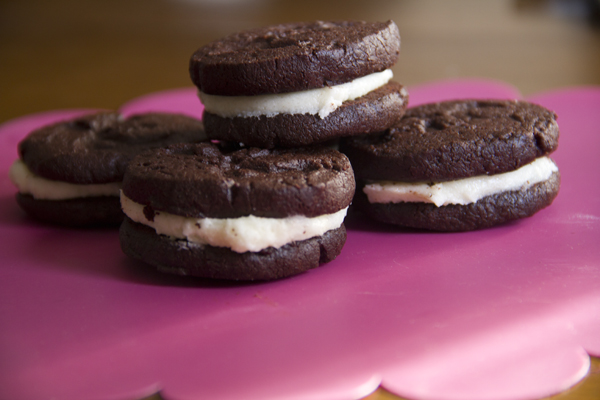
Galletas Oreo
Tal vez el aspecto no es el de una Oreo comercial pero el sabor es, sencillamente, increíble. En este caso, casi me atrevería a decir que es incluso mejor que el de las originales. Puede parecer un poco laborioso pero os aseguro que ni la masa ni la crema son complicadas de hacer, así que os aconsejo que os pongáis ya mismo a hacerlas.
¿Qué necesitamos?
Para las galletas:
230 g mantequilla
150 g azúcar
1 cucharada de esencia de vainilla
200 g de cobertura de chocolate
1 huevo
210 g harina
90 g cacao en polvo
1 cucharadita de sal
1/2 cucharada de levadura
Para la crema:
110 g mantequilla
200 g azúcar glas
1 cucharadita de esencia de vainilla
1 cucharada de leche
1 pizca de sal
¿Cómo lo hacemos?
Batimos la mantequilla con el azúcar hasta obtener una crema.
Añadimos el chocolate fundido y la esencia de vainilla. Añadimos el huevo y removemos bien.
En un cuenco aparte mezclamos el cacao con la harina, la levadura y la sal.
Echamos la mezcla de harina sobre la mezcla anterior de chocolate y unimos bien. Si es necesario, con las manos.
Hacemos un cilindro con la masa y lo envolvemos en film transparente.
Lo dejamos reposar en la nevera un par de horas.
Lo sacamos, le quitamos el film y cortamos en lonchas de medio centímetro aproximadamente.
Horneamos sobe una bandeja con papel de horno durante 12 minutos a 180ºC.
Dejamos enfriar y reservamos.
Para la crema batimos la mantequilla con el azúcar.
Luego le añadimos la leche, la vainilla y la pizca de sal.
Batimos bien hasta tener una crema homogénea.
Montamos nuestras galletas Oreo utilizando dos galletas y un poquito de crema en el centro para unirlas. Cogemos una galleta, ponemos un poco de relleno y con la otra aplastamos para que se extienda bien.
Consejos:
Para el chocolate también podéis utilizar una mezcla de chocolate de cobertura y chocolate negro del 70% de cacao. Esto es en función de gustos porque hay gente a la que no le gusta un sabor tan amargo.
Si cortáis las galletas de esta manera os quedarán un poco “rústicas”, es decir algo desiguales y más artesanales. Si preferis podéis estirar la masa con rodillo (poniéndola entre dos plásticos o dos papeles de horno), dejarla enfriar así en la nevera y luego cortarla con los cortantes de galletas como cuando hacemos galletas de mantequilla. Quedarán más uniformes y “perfectas”.
Al hornear estas galletas tenéis que tener cuidado para que no se os quemen ya que al ser casi negras, el color no os ayudará a saber cuándo están cocidas. Así que no queda otra que estar bien pendientes.
La receta la saqué de estos dos increíbles blogs: El Monstruo de las Galletas y Seasaltwithfood. 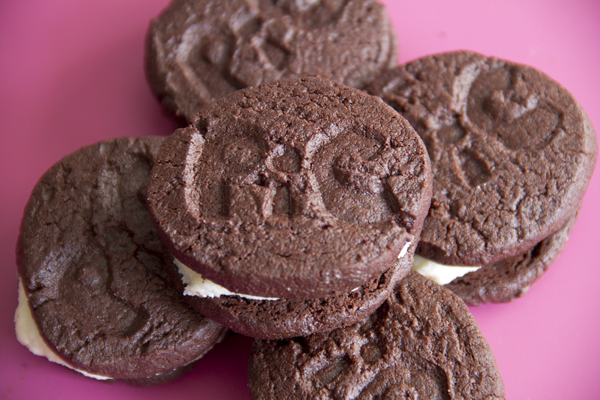 [English version] HOMEMADE OREO COOKIES* *Ingredients: For the cookies:
230 g butter,
150g granulated Sugar
1 tsp Pure Vanilla Extract
*200g semisweet Chocolate *
1 egg
210g Unbleached All-Purpose Flour
90g Dutch-Processed Cocoa Powder
1 tsp salt
1/2 tsp Baking Soda
For the cream filling:
110 g unsalted butter, at room temperature
200 g Confectioners’ Sugar
1 tsp Pure Vanilla Extract
1 Tbsp Milk
Pinch Salt
* In a medium bowl, whisk together the butter and granulated sugar until well combined. Whisk in the vanilla and chocolate. Add the egg and whisk until thoroughly incorporated.*
In another medium bowl, stir together the flour, cocoa powder, salt, and baking soda until well mixed. Using a wooden spoon or a fork, stir the flour mixture into the chocolate mixture. You may find it easier to switch to mixing it with your hands until the dough comes together.
*Transfer the dough to a 15-inch square sheet of parchment or waxed paper. Using your hands, shape the dough into a log about 10 inches long and 2 to 2 1/2 inches in diameter. Place the log at the edge of the paper and roll the paper around the log. With the log fully encased in paper, roll it into a smoother log no more than 2 1/2 inches in diameter. Refrigerate for at least 2 hours or until firm. *
Position a rack in the center of the oven and preheat the oven to 180°C. Butter a baking sheet or line it with parchment paper.
*Slice the dough log into 1/4-inch-thick slices. Place the slices about 1 inch apart on the prepared baking sheet.Bake for 12 minutes, or until the cookies are firm to the touch. *
* Using a stand mixer fitted with the paddle attachment or a handheld mixer or even a wooden spoon, beat the butter on low speed for about 30 seconds, or until completely smooth and soft.*
*Add the confectioners’ sugar and vanilla and beat until the mixture is perfectly smooth. Add the milk and salt and beat until smooth. *
To assemble the sandwich cookies: Scoop about 1 rounded tablespoon of the filling onto the flat side of 1 cookie. Top with a second cookie, flat side down, then press the cookies together to spread the filling toward the edges. Repeat with the remaining cookies.
Tips: - You can use a mixture of different chocolates. I like using dark chocolate for desserts and bitter chocolate (70% cocoa). - You can use another method to shape your cookies. You can roll out the dough with the rolling pin. Place the dough between two plastic sheets or oven paper, roll it out and place in the fridge. Then use the cookie cutter to cut the shapes of your cookies. - When baking, be careful, because you can’t judge by colour given that the dough is almost black. So you’ll have to pay attention and avoid them to get burnt.