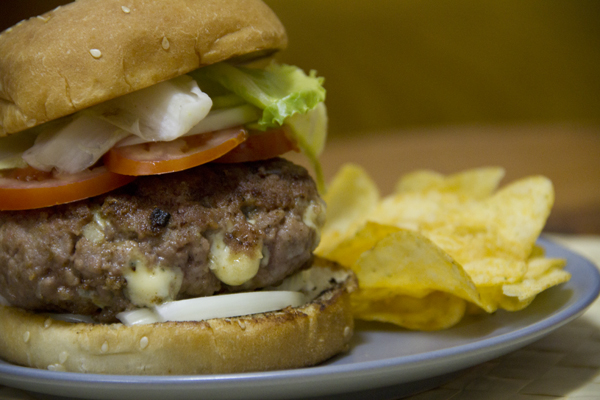
Blue Cheese Burger

Good and freezing morning. Today we’re bringing you a really simple recipe, the kind that even Jesús will be able to pull off without having to call twenty times :p The thing is, I’m a huge fan of making burgers at home. They’re usually way better than the ones you eat out, plus you make them to your own taste and load them with the ingredients you like best. This time we made the burger with blue cheese mixed right into the patty.

Pics and Cakes

What do we need?

(For each big-eater burger)

  • 200 g (7 oz) ground beef

  • 25-30 g (1 oz) blue cheese

  • 1 egg

  • Pepper

  • Salt

  • Breadcrumbs

  • Tomato

  • Lettuce

  • Onion

  • Burger bun

How do we make it?

  • Take the ground beef and dump it into a large bowl, since you’re going to be getting your hands in there.

  • Add the egg, a bit of freshly ground pepper, salt to taste, and a little breadcrumbs to give the meat some consistency.

  • Mix everything together with your hands.

  • Once all the ingredients are well combined, add the blue cheese cut into cubes. Try to work it into the meat but without pressing too hard so the cheese doesn’t break apart.

  • Wrap in cling film and shape into a burger.

  • Let the burger rest in the fridge for a couple of hours.

  • When you’re ready to eat, put a frying pan with a splash of oil over the heat and, while it’s warming up, start chopping the rest of the ingredients.

  • Cut the onion into rings, the lettuce into fairly large leaves (that way it’s easier to eat), and the tomato into slices.

  • Once the oil is hot, lower the heat a bit so the burger doesn’t burn on the outside while staying raw inside. Cook it to your liking (I like mine rare).

  • When it’s done, set it aside, wipe the pan clean with kitchen paper, and toast the bun for about half a minute.

  • Build your burger and enjoy.

Tips:

  • If you’re not going to use all the ground beef you bought, you can keep the formed patties in the freezer.

  • For me, as I said, I really enjoy a good burger, so 150 to 200 grams (5-7 oz) of ground beef is the “standard” size. Yes, that’s on the generous side, but hey, it’s a burger. Obviously you can make it with less.

  • If you want, you can dust the patty in flour before cooking it.

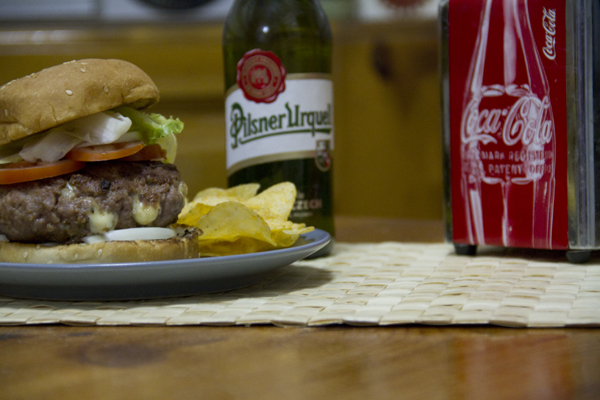
  • As my dad says when we play tute, “side dish requested.” A good beer or a cold Coke with fries (homemade or store-bought) is a must.

Pics and Cakes

[English version] **Ingredients:

(For each big hamburger)

  • 200 g de minced meat

  • 25-30 g de blue cheese

  • 1 egg

  • Pepper

  • Salt

  • Bread crumbs

  • Tomato

  • Salad

  • Onion

  • Hamburger bun

  • Place minced meat into a large bowl and mix well with your hands.

  • Add the egg, a bit of salt and pepper and some bread crumbs.

  • Mix well all ingredients.

  • Then chop blue cheese into small squares and add to the meat mix. Try to ‘knead’ the mix integrating the cheese but keeping it into pieces.

  • Make a ball, wrap in cling film and and flatten it with your hand to have hamburger shape.

  • Leave for a couple of hours in fridge.

  • Then, pour a bit of olive oil in the frying pan. Let it get warm and start preparing your fresh ingredients (onion, tomato and salad).

  • Cut onion into rings, tomato into slices and salad (lettuce) into big parts (it will be easier to eat).

  • Cook the hamburger according to your preferences (well done, medium or rare).

  • When it’s ready take it out from the pan, clean the frying pan with kitchen paper and toat the bread bun.

  • Prepare you hamburger sandwich with all the ingredients and enjoy it.

Tips:

  • You can freeze the prepared raw hamburgers and you will only need to defrost and cook in the pan whenever you need it.

  • This amount of minced meat is for a big hamburger but it’s up to you the size of your hamburger.

  • You can coat in flour the raw hamburger before cooking it.

  • It’s a must to serve the hamburger with a cold beer and chips or fries.


11 de diciembre de 2012 · 4 min · Cesmm

Hamburguesa con queso azul

Buenos y gélidos días. Hoy os presentamos una receta bien sencilla, de esas que hasta Jesús será capaz de hacer sin necesidad de llamar veinte veces :p El caso es que yo soy muy fan de hacer las hamburguesas en casa. Normalmente están mucho mejor que las que comes por ahí y encima las haces a tu gusto y le pones los ingredientes que más te gustan. En esta ocasión nosotros hicimos la hamburguesa integrando queso azul en ella.

Pics and Cakes

**¿Qué necesitamos? **

(Para cada hamburguesa de buen comedor)

  • 200 g de carne picada

  • 25-30 g de queso azul

  • 1 huevo

  • Pimienta

  • Sal

  • Pan rallado

  • Tomate

  • Lechuga

  • Cebolla

  • Pan de hamburguesa

¿Cómo lo hacemos?

  • Cogemos la carne picada la pasamos a un bol grande, ya que hay que manosear.

  • Añadimos el huevo, un poco de pimienta recién molida, sal al gusto y un poco de pan rallado para dar consistencia a la carne.

  • Mezclamos todo con las manos.

  • Cuando esté bien mezclado todos los ingredientes añadimos el queso azul cortado en cuadrados. Intentaremos integrarlo en la carne pero sin hacer mucha fuerza para que el queso no se rompa.

  • Envolvemos en film transparente y damos forma de hamburguesa.

  • Dejamos que la hamburguesa repose en la nevera un par de horas.

  • Cuando la vayamos a comer, ponemos una sartén con un chorrito de aceite en el fuego y mientras coge temperatura vamos cortando el resto de ingredientes.

  • Partimos la cebolla en aros, la lechuga en hojas más o menos grandes (así será más fácil de comer) y el tomate en rodajas.

  • Cuando el aceite esté caliente bajamos un poco la temperatura  para que no se nos queme mucho por fuera y se quede muy cruda por dentro. La hacemos a nuestro gusto (a mí me gusta poco hecha).

  • Cuando esté lista reservamos y limpiamos la sartén con papel de cocina y ponemos el pan medio minuto para tostarlo un poco.

  • Montamos la hamburguesa y a disfrutar.

Consejos:

  • Si no vais a consumir toda la carne picada que habéis comprado podéis conservar la hamburguesa ya hecha en el congelador.

  • Para mí, que como he dicho antes disfruto de las hamburguesas, de 150 a 200 gramos de carne picada es la medida “estándar” . Sí, es bastante tirando a mucho pero es que es una hamburguesa. Evidentemente podéis hacerla con menos cantidad.

  • Si queréis podéis pasar la hamburguesa por harina antes de hacerla en la sartén.

  • Como dice mi padre cuando jugamos al tute “se ruega acompañamiento”. Una buena cerveza o una coca-cola fría con patatas (hechas o compradas) son imprescindibles.

Pics and Cakes

[English version] **Ingredients:

(For each big hamburger)

  • 200 g de minced meat

  • 25-30 g de blue cheese

  • 1 egg

  • Pepper

  • Salt

  • Bread crumbs

  • Tomato

  • Salad

  • Onion

  • Hamburger bun

  • Place minced meat into a large bowl and mix well with your hands.

  • Add the egg, a bit of salt and pepper and some bread crumbs.

  • Mix well all ingredients.

  • Then chop blue cheese into small squares and add to the meat mix. Try to ‘knead’ the mix integrating the cheese but keeping it into pieces.

  • Make a ball, wrap in cling film and and flatten it with your hand to have hamburger shape.

  • Leave for a couple of hours in fridge.

  • Then, pour a bit of olive oil in the frying pan. Let it get warm and start preparing your fresh ingredients (onion, tomato and salad).

  • Cut onion into rings, tomato into slices and salad (lettuce) into big parts (it will be easier to eat).

  • Cook the hamburger according to your preferences (well done, medium or rare).

  • When it’s ready take it out from the pan, clean the frying pan with kitchen paper and toat the bread bun.

  • Prepare you hamburger sandwich with all the ingredients and enjoy it.

Tips:

  • You can freeze the prepared raw hamburgers and you will only need to defrost and cook in the pan whenever you need it.

  • This amount of minced meat is for a big hamburger but it’s up to you the size of your hamburger.

  • You can coat in flour the raw hamburger before cooking it.

  • It’s a must to serve the hamburger with a cold beer and chips or fries.


11 de diciembre de 2012 · 4 min · Cesmm

Pasta carbonara

La verdad es que ésta es una receta que llevamos haciendo mucho tiempo y que a mí me parece “la original”, la forma en que pensaba que este plato, típico italiano, era preparado por las *mammas *de toda Italia. Qué equivocado estaba… Todos los italianos que nos han visto preparar este plato se han sorprendido, reído e indignado por partes iguales al vernos preparar “su plato” con nata en lugar de utilizar uovo. Aquí podéis ver cómo lo preparan ellos y yo paso sin más dilación a presentaros nuestra forma (habiendo probado las dos me quedo con la nuestra :p)

Pics and Cakes

**¿Qué necesitamos? **

(Para 2 personas)

  • 200 gr. de espaguetis

  • 4 lonchas de beicon

  • 1/2 cebolla

  • 200 ml. de nata de cocinar

  • Sal y pimienta


¿Cómo lo hacemos?

  • Ponemos a cocer los espaguetis en abundante agua (cuando ya esté hirviendo) un poco sazonada.

  • Mientras la pasta está cociendo, la dejaremos en torno a los 15 minutos, ponemos un chorrito de aceite en una sartén y echamos la cebolla.

  • Dejamos que se sofría un poco y añadimos el beicon.

  • Cuando esté hecho añadimos la nata y dejamos que hierva.

  • Añadimos una pizca de sal, cuidado con pasarse ya que el bacón da sabor a la salsa, y un poco de pimienta. Reservamos si todavía no está cocida la pasta.

  • Escurrimos la pasta y mezclamos con la salsa carbonara.


Pics and Cakes


Consejos:

  • Dependiendo de vuestra cocina, olla y pasta puede que ésta esté lista un poco antes de los quince minutos o un poco más tarde. No dejéis de vigilarla si os gusta la pasta “al dente”.

  • El beicon puede ser sustituido por panceta.

  • Podéis espolvorear un poco de queso parmesano cuando sirváis la pasta.


Pics and Cakes

 [English version] SPAGHETTI CARBONARA* *Ingredients:

  • 200 g spaghetti

  • 4 slices of bacon

  • 1/2 onion

  • 200 ml cream

  • Salt and pepper

* *

  • *Add the spaghetti into a saucepan filled with boiling water with salt. *

  • *In the meanwhile (the pasta will be cooked after 15 minutes aprox.) add a bit of olive oil into a frying pan. Add the onion. *

  • *Fry lightly and add the bacon. *

  • *When it is cooked, add cream and leave simmer for a while. *

  • *Add salt and pepper. Set aside until pasta is ready. *

  • Strain the pasta and mix with the carbonara sauce.

Tips:- Depending on your saucepan, stove, etc. the pasta will need more or less minutes to be cooked. Watch out to get the perfect cooking, specially if you like pasta al dente. *- You can sprinkle the pasta dish with Parmesan cheese.


6 de noviembre de 2012 · 4 min · Cesmm

Pasta Carbonara

Truth is, this is a recipe we’ve been making for ages and one that I always thought was “the original” — the way I figured this typical Italian dish was prepared by mammas all over Italy. How wrong I was… Every Italian who’s seen us make this dish has been surprised, has laughed, and has gotten outraged in equal measure when watching us prepare “their dish” with cream instead of uovo. Here you can see how they make it, and without further ado I’ll show you our version (having tried both, I’ll stick with ours :p)

Pics and Cakes

What do we need?

(Serves 2)

  • 200 g (7 oz) spaghetti

  • 4 slices of bacon

  • 1/2 onion

  • 200 ml (3/4 cup) cooking cream

  • Salt and pepper

How do we make it?

  • Put the spaghetti to cook in plenty of water (once it’s boiling), lightly salted.

  • While the pasta is cooking — we’ll leave it for around 15 minutes — pour a splash of oil in a frying pan and add the onion.

  • Let it sauté a little and add the bacon.

  • Once it’s done, add the cream and let it come to a boil.

  • Add a pinch of salt — careful not to overdo it since the bacon already gives flavor to the sauce — and a bit of pepper. Set aside if the pasta isn’t ready yet.

  • Drain the pasta and mix with the carbonara sauce.

Pics and Cakes

Tips:

  • Depending on your stove, pot, and pasta, it may be ready a little before the fifteen minutes or a little after. Keep an eye on it if you like your pasta “al dente”.

  • The bacon can be swapped for pancetta.

  • You can sprinkle a bit of Parmesan cheese on top when you serve the pasta.

Pics and Cakes


Comments

Miguel (2012-11-07 12:01:29):

I usually make this same recipe, but when I add the salt and pepper, I take the chance to throw in a tiny bit (very, very little) of nutmeg.

And I also prefer the cream version over the egg one.

tía pi (2012-11-07 23:41:40):

For me, carbonara is without onion, with bacon, cream and egg, but I’ll give yours a try.

Palstelera (2012-11-09 21:26:49):

I love nutmeg. Truth is I always add it to béchamel but never to carbonara — I’ll try it next time :-)

Palstelera (2012-11-09 21:27:17):

Without onion? Try it, it’s delicious!

Vio (2012-12-07 20:44:34):

Boo! I love the blog, but you also know I couldn’t stay quiet knowing you call this carbonara. Maledetti!

I’ll take the chance to tell you that, aside from the amazing recipes, the site is super pretty and the photos rock ;-)

Big kiss!

Palstelera (2012-12-11 13:04:25):

hehe, Vio. It’s not that we call it carbonara… it’s that half of Spain does! That’s why, to avoid hurting any feelings, we started the post by making clear that what’s called carbonara in Spain has nothing to do with the Italian recipe… But honestly, I love the Spanish version :-)

Vio (2013-03-05 12:39:39):

Haha, sure — you, Spain… it’s all about complaining :-P

The truth is I do really like this version, but I think the Italian one is much tastier when it’s done right, with crispy bacon, lots of pepper, and nice juicy spaghetti. I will say a lot of Italians make a pretty lousy version and it really brings the dish down.

6 de noviembre de 2012 · 3 min · Cesmm