Petal Cake

We’ve had this recipe pending for a few days now, but since in the meantime we published our Whole Kitchen challenges, it had to be pushed back to this week. And well, what better week for a birthday cake… :-D I made the recipe following exactly the one @SandeeA did at La Receta de la Felicidad. So all credit for the explanation this time goes to her. My personal touch was just the little sugar bear.

Pics and Cakes

What do we need?

For the sponge cake (to make a tall cake, we’ll need to bake two sponges like this one, so double the quantities):

  • 250 g (about 1 cup + 2 tbsp) butter, room temperature

  • 250 g (1 ¼ cups) sugar

  • 4 eggs

  • 225 g (1 ¾ cups) all-purpose flour

  • 25 g (about 3 tbsp) cornstarch

  • half a packet of Royal-style baking powder (8 g, about 2 tsp)

For the chocolate buttercream:

  • 750 g (about 1 ⅔ lb) melting chocolate

  • 375 g (about 1 ⅔ cups) butter, room temperature

  • 100 g (about ¾ cup) powdered sugar

How do we make it?

  • Preheat the oven to 180 ºC (355 ºF).

  • Prepare a cake pan by greasing it with butter and dusting it lightly with flour.

  • In a large bowl, using a whisk or a spoon, mix the butter and sugar well until you get a smooth, creamy mixture.

  • Add the eggs one at a time, not adding the next one until the previous one is fully incorporated.

  • Add the flour, cornstarch, and baking powder and mix with a spatula or spoon until everything is well combined.

  • Pour the batter into the prepared pan, spreading it evenly.

  • Bake for 25-30 minutes at 180 ºC (355 ºF).

  • Take it out of the oven and wait a few minutes before unmolding.

  • Repeat these steps to make a second sponge cake just like the first one. (If you have two identical pans, you can make all the batter at once and divide it between both pans.)

  • Slice each sponge into two layers, trying to make them as even as possible.

  • Next, we start preparing the chocolate buttercream. First, we’ll melt the chocolate.

  • Chop it up and place it in a microwave-safe bowl. Heat it in 30-second intervals, stirring each time, until the chocolate is fully liquid. Let it cool for a few minutes.

  • Meanwhile, in another large bowl, beat the butter and sugar at top speed with a whisk until you get a fluffy, pale, smooth mixture (about 5 minutes).

  • Check that the chocolate you melted earlier has cooled down, and add it to the butter mixture. Beat a bit more until fully combined, and then move on to filling and decorating the cake.

  • Place the first sponge layer — the least perfect of the ones you made — on the plate you’ll be serving on, covered with some strips of parchment paper or printer paper, so it doesn’t get stained and you can pull them out easily afterwards.

  • Place a couple of spoonfuls of filling on this sponge layer and spread it evenly — it’s fine if some spills over the sides.

  • Place another sponge layer on top, pressing down gently and making sure it’s well aligned with the layer below. Add another two spoonfuls of filling and proceed as before.

  • Continue the same way with the rest of the layers. On top, place the most perfect sponge, with the bottom side facing up (it’s always the prettiest). If you don’t want the sponge layers to shift, since we’re about to cover and decorate the cake, you can stick a skewer down through the center of the cake, which you’ll remove once you’re done decorating.

  • Cover the cake with a first, very thin layer of chocolate buttercream — this is just to set things in place and hide any imperfections in the sponge layers.

  • Leave the chocolate cake in the fridge for 15 minutes so this layer firms up.

  • Using a piping bag fitted with a medium-sized round tip, pipe dots of buttercream onto the cake, forming a vertical line (4 dots, in my case).

  • Place a spatula on top of each dot and slide it to the right in a single motion (or to the left if you’re left-handed). Wipe the spatula clean and continue doing the same with the rest of the dots, remembering to always wipe the spatula between strokes.

  • Each time you finish a row of dots, grab the piping bag, create a new line of dots, and repeat the pattern across the whole cake. The spot where you finish the last row of petals will have some imperfections, and that should be the “back” of your cake.

  • If you’re not going to eat it the same day, store the chocolate cake preferably outside the fridge so the chocolate buttercream stays creamy, since the fridge tends to harden it.

Tips:

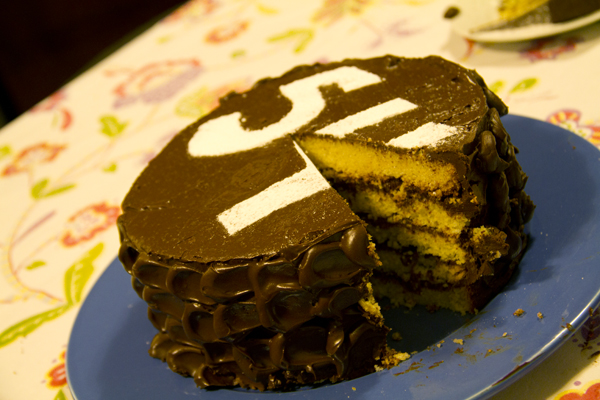
  • To decorate it, you can make a stencil out of a sheet of paper, cutting out the number of years the birthday person is turning, and dust it with powdered sugar.

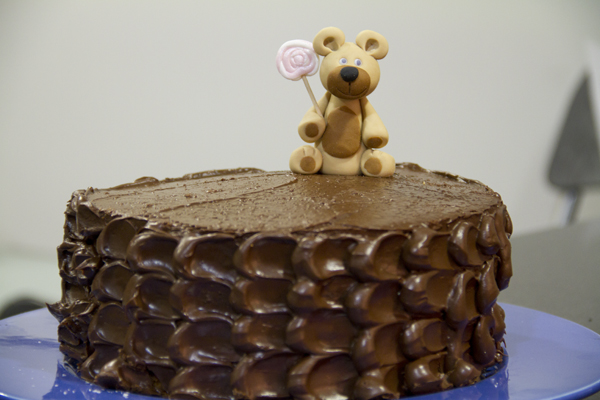
  • I made this sugar bear out of modeling paste to crown the cake. I’ll do a tutorial soon so you can see how easy it is.

Pics and Cakes

[English version] PETALS CAKE* *Ingredients:

  • *250 g butter, room temperature *

  • *250 g sugar *

  • 4 eggs

  • *225 g all purpose flour *

  • *25 g corstarch *

  • *8 g baking powder *

For the chocolate buttercream:

  • 750 g dark chocolate, melted

  • *375 g butter, room temperature *

  • *100 g confectioners’ sugar *

  • Preheat oven to 180ºC

  • Prepare a cake pan (butter and flour the bottom and the sides of the pan).

  • In a large bowl, place butter and sugar, and mix well.

  • Add eggs one by one.

  • Add flour, cornstarch and baking powder, and beat until combined.

  • Pour batter into pan and bake for 25 minutes.

  • Leave the cake in its pan on a wire rack for 10 minutes and then turn out to cool.

  • Repeat the whole process to make another similar cake.

  • Now we are going to prepare the chocolate buttercream.

  • Using and electric mixer, cream butter and sugar, until light and fluffy (about 5 minutes). Add melted chocolate, that shall be cool, and mix well. Now the buttercream is ready to use.

  • Fill the cake layers with chocolate buttercream, and then frost it with a thin layer of buttercream.

  • Place the cake in the fridge for 15 minutes to set.

  • Place the remaining chocolate buttercream on a piping bag fitted with a medium sized round tip.

  • Create a row of dots (vertical), as shown on the pictures.

  • Using a spatula, spread every dot to the right, in one motion (or to the left if you are left-handed). Clean the spatula between every swipe.

  • Once you have spread one row of dots, add another row of dots and repeat the pattern until the whole cake is covered with “petals”.

  • If you are not going to eat the cake on the same day, please avoid keeping it in the fridge if possible, so that the chocolate buttercream remains creamy.

Tips:

  • You can create a template showing the number of the age that the special person is turning and then sprinkle with confectioners’ sugar.

  • On the top, I placed this sugar bear made by myself. Soon I will post a tutorial about how to make it with gum paste.


29 de noviembre de 2012 · 6 min · Palstelera

Tarta de pétalos

Teníamos pendiente publicar esta receta ya hace algunos días pero como entre medias publicamos nuestros retos de Whole Kitchen, ha quedado obligatoriamente pospuesta a esta semana. Y bueno, qué mejor semana para una tarta de cumpleaños… :-D La receta la hice siguiendo exactamente la que hizo @SandeeA en La Receta de la Felicidad. Así que todo mérito en la explicación esta vez se lo debemos a ella. Mi toque particular sólo fue el osito de azúcar.

Pics and Cakes

¿Qué necesitamos?

Para el bizcocho (para hacer una tarta alta, necesitaremos hacer dos bizcochos como éste, así que duplicad las cantidades):

  • 250 g mantequilla, a temperatura ambiente

  • 250 g azúcar

  • 4 huevos

  • 225 g harina normal

  • 25 g Maizena

  • medio sobre de levadura química tipo Royal (8 g)

Para la crema de chocolate:

  • 750 g de chocolate para fundir

  • 375 g de mantequilla a temperatura ambiente

  • 100 g de azúcar glass

¿Cómo lo hacemos?

  • Precalentamos el horno a 180 ºC

  • Preparamos un molde engrasándolo con mantequilla, y enharinándolo ligeramente.

  • En un bol amplio, con un batidor de varillas o con una cuchara, mezclamos bien la mantequilla con el azúcar, hasta obtener una mezcla homogénea y cremosa.

  • Añadimos los huevos de uno en uno, sin agregar el siguiente hasta que el anterior esté perfectamente integrado.

  • Añadimos la harina, la maizena y la levadura química y mezclamos con una espátula o cuchara, hasta que estén todos los ingrediente bien integrados.

  • Vertemos la mezcla en el molde que hemos preparado, distribuyéndola uniformemente.

  • Horneamos 25-30 minutos a 180º C.

  • Sacamos del horno, y esperamos unos minutos antes de desmoldar.

  • Repetimos estos pasos para hacer otro bizcocho igual. (Si tenéis dos moldes iguales podéis hacer toda la mezcla a la vez y repartirla entre los dos moldes).

  • Dividimos cada bizcocho en dos capas tratando de hacerlas lo más rectas posibles.

  • A continuación, comenzamos a preparar la crema de chocolate. Para ello, en primer lugar fundiremos el chocolate.

  • Lo troceamos y lo ponemos en un bol apto para microondas. Vamos programando de 30 en 30 segundos, removiendo de cada vez, hasta que el chocolate esté totalmente líquido. Dejamos enfriar unos minutos.

  • Mientras, en otro bol amplio, vamos batiendo la mantequilla con el azúcar a máxima velocidad con un batidor de varillas, hasta que obtengamos una masa esponjosa, blanquecina, y homogénea (unos 5 minutos)

  • Comprobamos que el chocolate que hemos fundido anteriormete esté ya frío, y lo agregamos a la crema de mantequilla. Batimos un poco más hasta integrarlo completamente, y procedemos a rellenar y decorar la tarta

  • Colocaremos el primer bizcocho, el menos perfecto de los que hayamos hecho, sobre el plato en el que vayamos a servir, cubierto con algunos recortes de papel de hornear o folios, para que no se manche y podamos retirarlos después con facilidad.

  • Colocamos sobre esta capa de bizcocho un par de cucharadas de relleno, y distribuimos uniformemente, no pasa nada porque se salga por los lados.

  • Ponemos otra capa de bizcocho encima, presionando ligeramente, y asegurándonos de que está bien alineado con el bizcocho inferior. Agregamos otras dos cucharadas de relleno, y procedemos igual que anteriormente.

  • Seguimos igual con el resto de capas. Arriba del todo colocamos el bizcocho que nos haya quedado más perfecto, con la parte de abajo hacia arriba (siempre es la más bonita). Si no queremos que se muevan las capas de bizcocho ya que a continuación vamos a cubrir y decorar la tarta, podemos usar una brocheta clavada en el centro de la tarta, que retiraremos cuando hayamos terminado de decorar.

  • Cubrimos nuestra tarta con una primera capa de crema de chocolate, muy fina, que servirá únicamente para fijar, y que se oculten las imperfecciones de las capas de bizcocho.

  • Dejamos la tarta de chocolate 15 minutos en el frigorífico, para que se solidifique esta capa.

  • Con una manga pastelera con boquilla redonda, de tamaño mediano, vamos depositando botones de crema en la tarta, formando una línea vertical (de 4 botones, en mi caso).

  • Colocamos una espátula sobre cada montoncito, y la deslizamos hacia la derecha, en un solo movimiento (o hacia la izquierda si sois zurdos). Limpiamos la espátula, y continuamos haciendo lo mismo con el resto de montoncitos, recordando limpiar siempre la espátula entre pasada y pasada.

  • Cada vez que terminemos con una fila de puntos, cogemos la manga, creamos una nueva línea de puntos, y repetimos el patrón a lo largo de toda la tarta. El punto donde finalicemos la última fila de pétalos quedará con imperfecciones, y deberá ser la “trasera” de nuestra tarta.

  • Si no la vamos a consumir en el día, conservamos la tarta de chocolate preferiblemente fuera del frigorífico, para que la crema de chocolate siga estando cremosa, ya que en el frigo tiende a endurecerse.

Consejos:

  • Para decorarla podéis hacer una plantilla con un folio, recortando el número de años que cumple el homenajeado y espolvorearla con azúcar glas.

  • Yo hice este oso de azúcar con pasta de modelar para coronar la tarta. Próximamente haré algún tutorial para que veáis lo fácil que es.

Pics and Cakes

[English version]  PETALS CAKE* *Ingredients:

  • *250 g butter, room temperature *

  • *250 g sugar *

  • 4 eggs

  • *225 g all purpose flour *

  • *25 g corstarch *

  • *8 g baking powder *

For the chocolate buttercream:

  • 750 g dark chocolate, melted

  • *375 g butter, room temperature *

  • *100 g confectioners’ sugar *

* *

  • Preheat oven to 180ºC

  • Prepare a cake pan (butter and flour the bottom and the sides of the pan).

  • In a large bowl, place butter and sugar, and mix well.

  • Add eggs one by one.

  • Add flour, cornstarch and baking powder, and beat until combined.

  • Pour batter into pan and bake for 25 minutes.

  • Leave the cake in its pan on a wire rack for 10 minutes and then turn out to cool.

  • Repeat the whole process to make another similar cake.

  • Now we are going to prepare the chocolate buttercream.

  • Using and electric mixer, cream butter and sugar, until light and fluffy (about 5 minutes). Add melted chocolate, that shall be cool, and mix well. Now the buttercream is ready to use.

  • Fill the cake layers with chocolate buttercream, and then frost it with a thin layer of buttercream.

  • Place the cake in the fridge for 15 minutes to set.

  • Place the remaining chocolate buttercream on a piping bag fitted with a medium sized round tip.

  • Create a row of dots (vertical), as shown on the pictures.

  • Using a spatula, spread every dot to the right, in one motion (or to the left if you are left-handed). Clean the spatula between every swipe.

  • Once you have spread one row of dots, add another row of dots and repeat the pattern until the whole cake is covered with “petals”.

  • If you are not going to eat the cake on the same day, please avoid keeping it in the fridge if possible, so that the chocolate buttercream remains creamy.

Tips:

  • You can create a template showing the number of the age that the special person is turning and then sprinkle with confectioners’ sugar.

  • On the top, I placed this sugar bear made by myself. Soon I will post a tutorial about how to make it with gum paste.


29 de noviembre de 2012 · 6 min · Palstelera