Baklava

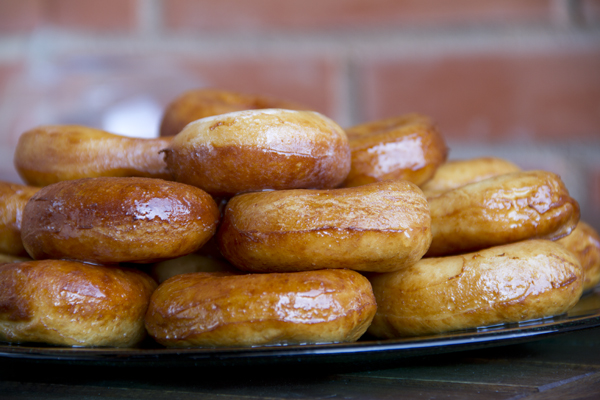
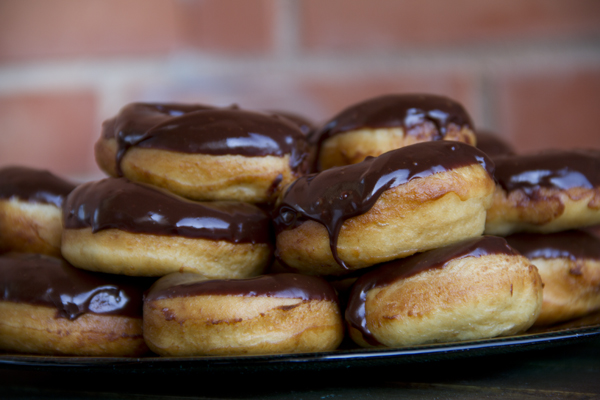
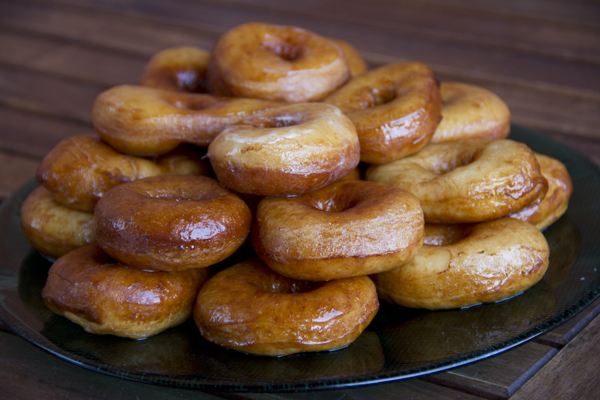
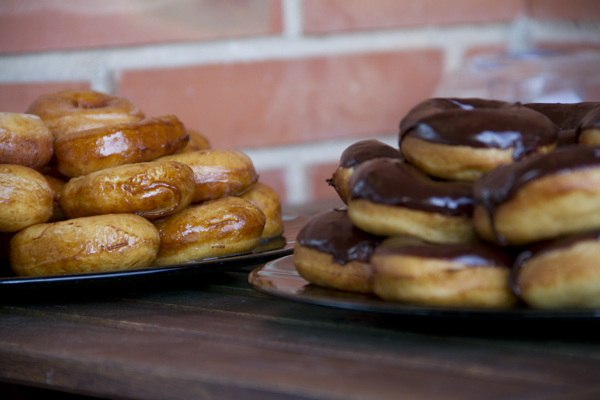
Whole kitchen, for their Sweet Proposal for the month of November, invites us to prepare a Persian classic: Baklava. Apparently this little pastry has its origins in ancient Mesopotamia, although several cultures and civilizations are still fighting over who actually invented it. Persian, Greek or Arab — it’s delicious. This time we’ve made two versions: one with dates and toasted almonds, and another with hazelnuts and chocolate. Filo pastry is a wonder of the kitchen that you really have to try, both for sweet and savory.

Pics and Cakes

What do we need?

  • 1 package of filo pastry

  • 100 g (3.5 oz) butter

For the syrup:

  • 210 ml (scant 1 cup) water

  • 180 g (about 3/4 cup) sugar

  • 30 g (1 tbsp) honey

  • Juice of half a lemon

  • A cinnamon stick

For the filling:

  • 18 dates

  • 50 g (1.75 oz) toasted almonds

  • 50 g (1.75 oz) chocolate (drops or chips)

  • 50 g (1.75 oz) hazelnuts

Pics and Cakes

How do we make it?

  • We start by making the syrup. Put all the ingredients in a saucepan and, over high heat, bring to a boil. Lower the heat a bit and let it simmer for about 15 minutes so it thickens.

  • Preheat the oven to 180°C (355°F).

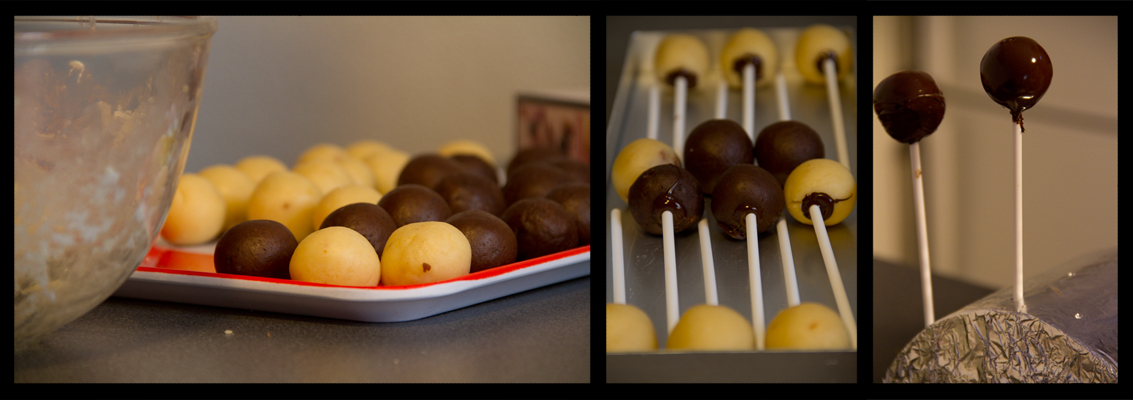
  • Prepare the filling: pit the dates and cut them into small pieces. Chop the almonds and hazelnuts as well. In one bowl mix the dates with the almonds, and in another mix the hazelnuts with the chocolate.

  • Melt the butter for a few seconds in the microwave.

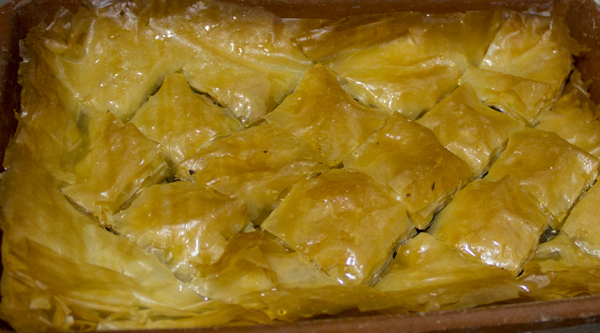
  • Grease the baking dish you’re going to use with butter and cut all the filo sheets to the size of your tray.

  • Lay down a sheet of filo and, with a brush or your hands, smear it with butter on one side. Add another layer and brush it with butter again. Keep going until you have 8 layers.

  • Spread half of the date-and-almond filling over the filo.

  • Add more filo on top — this time, 4 layers (always brushed with butter so they stay separate after baking).

  • Add the rest of the date-and-almond filling.

  • Make another batch of 8 filo layers (always buttered).

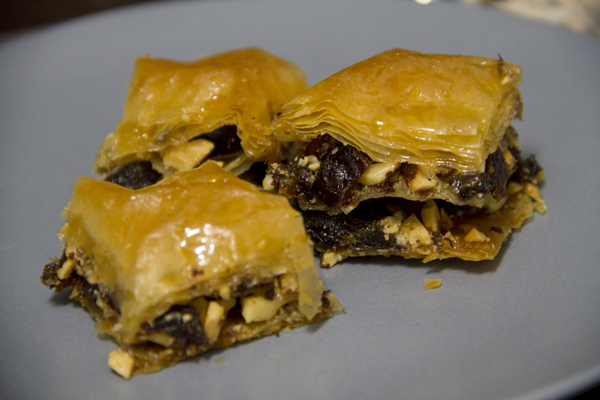
  • With a sharp knife, cut the baklava into squares.

  • Bake for 45 minutes total: the first 20 minutes uncovered, and the next 25 minutes with a sheet of aluminum foil over the baklava so it doesn’t brown too much.

  • As soon as you take it out of the oven, let it rest for 5 minutes, then pour the cold syrup over the hot baklava (this way it’ll stay crispy).

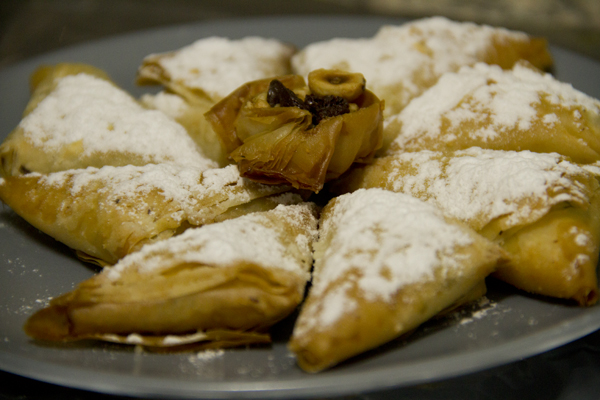
  • For the hazelnut-and-chocolate version you can repeat the same process in another baking dish, or make triangles. To do that, cut the filo into strips of about 5 cm by 20 cm (2 in by 8 in). Brush each layer with butter and stack 4 strips together.

  • Place a teaspoon of filling at one end and fold a corner over to form a triangle with the filling tucked inside. Take the other end and keep folding the triangle over itself. (Since it’s a bit tricky to explain, I found [this video](

{{}}

) where you can easily see how to do it.)

  • Bake them at 180°C (355°F) too, but they’ll be ready in 10–15 minutes.

  • Once out of the oven, you can dust them with powdered sugar.

Tips:

  • Filo pastry dries out very quickly, so whenever you’re not using it, keep it well wrapped in a plastic bag.

  • It’s important to add butter between each layer, but you don’t need to “drown” it either.

  • It’s quite a rich, filling sweet, so it’s better to cut the squares small.

Pics and Cakes

[English version] BAKLAVA* *Ingredients:

  • 1 package of filo pastry

  • 100 g butter

For the syrup:

  • 210 ml water

  • 180 g sugar

  • 30 g honey

  • Juice of 1/2 lemon

  • Cinnammon stick

For the filling:

  • 18 dates

  • 50 g almonds

  • 50 g chocolate (drops or chips)

  • 50 g hazelnuts

  • Combine the syrup ingredients in a medium saucepan and bring to boil. Let the syrup simmer on low heat for about 15 minutes

  • Preheat oven at 180ºC.

  • *Now prepare the filling: pit the dates and chop into small pieces. Chop almonds and hazelnuts. Mix almonds and dates into a bowl and chocolate and hazelnut in other. *

  • Melt the butter in the microwave for a few seconds.

  • Butter the baking pan and cut the filo pastry sheets into the size of the baking pan.

  • *Place a sheet of filo pastry and butter it. Place another sheet over it and butter again. Do it again until having 8 layers. *

  • *Scatter half of the dates-almonds filling. *

  • *Place more filo pastry. This time, only 4 layers but always buttered. It will make to have separate layers once the baklava is baked. *

  • *Add the other half of the filling. *

  • *Create another pack of 8 layers of filo pastry (always buttered). *

  • *With sharp knife cut baklava into small squares. *

  • *Bake for 45 minutes. The first 20 minutes uncovered and then you can cover with aluminium foil to prevent it from browning too much. *

  • When you take it out from oven, let stand for 5 minutes and then pour the cold syrup.

  • For the hazelnut-chocolate version, you can follow the same steps or make small triangles of filo pastry. For the triangles, cut the pastry into stripes (4 x 20 cm aprox.). Butter each stripe and put 4 of them together.

  • *Add a tsp of the filling in one of the sides and proceed to fold into triangle shape. You can see how to do it easily in [this video](

{{}}

).*

  • Bake at 180ºC only for 10-15 minutes.

  • You can powder some confectioners’ sugar when you take them out from oven.

Tips:

*- Filo pastry dries very fast, so when you are not using it, keep it in a plastic bag. *

- It’s important to butter every single sheet (layer) of filo pastry but don’t “over butter” (otherwise, it will be too greasy).

- It’s a filling sweet, so make small squares when cutting the baklava.


Comments

Apfelstrudelkuchen (2012-11-26 00:03:04):

Hi!!

Your baklava-as-triangles version turned out really original!! And with dates it must be amazing.

Hugs,

Mara (2012-11-26 17:34:08):

So good with the chocolate touch. I love the idea of making individual portions, because when you cut it the filo sheets tend to come apart a bit. Since everyone at home liked it so much I’ll make it again, and I’m going to do it your way, in the individual triangle version. This is my version: http://masdulcequesaladopuntocom.blogspot.com.es/

tía pi (2012-11-27 17:48:26):

This Friday I have guests over for dinner — it’s going to be a light meal, so the baklava is going to be a great dessert. I’ll let you know how it goes.

silvia (2012-11-29 22:09:14):

The little chocolate triangles were really tasty… and that’s saying something, because I’m not really one for sweets…

Palstelera (2012-12-07 19:16:00):

Mara, I’m glad you like the little-triangles version… :-)

25 de noviembre de 2012 · 6 min · Palstelera

Baklava

**Whole kitchen en su Propuesta Dulce para el mes de Noviembre nos invita a preparar un clásico persa Baklava. **Al parecer este pastelito tiene su origen en la antigua Mesopotamia aunque todavía hoy siguen disputándose varias culturas y civilizaciones su creación. Persa, griego o árabe, está buenísimo. En esta ocasión hemos preparado dos versiones; una con dátiles y almendras tostadas y otra con avellanas y chocolate. La pasta filo es una maravilla de la cocina que no podéis dejar de probar tanto para dulce como para salado.

 Pics and Cakes

¿Qué necesitamos?

  • 1 paquete de pasta filo

  • 100 g de mantequilla

Para el almíbar:

  • 210 ml de agua

  • 180 g de azúcar

  • 30 g de miel

  • Zumo de medio limón

  • Una ramita de canela

 Para el relleno:

  • 18 dátiles

  • 50 g de almendras tostadas

  • 50 g de chocolate (en gotas o perlas)

  • 50 g de avellanas

 Pics and Cakes

¿Cómo lo hacemos?

  • Empezamos haciendo ****el almíbar. Ponemos todos los ingredientes en una cazuela y, a fuego fuerte, lo llevamos a ebullición. Bajamos un poco el fuego y dejamos cocer durante 15 minutos aproximadamente para que espese.

  • Precalentamos el horno a 180ºC.

  • Preparamos el relleno: deshuesamos los dátiles y los partimos en trozos pequeños. Troceamos también las almendras y las avellanas. Mezclamos en un cuenco los dátiles con las almendras y en otro las avellanas con el chocolate.

  • Derretimos la mantequilla unos segundos en el microondas.

  • Untamos la fuente que vayamos a usar con mantequilla  y cortamos todas las láminas de pasta filo del tamaño de nuestra bandeja.

  • Ponemos una lámina de pasta filo, y con un pincel, o con las manos, la embadurnamos de mantequilla por una cara. Ponemos otra capa y volvemos a untarla con la mantequilla. Así hasta tener 8 capas.

  • Ponemos la mitad de nuestro relleno de dátiles y almendras y lo extendemos sobre la pasta filo.

  • Volvemos a poner pasta filo. Esta vez, 4 capas (siempre untándolas con mantequilla para que al hornearlas se queden separadas).

  • Echamos el resto del relleno de dátiles y almendras.

  • Hacemos otra tanda de 8 capas de pasta filo (siempre untadas con mantequilla).

  • Con un cuchillo afilado cortamos el baklava en cuadrados.

  • Horneamos 45 minutos en total, los 20 primeros destapado, y los 25 siguientes colocando papel de aluminio sobre el baklava para que no se dore demasiado.

  • Nada más sacarlo del horno, dejamos reposar 5 minutos, y vertemos el almíbar frío sobre el baklava caliente (así seguirá estando crujiente).

  • Para la versión de avellanas y chocolate podéis repetir el mismo proceso en otra fuente de horno o bien hacer triángulos. Para ello cortamos la pasta filo en tiras de 5 cm por 20 cm (aproximadamente). Embadurnamos con mantequilla cada capa y ponemos 4 tiras juntas.

  • Ponemos una cucharadita de relleno en un extremo y doblamos una esquina para formar un triángulo con el relleno en el interior. Cogemos el otro extremo y vamos plegando el triángulo sobre sí mismo. (Como es un tanto complicado de explicar, he encontrado [este vídeo](

{{}}

) donde podéis ver fácilmente cómo hacerlo).

  • Los horneamos también a 180ºC pero en 10-15 minutos estarán listos.

  • Al sacarlos los podemos espolvorear con azúcar glas por encima.


Consejos:

  • La pasta filo se seca enseguida así que cuando no la estés utilizando, guárdala bien en una bolsa de plástico.

  • Es importante echar la mantequilla entre cada capa pero tampoco es necesario “ahogarla”.

  • Es un dulce bastante contundente así que es preferible hacer los cuadraditos pequeños.

Pics and Cakes

[English version] BAKLAVA* *Ingredients:

  • 1 package of filo pastry

  • 100 g  butter


For the syrup:

  • 210 ml water

  • 180 g sugar

  • 30 g honey

  • Juice of 1/2 lemon

  • Cinnammon stick


For the filling:

  • 18 dates

  • 50 g almonds

  • 50 g chocolate (drops or chips)

  • 50 g hazelnuts

* *

  • Combine the syrup ingredients in a medium saucepan and bring to boil. Let the syrup simmer on low heat for about 15 minutes

  • Preheat oven at 180ºC.

  • *Now prepare the filling: pit the dates and chop into small pieces. Chop almonds and hazelnuts. Mix almonds and dates into a bowl and chocolate and hazelnut in other. *

  • Melt the butter in the microwave for a few seconds.

  • Butter the baking pan and cut the filo pastry sheets into the size of the baking pan.

  • *Place a sheet of filo pastry and butter it. Place another sheet over it and butter again. Do it again until having 8 layers. *

  • *Scatter half of the dates-almonds filling. *

  • *Place more filo pastry. This time, only 4 layers but always buttered. It will make to have separate layers once the baklava is baked. *

  • *Add the other half of the filling. *

  • *Create another pack of 8 layers of filo pastry (always buttered). *

  • *With sharp knife cut baklava into small squares. *

  • *Bake for 45 minutes. The first 20 minutes uncovered and then you can cover with aluminium foil to prevent it from browning too much. *

  • When you take it out from oven, let stand for 5 minutes and then pour the cold syrup.

  • For the hazelnut-chocolate version, you can follow the same steps or make small triangles of filo pastry. For the triangles, cut the pastry into stripes (4 x 20 cm aprox.). Butter each stripe and put 4 of them together.

  • *Add a tsp of the filling in one of the sides and proceed to fold into triangle shape. You can see how to do it easily in [this video](

{{}}

).*

  • Bake at 180ºC only for 10-15 minutes.

  • You can powder some confectioners’ sugar when you take them out from oven.

* *

Tips:

*- Filo pastry dries very fast, so when you are not using it, keep it in a plastic bag. *

- It’s important to butter every single sheet (layer) of filo pastry but don’t “over butter” (otherwise, it will be too greasy).

- It’s a filling sweet, so make small squares when cutting the baklava.


25 de noviembre de 2012 · 6 min · Palstelera

Donuts

Creo que sin duda alguna éste es uno de los mejores descubrimientos culinarios que he hecho en mi vida. Por increíble que parezca el sabor es muy parecido a los comerciales, la masa es muy esponjosa, no se siente grasienta como la de algunos donuts de panadería y la cobertura de chocolate es sencillamente, magnífica. El único problema que tienen, es que son altamente adictivos… Os lo advierto, una vez que los probéis querréis repetir y repetir. Pero bueno, creo que merece la pena.

Pics and Cakes

¿Qué necesitamos?

  • 300 gr. de harina de fuerza

  • 200 gr de harina normal

  • 80 gr. de azúcar

  • 5 gr. de sal

  • 20 gr. de leche en polvo

  • 2 sobres de levadura de panadería

  • 230 gr. de agua templada

  • 1 huevo mediano

  • 40 gr. de manteca o margarina (nosotros usamos Crisco que es una grasa vegetal inolora e insípida)

  • 2 cucharaditas de esencia de naranja


Para el glaseado de azúcar:

  • 200 g azúcar glas

  • 1 cucharadita de mantequilla

  • Un chorrito de zumo de limón

  • Agua

Para el glaseado de chocolate:

  • 200 g azúcar glas

  • 1 cucharadita de mantequilla

  • 150 g chocolate para postres

  • Agua


Pics and Cakes

¿Cómo lo hacemos?

  • Mezclamos bien los ingredientes secos: harinas, azúcar, sal, leche en polvo y la levadura.

  • Añadimos el agua, ni caliente ni demasiado fría, a temperatura ambiente, el huevo batido y la esencia de naranja. Recordad, si el agua está caliente “matará la levadura”, si está muy fría tardará más tiempo en fermentar. Amasamos durante 8 minutos aproximadamente.

  • Añadimos la materia grasa y amasamos hasta que no se nos pegue a las manos. Es posible que necesitemos añadir más harina pero no lo sabremos hasta que no hayamos incorporado la manteca del todo. La textura resultante debe ser homogénea y elástica.

  • Formamos una bola y dejamos reposar unos 45 min. No pasa nada si lo dejamos más tiempo.

  • Pasado ese tiempo, amasamos un poco y estiramos del tamaño de 1 cm. de espesor. Si tenemos un cortapastas de donuts, perfecto. Si no con un cortador redondo (o con un vaso) hacemos los círculos y con un cortador más pequeño el círculo interior. Para el agujero del centro, nosotros hicimos el agujero con el dedo y lo agrandamos un poco (la masa es muy elástica así que no se notará la irregularidad).

  • Dejamos reposar en una bandeja sobre papel de hornear durante 1 hora mínimo para que vuelvan a crecer.

  • Freímos en aceite de girasol (si utilizamos aceite de oliva le dará demasiado sabor). El aceite no tiene que estar muy caliente ya que se queman enseguida. En cuanto los echemos a la sartén empezarán a hincharse. Los dejamos unos segundos y les damos la vuelta para que se doren por la otra parte.

  • Los sacamos y escurrimos en papel absorbente y todavía calientes, los bañamos con el glaseado de azúcar. Si los bañamos en glaseado de chocolate no hace falta que estén calientes.

  • Para hacer el glaseado de azúcar, derretimos un poco la mantequilla en el microondas y la mezclamos bien con el azúcar glas y un chorrito de limón. Añadimos unas cucharadas de agua hasta obtener una papilla ligera de color blanquecino.

  • Para el glaseado de chocolate, mezclamos el azúcar glas con unas cucharadas de agua (que nos quede de nuevo una papilla ligera). Derretimos el chocolate con la mantequilla en el microondas y una vez deshecho, lo añadimos a nuestra papilla de agua y azúcar. Si está demasiado espeso podemos añadir un poco más de agua. Si por el contrario, está demasiado duro, lo podemos dejar enfriar.

  • Para bañar los donuts en el glaseado de azúcar los sumergimos en el bol con el glaseado para que se pegue por todas partes. En cambio, para el glaseado de chocolate, sólo los bañaremos por una cara.


Pics and Cakes

Consejos:

  • Parece complicado pero no lo es. Simplemente hay que disponer de tiempo para hacerlos ya que es muy importante respetar los tiempos de ‘subida’ de la masa.

  • Es importante que la levadura sea de panadería y que la leche sea en polvo ya que si no, variarán nuestras proporciones de ingredientes secos y no obtendremos el mismo resultado.

  • A la hora de freír los donuts, hazlo de uno en uno o si es una sartén grande puedes poner 2 ó 3 máximo. De lo contrario, corres el riesgo de que se te quemen.


Pics and Cakes

*[English version] DOUGHNUTS ** *Ingredients:

  • 300 g strong flour

  • 200 g flour

  • 80 g sugar

  • 5 g salt

  • 20 g powdered milk

  • 2 sachets of dry yeast

  • 230 g warm water

  • 1 medium size egg

  • 40 g fat or margarine (we use Crisco)

  • 2 tsps orange flavour

  • *For sugar icing:
  • 200 g confectioners’ sugar

  • 1 tsp butter

  • Lemon juice

  • Water

For chocolate icing:

  • 200 g confectioners’ sugar

  • 1 tsp butter

  • 150 g chocolate

  • Water


  • Mix dry ingredients into a large bowl (flours, sugar, salt, powdered milk and yeast).

  • Add warm water, whisked egg and orange flavour. Remember, too hot water will ‘kill’ the yeast, too cold water will make fermentation slower. Knead for 8 minutes.

  • Add fat and keep kneading until having a non-sticky dough. You may need to add some more flour. The resulting texture should be a homogenous and elastic dough.

  • Make a ball and set aside for 45 minutes or more.

  • After this time, knead it and roll it out (1 cm). Use a round biscuit cutter to make the circles and use a smaller one to make the inner circle. You can also make the inner hole with your fingers. If you have a special doughnut cutter, it will be perfect.

  • Let the dough stand (already on the doughnut shape) again for 45 minutes on a baking tray covered by baking paper.

    • Deep fry in sunflower oil (don’t use olive oil because it will give them too strong flavour). Be careful, it will be fried very soon. Leave them some seconds and then turn them around until golden brown.*
  • Take them out and place on kitchen paper. Still hot, covered them with the sugar icing. If you use chocolate icing, they don’t need to be hot.

  • For sugar icing, melt butter in the microwave and mix with confectioners’ sugar and a trickle of lemon juice. Add some tbsp of water and stir well. You need a white thick soup.

  • For chocolate icing, mix confectioners’ sugar with some tbsp of water (you will need again a white thick soup). Melt chocolate with butter in the microwave and mix with the sugar mixture. If it’s too thick, you can add some more water. However, if it’s too liquid, you can let it cool for a while.

  • To cover the doughnuts with the sugar icing, plunge them into the bowl and cover both sides. However, for the chocolate icing, cover only one side of the doughnut.

    • Tips:*

*- It may seem complicated but it’s not. You only need time to do it because the rising times for the dough are essential for the success of the recipe. *

*- You need dry yeast and powdered milk to keep the proportion of dry ingredients and get perfect results. *

- When frying the doughnuts, take your time. Fry only one by one or, if you are using a large pan, 2 or 3 at the same time maximum. Otherwise, you risk to have them all burnt.


Pics and Cakes


1 de noviembre de 2012 · 8 min · Palstelera

Doughnuts

I think this is hands-down one of the best culinary discoveries I’ve made in my life. As unbelievable as it sounds, the flavor is really close to the store-bought ones — the dough is super fluffy, it doesn’t feel greasy like some bakery doughnuts, and the chocolate glaze is simply magnificent. The only problem is that they’re highly addictive… I’m warning you: once you try them, you’ll want to make them again and again. But hey, I think it’s worth it.

Pics and Cakes

What do we need?

  • 300 g (2.5 cups) bread flour

  • 200 g (1.5 cups) all-purpose flour

  • 80 g (1/3 cup + 1 tbsp) sugar

  • 5 g (1 tsp) salt

  • 20 g (3 tbsp) powdered milk

  • 2 packets of active dry yeast

  • 230 g (1 cup) warm water

  • 1 medium egg

  • 40 g (3 tbsp) shortening or margarine (we use Crisco, which is an odorless and tasteless vegetable fat)

  • 2 teaspoons orange extract

For the sugar glaze:

  • 200 g (1.75 cups) confectioners’ sugar

  • 1 teaspoon butter

  • A splash of lemon juice

  • Water

For the chocolate glaze:

  • 200 g (1.75 cups) confectioners’ sugar

  • 1 teaspoon butter

  • 150 g (5.3 oz) baking chocolate

  • Water

Pics and Cakes

How do we make them?

  • Mix the dry ingredients well: flours, sugar, salt, powdered milk and yeast.

  • Add the water — neither hot nor too cold, at room temperature — along with the beaten egg and the orange extract. Remember: if the water is hot it will “kill the yeast,” and if it’s too cold the dough will take longer to rise. Knead for about 8 minutes.

  • Add the fat and keep kneading until the dough no longer sticks to your hands. You might need to add more flour, but you won’t know until the shortening is fully incorporated. The resulting texture should be smooth and elastic.

  • Form a ball and let it rest for about 45 minutes. It’s fine to let it go longer.

  • After that time, knead it a bit and roll it out to about 1 cm (3/8 inch) thick. If you have a doughnut cutter, perfect. If not, use a round cutter (or a glass) to make the circles, and a smaller one for the inner circle. For the center hole, we just made it with our finger and stretched it a little (the dough is very elastic, so any irregularity won’t show).

  • Let them rest on a tray lined with parchment paper for at least 1 hour so they can rise again.

  • Fry in sunflower oil (if you use olive oil it’ll give them too much flavor). The oil shouldn’t be too hot or they’ll burn right away. As soon as you drop them in the pan they’ll start puffing up. Leave them for a few seconds and flip them so they brown on the other side.

  • Take them out and drain on paper towels, and while they’re still warm, dip them in the sugar glaze. If you’re using the chocolate glaze, they don’t need to be warm.

  • To make the sugar glaze, melt the butter a bit in the microwave and mix it well with the confectioners’ sugar and a splash of lemon. Add a few tablespoons of water until you get a light, whitish slurry.

  • For the chocolate glaze, mix the confectioners’ sugar with a few tablespoons of water (again, you want a light slurry). Melt the chocolate with the butter in the microwave and once melted, add it to the sugar-and-water mixture. If it’s too thick, add a bit more water. If on the other hand it’s too runny, let it cool down.

  • To coat the doughnuts in the sugar glaze, dip them into the bowl so the glaze sticks all over. For the chocolate glaze, only dip one side.

Pics and Cakes

Tips:

  • It looks complicated but it isn’t. You just need time, because respecting the dough’s rising times is really important.

  • It’s important that the yeast is bread yeast (not baking powder) and that the milk is powdered — otherwise your dry ingredient ratios will change and you won’t get the same result.

  • When frying the doughnuts, do them one at a time, or if you have a large pan, 2 or 3 at most. Otherwise you risk burning them.

Pics and Cakes

Pics and Cakes


1 de noviembre de 2012 · 5 min · Palstelera

Brownie

Whole Kitchen’s Sweet Proposal for October invites us to make an American classic: brownies

And what a treat, seriously. I’ve made dozens of brownies in my life and I have to confess I almost always pull out a different recipe and they all turn out delicious. The secret is that a brownie is a compact but fluffy cake (sometimes even moist), since it usually doesn’t have any leavening and therefore doesn’t rise. I read somewhere that the brownie was actually discovered thanks to someone forgetting to add the leavening to a chocolate cake. All I can say is… blessed mistake!

Pics and Cakes

What do we need?

  • 200 g (7 oz) baking chocolate

  • 100 g (3.5 oz / 7 tbsp) butter

  • 2 eggs

  • 100 g (1/2 cup) regular sugar

  • 1/2 teaspoon baking soda

  • 1/2 teaspoon salt

  • 80 g (2/3 cup) flour

  • 100 g (3.5 oz / about 1 cup) walnuts

Pics and Cakes

How do we make it?

  • Chop the chocolate and put it in a microwave-safe bowl together with the butter. Melt in 20-30 second intervals, stirring each time so it doesn’t burn.

  • In another large bowl, whisk the eggs with the sugar until you get a foamy mixture.

  • Add the chocolate to this foamy mixture and stir well.

  • Mix the flour with the salt and baking soda. Sift it and add it to the previous mixture.

  • Stir well and add the walnuts.

  • Prepare a baking pan, greasing and flouring it so the cake doesn’t stick, and pour the mixture into it.

  • Put it in the oven (preheated to 180°C / 350°F) and bake for about 30 minutes.

  • It’ll be ready when you see a light brown crust has formed on top. Remember that the toothpick won’t come out perfectly clean since this is a moist cake. The important thing is that it’s not completely liquid.

Pics and Cakes

Tips:

  • Even though brownie batter is pretty dense and it’s usually not necessary, a trick to keep the walnuts from sinking to the bottom of the pan is to coat them in flour or cocoa first.

  • To turn the brownie into a proper dessert, serve it with a scoop of vanilla ice cream and hot chocolate sauce on top.

Pics and Cakes

[English version] BROWNIES* *Ingredients:

  • 200 g chocolate

  • 100 g butter

  • 2 eggs

  • 100 g sugar (sugar or confectioners’ sugar)

  • 1/2 tsp baking soda

  • 1/2 tsp salt

  • 80 g flor

  • *100 g walnuts *

  • Cut chocolate into chunks and put into a microwave bowl with butter. Melt it slowly (stop every 20-30 seconds and stir with a spoon).

  • *In a large bowl, whisk the eggs and the sugar together to get a fluffy mix. *

  • Add chocolate cream and stir well.

  • *Mix flour, salt and baking soda. Sift the flour mix and add to the previous cream. *

  • *Stir well and add walnuts. *

  • *Prepare the baking pan (butter and flour it!) and pour the mixture on it. *

  • *Put into oven (preheated at 180ºC) and bake for 30 minutes. *

  • *It will be ready when you see a brown crust created on the top. If you insert a needle or knife to check the baking, it might not be clean because it’s supposed to be a ‘wet’ cake. *

  • ** Tips:- Normally this tip is not needed with brownies recipe because the dough is very thick. However, when you add nuts to a cake and you don’t want to have all of them at the bottom of your baking pan, you can coat the walnuts in flour or cocoa powder. *- For a perfect dessert result, serve the brownie with a scoop of vanilla ice-cream and hot chocolate sauce over it!

25 de octubre de 2012 · 4 min · Palstelera

Brownie

Whole Kitchen en su Propuesta Dulce para el mes de octubre nos invita a preparar un clásico estadounidense: brownies

Y qué cosa más rica, por favor. He hecho decenas de brownies en mi vida y he de confesar que casi siempre rescato una receta diferente y todas salen riquísimas. El secreto es que el brownie es un bizcocho compacto pero esponjoso (en ocasiones, incluso húmedo) ya que no suele llevar levadura y por tanto no crece. En algún he leído que el descubrimiento del brownie fue precisamente gracias a haberse olvidado echar la levadura a un bizcocho de chocolate. Sólo me queda decir… ¡bendito error!

Pics and Cakes


¿Qué necesitamos?

  • 200 g de chocolate para postres

  • 100 g de mantequilla

  • 2 huevos

  • 100 g de azúcar normal

  • 1/2 cucharadita de postre de bicarbonato

  • 1/2 cucharadita de sal

  • 80 g de harina

  • 100 g de nueces

Pics and Cakes

¿Cómo lo hacemos?

  • Troceamos el chocolate y lo ponemos junto con la mantequilla en un bol apto para microondas. Lo derretimos en intervalos de 20-30 segundos, removiendo cada vez para evitar que se nos queme.

  • En otro bol grande, batimos los huevos con el azúcar con ayuda de unas varillas para que nos quede una mezcla espumosa.

  • Agregamos el chocolate a esta mezcla espumosa y removemos bien.

  • Mezclamos la harina con la sal y el bicarbonato. Lo tamizamos y echamos sobre la mezcla anterior.

  • Removemos bien y añadimos las nueces.

  • Preparamos un molde de horno, engrasándolo y enharinándolo para que no se nos pegue y vertemos la mezcla en él.

  • Lo introducimos al horno (precalentado a 180º) y lo horneamos durante 30 minutos aproximadamente.

  • Estará listo cuando veamos que se ha formado una costra por encima de color marrón claro. Recordad que la aguja no saldrá perfectamente limpia ya que se trata de un bizcocho húmedo. Lo importante es que no esté completamente líquido.

 Pics and Cakes

Consejos:

  • Aunque la masa del brownie es bastante densa y no suele hacer falta, un truco para que las nueces no se vayan al fondo del molde consiste en rebozarlas antes en harina o cacao.

  • Para hacer del brownie un auténtico postre se puede servir con una bola de helado de vainilla y chocolate caliente por encima.

Pics and Cakes

 [English version] BROWNIES* *Ingredients:

  • 200 g chocolate

  • 100 g butter

  • 2 eggs

  • 100 g sugar (sugar or confectioners’ sugar)

  • 1/2 tsp baking soda

  • 1/2 tsp salt

  • 80 g flor

  • *100 g walnuts *

* *

  • Cut chocolate into chunks and put into a microwave bowl with butter.  Melt it slowly (stop every 20-30 seconds and stir with a spoon).

  • *In a large bowl, whisk the eggs and the sugar together to get a fluffy mix. *

  • Add chocolate cream and stir well.

  • *Mix flour, salt and baking soda. Sift the flour mix and add to the previous cream. *

  • *Stir well and add walnuts. *

  • *Prepare the baking pan (butter and flour it!) and pour the mixture on it. *

  • *Put into oven (preheated at 180ºC) and bake for 30 minutes. *

  • *It will be ready when you see a brown crust created on the top. If you insert a needle or knife to check the baking, it might not be clean because it’s supposed to be a ‘wet’ cake. *

* **  Tips:- Normally this tip is not needed with brownies recipe because the dough is very thick. However, when you add nuts to a cake and you don’t want to have all of them at the bottom of your baking pan, you can coat the walnuts in flour or cocoa powder. *- For a perfect dessert result, serve the brownie with a scoop of vanilla ice-cream and hot chocolate sauce over it!


25 de octubre de 2012 · 4 min · Palstelera

Cake pops

O pop cakes. Cualquier forma vale para denominar a estos pequeños dulces con forma de chupachus y rellenos de bizcocho. La idea original es aprovechar los recortes de un bizcocho que hayamos utilizado para hacer una tarta o uno que no nos haya quedado muy bonito y por tanto no nos dé pena destrozarlo (literalmente).

Pics and Cakes

¿Qué necesitamos?

  •       Bizcocho*
  •       Queso blanco de untar
  •       Chocolate para fundir
  •       Fideos de chocolate, de colores, crocanti, azúcar coloreada…
  •       Palitos de piruleta

Crema de mantequilla:

  •       250 g mantequilla (temperatura ambiente)
  •       500 g azúcar glas
  •       1 cucharadita de esencia de vainilla
  •       1 cucharada de agua
  •       Colorantes alimenticios
  • Si no tenéis ningún bizcocho hecho podéis preparar uno bien esponjoso (sponge cake) con los siguientes ingredientes:
  •       4 huevos
  •       250 g azúcar
  •       1 cucharadita de esencia de vainilla
  •       250 ml leche
  •       55 g mantequilla
  •       250 g harina
  •       2 cucharaditas levadura
  •       1/4 cucharadita de sal


¿Cómo lo hacemos?

Preparación del bizcocho:

  • Batimos los huevos con la batidora con el accesorio de varillas (este paso es esencial para que quede esponjoso).

  • Añadimos el azúcar y seguimos batiendo durante otros 4 minutos hasta que lo veamos cremoso. Añadimos la esencia de vainilla y mezclamos bien.

  • En otro cuenco mezclamos los ingredientes secos. A continuación añadimos la crema de huevos y azúcar y lo batimos a baja velocidad hasta que se hayan incorporado todos los ingredientes.

  • Calentamos en el microondas la leche con la mantequilla hasta que ésta se derrita. Añadimos al resto de la mezcla y removemos bien.

  • Lo ponemos en una fuente de horno previamente engrasada y enharinada.

  • Lo horneamos a 170ºC hasta que al insertar un pincho (o punta del cuchillo) en el bizcocho, éste salga limpio.

Pics and Cakes

Y ahora nos ponemos con los cake pops propiamente dichos:

  • Cuando el bizcocho esté frío cortamos un trozo y separamos aproximadamente el mismo volumen de queso blanco (hacer cake pops con un bizcocho entero puede ser una locura a no ser que tengáis una fiesta multitudinaria y no os importe pasaros todo el día haciendo bolitas).

  • Cogemos nuestro trozo de bizcocho, lo desmenuzamos con las manos en un cuenco y le añadimos el queso blanco. Mezclamos bien con las manos. (La masa que obtendremos no tiene que estar ni muy seca mi muy pegajosa, si vemos que sucede alguna de las dos cosas rectificaremos con más bizcocho o con más queso).

  • Ahora procedemos a hacer pequeñas bolitas con nuestra nueva masa. Es importante que nos queden muy lisas y no se vean resquebrajadas.

  • Derretimos un poquito de chocolate en el microondas.

  • Cogemos una bolita y le clavamos un palito de piruleta. A continuación, sacamos el palo lo mojamos en chocolate, dejamos caer un poco de chocolate derretido dentro del agujero y lo clavamos definitivamente en nuestra bolita. (Este procedimiento es importante para que luego la bola no se caiga del palo).

  • Repetimos estos pasos hasta acabar con toda la masa y los metemos en la nevera durante media hora, si es posible.

  • Derretimos el chocolate en el microondas con cuidado de que no se nos queme (ponemos unos segundos, sacamos y removemos. Así sucesivamente hasta obtener la textura deseada).

  • Cogemos nuestra bola ensartada y la bañamos en el chocolate. La sacamos y la hacemos girar para que quede recubierta toda la superficie.

  • La dejamos secar pinchada en un trozo de corcho blanco, una patata o una huevera (en cualquier caso hay que hacer los agujeros antes con un palo de brocheta para no destrozar el palo del cake pop). Repetimos con todas las bolas.

  • Una vez recubiertas de chocolate sólo queda echarle imaginación y decorarla con chocolate de otro color, pegarle virutas, azúcar de colores, fideos de chocolate, etc.

  • Otra opción es decorar nuestros cake pops con crema de mantequilla. Para ello mezclaremos con la batidora con varillas todos los ingredientes para la crema (velocidad baja si no queréis tener una ventisca de azúcar glas en vuestra cocina). Podemos teñir esta crema con colorantes alimenticios, la introducimos en la manga pastelera y sólo nos queda ir haciendo pequeños montoncitos hasta cubrir por completo la bola.


Consejos:

  • En vez de utilizar queso blanco para la masa podemos usar dulce de leche, nutella o cualquier producto untuoso.
  • Si utilizamos chocolate blanco podemos teñirlo con colorantes alimenticios pero hay que tener cuidado que no sean con base acuosa sino en gel o específicos de chocolate. También podemos utilizar unas grageas de chocolate de colores que venden en tiendas de repostería (candy melts).
  • Al derretir el chocolate si queremos que esté más líquido y que así sea más fácil bañar los cake pops, podemos añadir un poco de aceite de girasol, mantequilla o Crisco (manteca vegetal). ¡Nunca agua!
  • Si no tenéis virutas, crocanti o fideos podéis hacer azúcar coloreada muy fácilmente. Simplemente meted unas cuantas cucharadas de azúcar en una bolsa de plástico y añadid un par de gotas de colorante (éste sí puede ser líquido), cerrad la bolsa y agitad. Tendréis una bonita azúcar teñida del color que más os guste.
  • Si lo que queréis es inspiración y disfrutar de verdadero arte no dejéis de visitar la web de Bakerella.


Pics and Cakes


[English version] CAKE POPS *Ingredients:- Cake- Cream cheese- Chocolate chips or candy melts- Sprinkles for decoration- Lollipop sticks For buttercream:- 250 g butter- 500 powdered sugar- 1 tsp vanille- 1 tbsp water- Food coloring *For sponge cake:- 4 eggs -250 g sugar

  • 1 tsp vanilla

  • 250 ml whole milk

  • 55 g butter (lightly salted)

  • 250 g all-purpose flour

  • 2 tsp baking powder

  • 1/4 tsp salt Sponge cake:

  • Beat eggs in large mixing bowl with paddle attachment for 4 minutes.  Do not skip this step!

  • Add sugar, and continue beating for another 4-5 minutes until light and fluffy.  Add vanilla and stir on low until just combined.

  • In a separate bowl, sift together dry ingredients.  Add to eggs and sugar on low speed until just combined.

  • In the microwave, heat milk and butter on low heat just until butter is melted.  Add to batter, beat just until combined.

  • Pour into a greased and floured cake pan.

  • *Bake at 170ºC until the middle springs back when touched, or a toothpick inserted in the center comes out clean. *

 Cake pops:

  • After cake is cooked and cooled, cut a big portion and take the same amount of cream cheese.

  • Crumble the cake into a large bowl and mix thoroughly with cream cheese using your hands. (Mixture is not supposed to be too sticky or too dry)

  • *Roll mixture into small balls. It’s important to get a smooth surface. *

  • Melt chocolate chips or candy melts in the microwave.

  • Insert the lollipop stick into the cake ball. Then take it out and dip it in a little of melted chocolate. Then, put some chocolate into the hole you have just made and finally insert the lollipop stick again into the cake ball.

  • Repeat with the rest of mixture and place in the fridge for half an hour, if possible, to firm up.

  • *Melt the rest of chocolate in the microwave. *

  • Once firm, carefully insert the cake ball into the candy coating by holding the lollipop stick and rotating until covered.

  • Place in a styrofoam block, a potato or an egg box to dry.

  • *Then, let’s decorate with imagination! Use some sprinkles to cover your cake pop. *

  • You can also use buttercream for decoration. Mix all the ingredients with paddle attachment and place it in the piping bag. You can color the buttercream with food coloring.

  Tips:

- You can replace cream cheese by milk caramel (dulce de leche), nutella or any other cream. - You can use white chocolate and colour it or use candy melts (sold in different colours). Don’t use water-based food coloring! - When melting chocolate, you can add some butter, Crisco or sunflower oil to get a thinner texture.  Never water! - If you don’t have sprinkles at home, you can create coloured sugar. Put some sugar in a plastic bag, add some drops of food coloring and shake it. You’ll get nice coloured sugar in a few seconds! - If you want to get really inspired and enjoy real art, visit Bakerella’s website.


19 de julio de 2012 · 7 min · Palstelera

Cake Pops

Or pop cakes. Any name works for these little lollipop-shaped treats stuffed with cake. The original idea is to use up the trimmings from a cake you’ve made for something else, or one that didn’t turn out pretty enough — so you don’t feel bad destroying it (literally).

Pics and Cakes

What do we need?

  •   Cake*
    
  •   Cream cheese
    
  •   Chocolate for melting
    
  •   Chocolate sprinkles, colored sprinkles, crushed nuts, colored sugar...
    
  •   Lollipop sticks
    

Buttercream:

  •   250 g (1 cup + 2 tbsp) butter, at room temperature
    
  •   500 g (4 cups) powdered sugar
    
  •   1 tsp vanilla extract
    
  •   1 tbsp water
    
  •   Food coloring
    
  • If you don’t have any cake on hand, you can make a nice fluffy sponge cake with the following ingredients:
  •   4 eggs
    
  •   250 g (1 1/4 cups) sugar
    
  •   1 tsp vanilla extract
    
  •   250 ml (1 cup) milk
    
  •   55 g (4 tbsp) butter
    
  •   250 g (2 cups) all-purpose flour
    
  •   2 tsp baking powder
    
  •   1/4 tsp salt
    

How do we make it?

Making the sponge cake:

  • Beat the eggs with the whisk attachment of the mixer (this step is essential for getting a fluffy texture).

  • Add the sugar and keep beating for another 4 minutes until creamy. Add the vanilla extract and mix well.

  • In another bowl, mix the dry ingredients. Then add the egg-and-sugar cream and beat on low speed until everything is incorporated.

  • Heat the milk and butter in the microwave until the butter melts. Add to the rest of the mixture and stir well.

  • Pour into a greased and floured baking pan.

  • Bake at 170°C (340°F) until a skewer (or knife tip) inserted into the cake comes out clean.

Pics and Cakes

And now on to the cake pops themselves:

  • Once the cake has cooled, cut a piece and set aside roughly the same volume of cream cheese (making cake pops with a whole cake can be madness unless you’ve got a huge party and don’t mind spending the entire day rolling little balls).

  • Take your piece of cake, crumble it with your hands into a bowl and add the cream cheese. Mix well with your hands. (The mixture you get shouldn’t be too dry or too sticky — if either happens, fix it with more cake or more cream cheese.)

  • Now roll small balls with your new mixture. It’s important they come out very smooth, with no cracks visible.

  • Melt a little chocolate in the microwave.

  • Take a ball and stick a lollipop stick into it. Then pull the stick out, dip it in chocolate, drop a bit of melted chocolate inside the hole, and finally push the stick back into the ball for good. (This step matters so the ball doesn’t fall off the stick later.)

  • Repeat until you’ve used up all the mixture and put them in the fridge for half an hour, if possible.

  • Melt the chocolate in the microwave, being careful not to burn it (heat for a few seconds, take it out and stir. Repeat until you get the texture you want).

  • Take your skewered ball and dip it in the chocolate. Pull it out and rotate it so the whole surface gets coated.

  • Let it dry stuck into a piece of styrofoam, a potato or an egg carton (in any case, poke the holes ahead of time with a skewer so you don’t ruin the cake pop’s stick). Repeat with all the balls.

  • Once they’re coated in chocolate, all that’s left is to use your imagination and decorate them with chocolate of another color, sprinkles, colored sugar, chocolate jimmies, etc.

  • Another option is to decorate your cake pops with buttercream. To do that, mix all the buttercream ingredients with the whisk attachment (low speed if you don’t want a powdered-sugar blizzard in your kitchen). You can tint the buttercream with food coloring, transfer it to a piping bag, and pipe little mounds until the ball is fully covered.

Tips:

  • Instead of cream cheese for the mixture, you can use dulce de leche, Nutella, or any other spreadable filling.
  • If you use white chocolate, you can tint it with food coloring — but make sure it’s gel-based or chocolate-specific, never water-based. You can also use the colored chocolate buttons sold at baking shops (candy melts).
  • When melting the chocolate, if you want it runnier so the cake pops are easier to dip, you can add a bit of sunflower oil, butter, or Crisco (vegetable shortening). Never water!
  • If you don’t have sprinkles, jimmies or crushed nuts, you can make colored sugar very easily. Just put a few tablespoons of sugar in a plastic bag, add a couple of drops of food coloring (this one can be liquid), close the bag and shake. You’ll have lovely sugar tinted in whatever color you like.
  • If you’re after inspiration and want to enjoy some real artistry, definitely check out Bakerella’s website.

Pics and Cakes


Comments

Esther (2012-07-28 13:28:38):

Hi!

Just looking at this is making my mouth water! So much so that I think in a few days I’ll be getting to work on it, and I wanted to know where I can buy lollipop sticks in Madrid.

Thanks so much,

EPS

Palstelera (2012-07-28 15:09:13):

I’ll tell you the shops I usually buy from in Madrid, but with how popular all this stuff is getting, I’m sure you can find them in more places too: Decake, in the Estrella neighborhood, La tienda americana, near Plaza de Cristo Rey (Islas Filipinas metro stop), or Comercial Mínguez (downtown area).

I’ve seen that most of them close in August, so hurry up! And I’m waiting for the photos of the result…

Esther (2012-07-28 15:19:44):

Thanks so much!!! I promise photos if they turn out halfway decent, although yours have set the bar pretty high, hehe

19 de julio de 2012 · 5 min · Palstelera