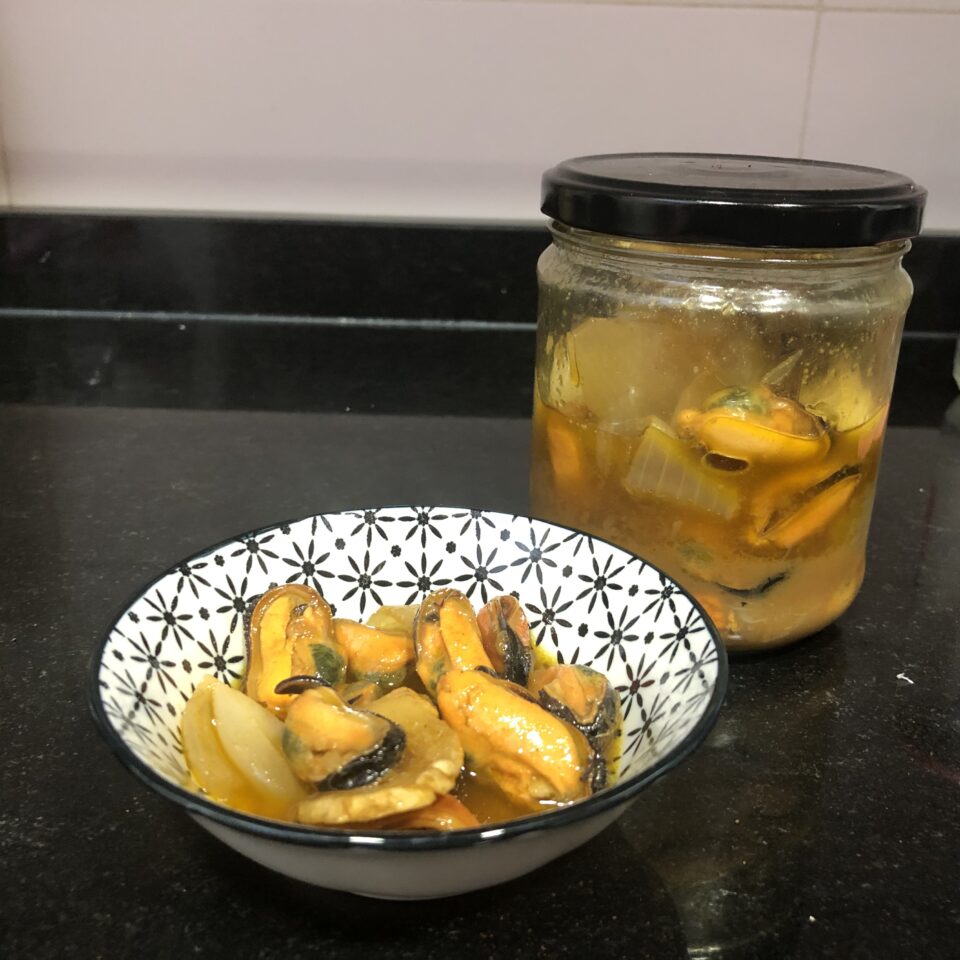
Mejillones en escabeche

A priori pensé que sería una de esas recetas que no merecería la pena hacerlas caseras pero cuán equivocada estaba. Me apetecía hacer el escabeche, ver el método y comprobar si conseguía ese sabor tan característico. Tanto me gustó que he repetido el proceso unas tres veces este verano. Cunden mucho y aguantan varios días en la nevera así que no hay excusa para tener un aperitivo bien rico en casa y hecho por uno mismo.

Ingredientes

  • 1 kg mejillones
  • 300 ml aceite oliva
  • 100 ml vinagre Jerez
  • 50 ml vinagre blanco (yo usé de arroz)
  • 100 ml vino blanco
  • 1 cabeza de ajos (dientes separados sin pelar)
  • 1 cebolla en juliana grande
  • 3 rodajas de jengibre fresco
  • Pimienta en grano (yo usé de Jamaica)
  • 2-3 cayenas
  • 3 hojas de laurel
  • Sal
  • 2 cucharaditas de pimentón (dulce, picante o mezcla)
Pics and Cakes

Elaboración

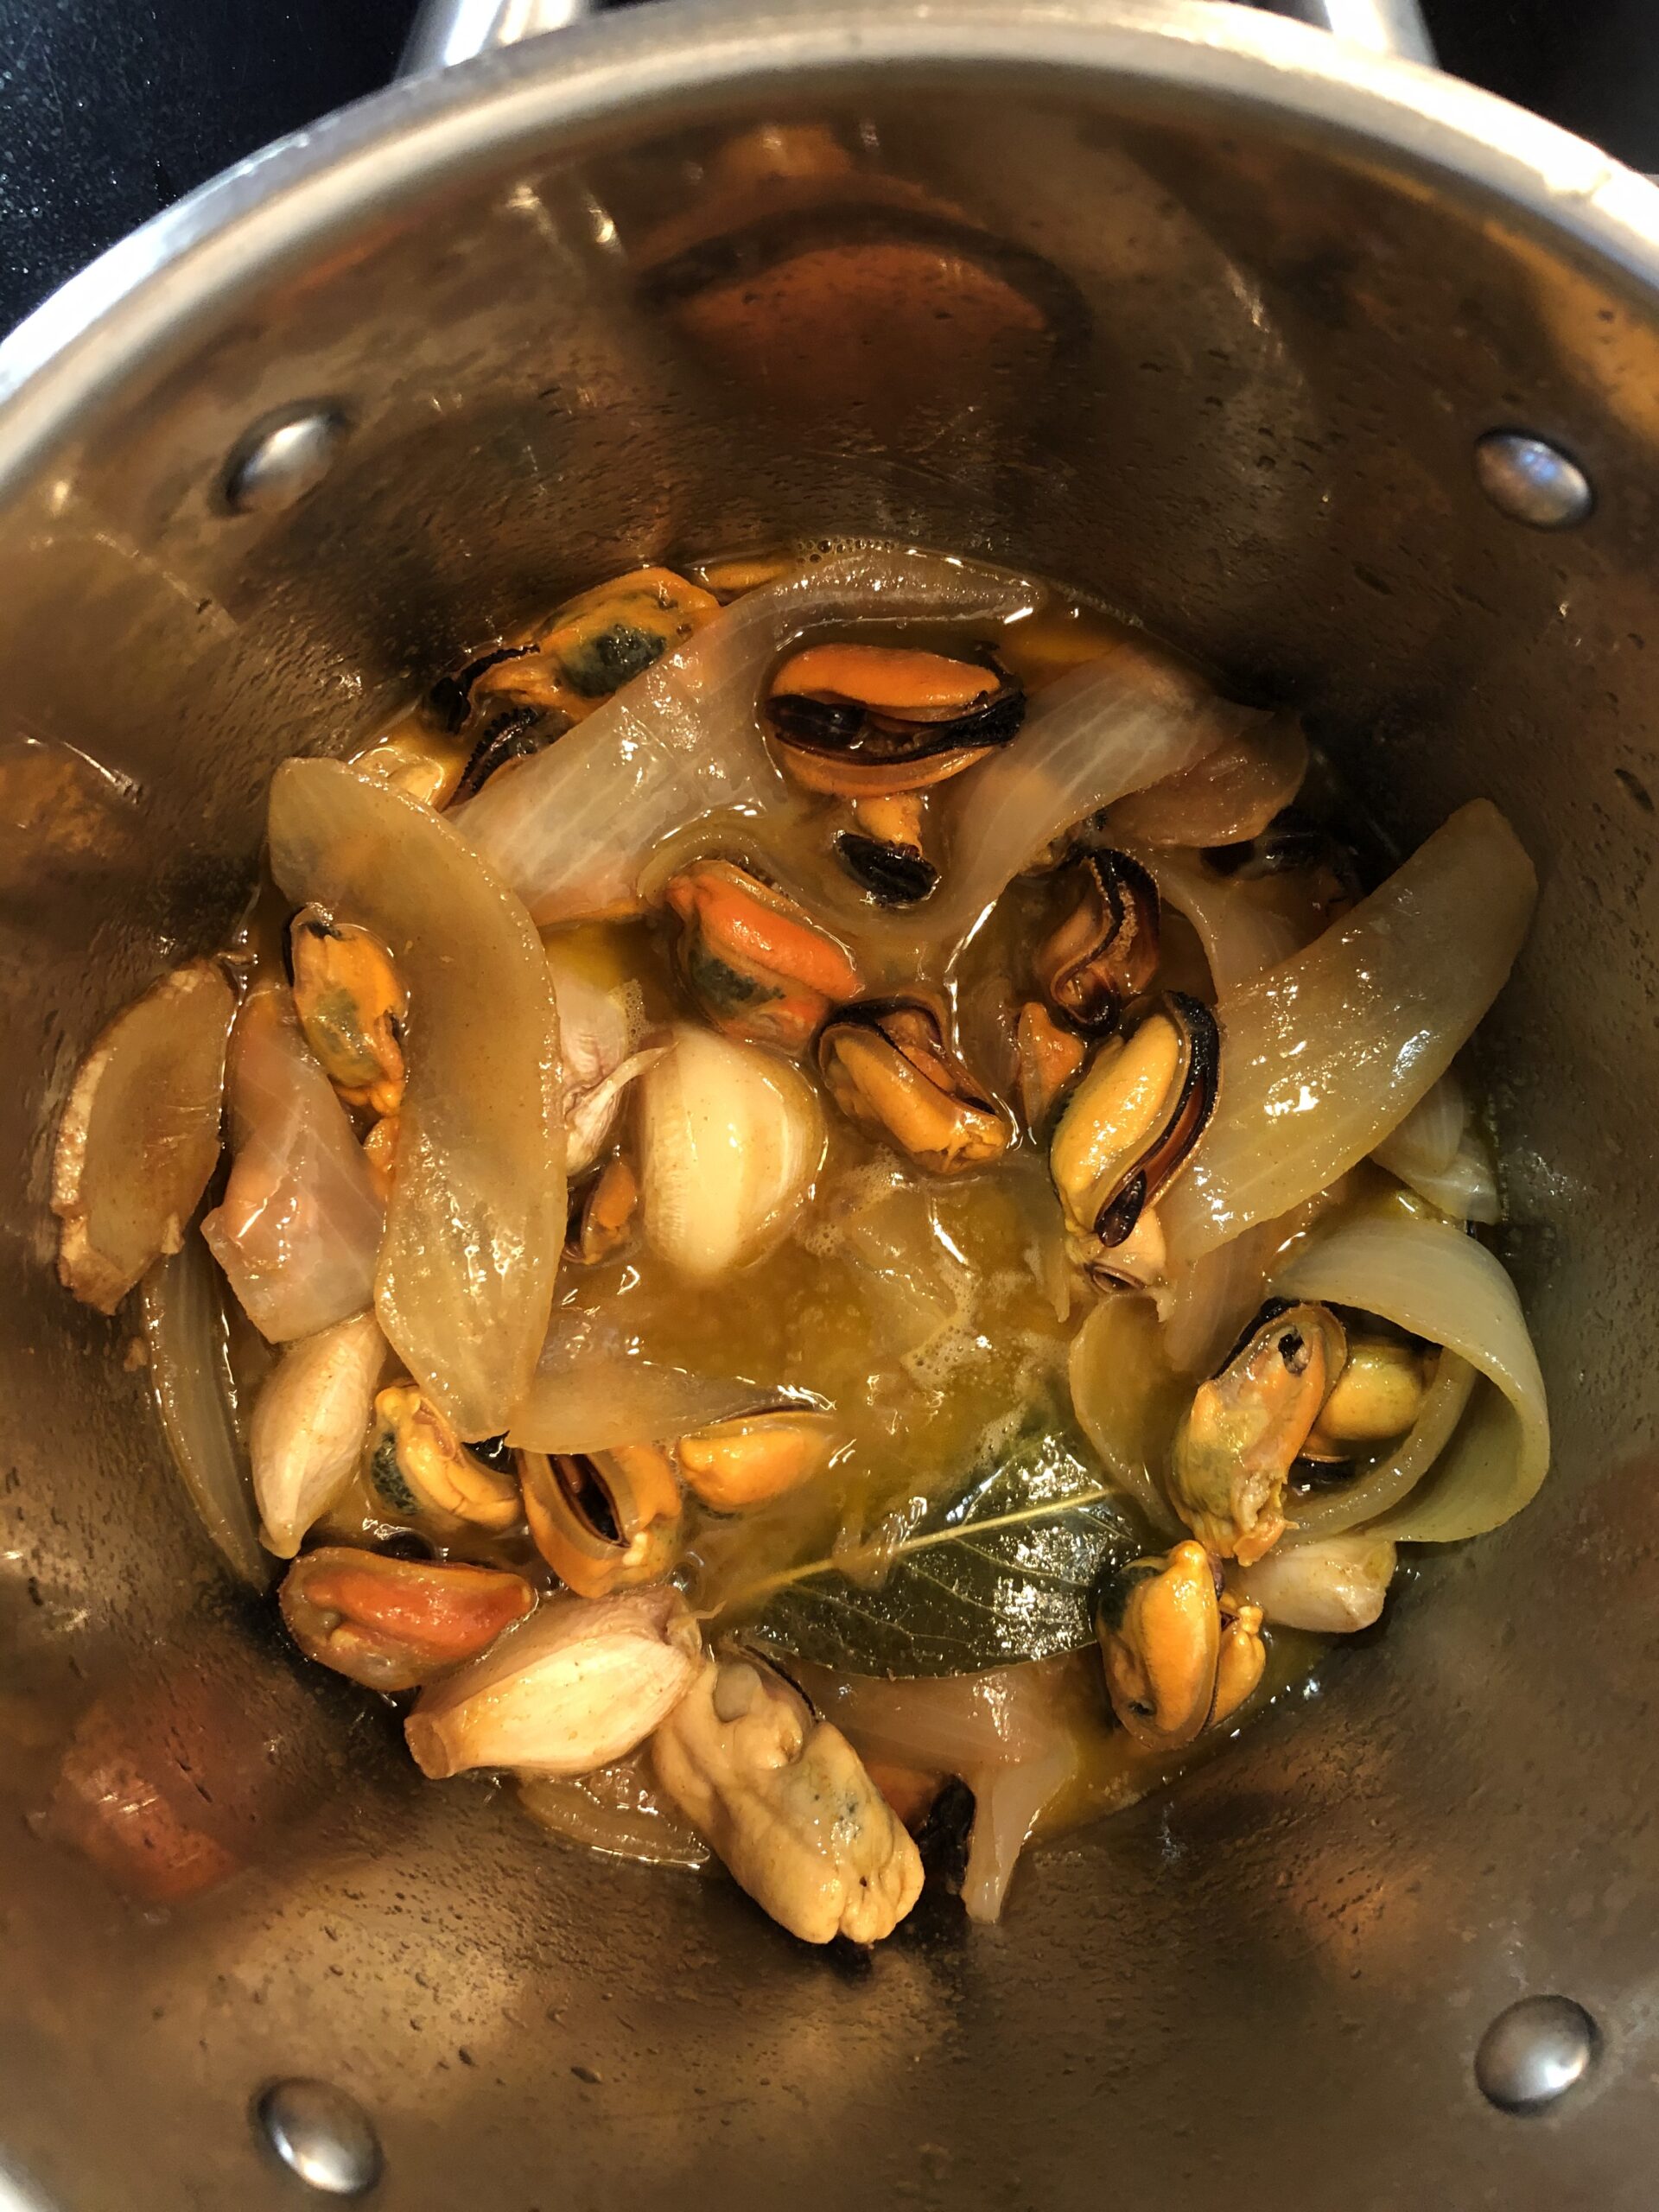
  1. Cocemos los mejillones al vapor para que se abran pero queden tiernos. Les quitamos las conchas y las barbas. Reservamos.
  2. Ponemos en una cazuela el aceite a calentar y añadimos todos los ingredientes excepto los mejillones cocidos y el pimentón.
  3. Dejamos cocer a fuego medio durante 30 min.
  4. Pasado el tiempo, apartamos del fuego y echamos el pimentón. Removemos bien y añadimos los mejillones.
  5. Volvemos a poner al fuego para darle un calentón a los mejillones durante unos segundos.
  6. Solo queda pasarlo a botes y listo para degustar. Aunque mejor dejarlos unas horas para que se asienten bien los sabores.

Consejos PiC

  • Puedes esterilizar previamente los botes que vayas a utilizar hirviéndolos en agua durante 15-20 minutos.
  • Con esta receta no estamos creando una conserva porque no hemos hecho el vacío ni los hemos hervido después por lo que te recomiendo guardarlos en la nevera. Cuando quieras disfrutarlos, te recomiendo que los saques un poco antes de la nevera para que se atemperen y el aceite no esté tan sólido.
  • Puedes añadir otras hierbas aromáticas o especias según tus gustos y tu despensa.
Pics and Cakes
Pics and Cakes

30 de septiembre de 2020 · 2 min · Palstelera

Pickled Mussels

At first I thought this would be one of those recipes that wasn't worth making at home, but how wrong I was. I felt like making the escabeche, seeing the method, and checking whether I could pull off that characteristic flavor. I liked it so much that I've repeated the process about three times this summer. They go a long way and keep for several days in the fridge, so there's no excuse not to have a really tasty homemade appetizer on hand.

Ingredients

  • 1 kg (2.2 lb) mussels
  • 300 ml (1.25 cups) olive oil
  • 100 ml (scant ½ cup) sherry vinegar
  • 50 ml (3 tbsp + 1 tsp) white vinegar (I used rice vinegar)
  • 100 ml (scant ½ cup) white wine
  • 1 head of garlic (cloves separated, unpeeled)
  • 1 large onion, julienned
  • 3 slices of fresh ginger
  • Whole peppercorns (I used allspice)
  • 2-3 dried chili peppers
  • 3 bay leaves
  • Salt
  • 2 teaspoons paprika (sweet, hot, or a mix)
Pics and Cakes

Method

  1. Steam the mussels just until they open but stay tender. Remove the shells and beards. Set aside.
  2. Heat the oil in a saucepan and add all the ingredients except the cooked mussels and the paprika.
  3. Let it simmer over medium heat for 30 minutes.
  4. Once the time is up, take it off the heat and add the paprika. Stir well and add the mussels.
  5. Put it back on the heat for a few seconds just to warm the mussels through.
  6. All that's left is to transfer everything to jars and they're ready to enjoy. Although it's better to leave them for a few hours so the flavors settle in nicely.

PiC Tips

  • You can sterilize the jars beforehand by boiling them in water for 15-20 minutes.
  • With this recipe we're not creating a true preserve since we haven't vacuum-sealed them or boiled them afterwards, so I recommend keeping them in the fridge. When you want to enjoy them, take them out of the fridge a bit ahead of time so they come to room temperature and the oil isn't so solid.
  • You can add other herbs or spices to taste, depending on what you have in your pantry.
Pics and Cakes
Pics and Cakes

30 de septiembre de 2020 · 2 min · Palstelera

Arroz con pollo al curry

Tras una aplastante victoria por cuatro votos, frente a los dos de la Crispy Chicken, (modo ironic on) hoy os traemos una riquísima receta que llevamos haciendo mucho tiempo y que desde que la probamos quedamos enamorados de ella.

Pics and Cakes


¿Qué necesitamos?

  • Una pechuga de pollo

  • Una taza de arroz

  • Media cebolla

  • 200 ml de nata

  • Curry al gusto

  • Sal

  • 2 dientes de ajo


¿Cómo lo hacemos?

  • Ponemos en una cazuela pequeña un poco de aceite. Picamos un ajo y lo añadimos. Cuando el ajo esté un poco dorado añadimos el arroz.

  • Rehogamos un poco el arroz y añadimos el doble de agua que de arroz. Echamos la sal.

  • Cuando empiece a hervir bajamos a fuego medio-bajo y tapamos. En 15-20 minutos estará listo.

  • Mientras se va haciendo el arroz, cortamos la cebolla en juliana.

  • Ponemos una sartén con un chorrito de aceite y añadimos la cebolla.

  • Cortamos el pollo en tiras y lo echamos en la sartén.

  • Cuando el pollo esté un poco hecho añadimos un par de cucharadas de curry.

  • Dejamos que se haga un poco todo junto e incorporamos la nata.

  • Llevamos a ebullición y añadimos más curry y sal al gusto. Hay que ir probando.


Consejos:

  • Si queréis hacer una bonita presentación podéis llenar medio vaso con el arroz ya hecho. Aplastáis un poco con una cuchara para que se compacte. Le dais la vuelta en el plato y os quedará una pequeña torre de arroz.

  • La primera vez que Palstelera lo probó estaba acompañado por melocotón en almíbar a la plancha. Podéis probar.

Pics and Cakes

[English version] CURRY CHICKEN WITH RICE* *Ingredients:

  • 1 chicken breast

  • 1 cup of rice

  • 1/2 onion

  • 200 ml cream

  • *Curry *

  • Salt

  • 2 garlic cloves

* *

  • *First prepare the rice. In a cooking pot, pour a bit of olive. Peel and chop the garlic cloves and stir fry. When it’s slightly golden brown, add the rice. *

  • *Stir fry the rice and add 2 cups of water. Add some salt. *

  • When the water boils, turn the heat down and cover with the lid. It will be ready in 15-20 minutes.

  • *Now, slice the onion. *

  • *Pour some olive into a frying pan and add the onion. *

  • *Cut chicken breast into strips and add to the frying pan. *

  • *After a few minutes, add a couple of tsp of curry. *

  • Stir fry again and add the cream.

  • *Simmer for a while and add more curry and salt if needed. *

* *

Tips:

- You can have an easy and nice presentation just using a cup to create a rice tower. Fill a cup with cooked rice, press with a spoon and turn the cup upside down over the dish.

- You can serve it with some canned peaches. Just grill them a bit and serve them as a garnish.

7 de mayo de 2013 · 3 min · Cesmm

Curry Chicken with Rice

After a crushing victory by four votes, against the two for the Crispy Chicken (irony mode on), today we bring you a delicious recipe we’ve been making for a long time and that we’ve been in love with ever since we first tried it.

Pics and Cakes

What do we need?

  • One chicken breast

  • One cup of rice

  • Half an onion

  • 200 ml (3/4 cup) heavy cream

  • Curry powder to taste

  • Salt

  • 2 garlic cloves

How do we make it?

  • Pour a bit of oil into a small pot. Chop a garlic clove and add it. When the garlic is slightly golden, add the rice.

  • Stir-fry the rice for a moment and add twice as much water as rice. Add salt.

  • When it starts to boil, lower the heat to medium-low and cover. It’ll be ready in 15-20 minutes.

  • While the rice cooks, slice the onion into thin strips.

  • Place a frying pan with a splash of oil over the heat and add the onion.

  • Cut the chicken into strips and toss it into the pan.

  • When the chicken is partly cooked, add a couple of tablespoons of curry powder.

  • Let everything cook together for a bit and stir in the cream.

  • Bring to a boil and add more curry and salt to taste. You’ll have to keep tasting as you go.

Tips:

  • If you want a nice presentation, you can fill half a glass with the cooked rice. Press it down a bit with a spoon so it packs together. Flip it onto the plate and you’ll have a little rice tower.

  • The first time Pastelera tried it, it was served with grilled peaches in syrup. Give it a try.

Pics and Cakes

[English version] CURRY CHICKEN WITH RICE* *Ingredients:

  • 1 chicken breast

  • 1 cup of rice

  • 1/2 onion

  • 200 ml cream

  • *Curry *

  • Salt

  • 2 garlic cloves

  • *First prepare the rice. In a cooking pot, pour a bit of olive. Peel and chop the garlic cloves and stir fry. When it’s slightly golden brown, add the rice. *

  • *Stir fry the rice and add 2 cups of water. Add some salt. *

  • When the water boils, turn the heat down and cover with the lid. It will be ready in 15-20 minutes.

  • *Now, slice the onion. *

  • *Pour some olive into a frying pan and add the onion. *

  • *Cut chicken breast into strips and add to the frying pan. *

  • *After a few minutes, add a couple of tsp of curry. *

  • Stir fry again and add the cream.

  • *Simmer for a while and add more curry and salt if needed. *

Tips:

- You can have an easy and nice presentation just using a cup to create a rice tower. Fill a cup with cooked rice, press with a spoon and turn the cup upside down over the dish.

- You can serve it with some canned peaches. Just grill them a bit and serve them as a garnish.

7 de mayo de 2013 · 3 min · Cesmm

Patatas rellenas

He de reconocer que somos un poco esponjas y todo lo que vemos que nos gusta intentamos hacerlo en casa. Este es el caso de la receta de hoy. Hace ya algunos años nos fuimos los amigos a pasar una Semana Santa a Camposancos, un pueblito bueno de Pontevedra, y allí Ana (con la ayuda de Germán) nos prepararon unas riquísimas patatas rellenas para el regimiento que éramos (bueno, igual no éramos tantos…) El caso es que nos encantó la idea y desde entonces la hemos incorporado a nuestro recetario.

Pics and Cakes


¿Qué necesitamos?

  • 4 patatas medianas

  • 5 lonchas de beicon

  • 1 cebolla

  • Queso

  • Sal

  • Pimienta


¿Cómo lo hacemos?

  • Asamos las patatas en el horno. (Podéis mirarlo aquí si no sabéis cómo hacerlo).

  • Mientras tanto cortamos el beicon y la cebolla y la pochamos en la sartén con un poco de aceite.

  • Cuando las patatas estés listas, podemos comprobar con un pincho de cocina, las sacamos del horno y las partimos por la mitad.

  • Con cuidado y con ayuda de una cuchara, vaciamos las mitades, dejando la piel con una capa fina de patata.

  • Mezclamos la patata extraída con el beicon y la cebolla pochados. Salpimentamos.

  • Rellenamos las mitades de patata con la mezcla, añadimos un poco de queso y ponemos en el horno a gratinar.


Consejos:

  • Acepta cualquier tipo de queso. A nosotros nos gusta con emmental (querido Watson).

  • Si no queréis hacer las patatas asadas, podéis cocerlas pero recomendamos que al menos gratinéis con el queso en el horno.

  • Esta es nuestra propuesta para el relleno. Podéis adaptarla a vuestros gustos.

Pics and Cakes

*[English version] STUFFED POTATOES * Ingredients:

  • *4 medium potatoes *

  • *5 bacon slices *

  • *1 onion *

  • Cheese

  • Salt

  • Pepper

* ** *

  • *Bake the potatoes in the oven. *

  • *Chop bacon and onion and stirfry in a frying pan with a bit of olive oil. *

  • *Check if the potatoes are ready and cut them into halves. *

  • *With a spoon empty the potatoes leaving the skin with a thin layer of potato. *

  • *Mix this potato with the onion and bacon. Add salt and pepper. *

  • *Fill the potato halves with this mix, add some cheese and enter into the oven. *


Tips:*- You can use any kind of cheese you like. We usually like to add emmental cheese. **- If you prefer, you can boil the potatoes instead of baking them. But for the final step we advice to keep using the oven. *- This is just a proposal, you can modify the ingredients for the filling according to your preferences.

27 de diciembre de 2012 · 2 min · Cesmm

Stuffed Potatoes

I have to admit we’re a bit like sponges — anything we see and like, we try to make at home. That’s exactly what happened with today’s recipe. A few years ago we went with friends to spend Easter week in Camposancos, a lovely little village in Pontevedra, and there Ana (with Germán’s help) made us some delicious stuffed potatoes that could have fed a regiment (well, maybe we weren’t quite that many…). The thing is, we loved the idea and ever since it’s been part of our recipe book.

Pics and Cakes

What do we need?

  • 4 medium potatoes

  • 5 slices of bacon

  • 1 onion

  • Cheese

  • Salt

  • Pepper

How do we make it?

  • Bake the potatoes in the oven. (You can check here if you’re not sure how to do it.)

  • Meanwhile, chop the bacon and onion and sauté them in a pan with a little olive oil.

  • When the potatoes are ready — you can check by poking them with a kitchen skewer — take them out of the oven and cut them in half.

  • Carefully, with the help of a spoon, scoop out the halves, leaving the skin with a thin layer of potato.

  • Mix the scooped-out potato with the sautéed bacon and onion. Season with salt and pepper.

  • Fill the potato halves with the mixture, add a bit of cheese on top, and put them in the oven to broil.

Tips:

  • Any kind of cheese works. We like it with Emmental (elementary, my dear Watson).

  • If you don’t feel like baking the potatoes, you can boil them instead, but we recommend at least broiling them with the cheese in the oven.

  • This is just our take on the filling. Feel free to adapt it to your taste.

Pics and Cakes

27 de diciembre de 2012 · 2 min · Cesmm

Blue Cheese Burger

Good and freezing morning. Today we’re bringing you a really simple recipe, the kind that even Jesús will be able to pull off without having to call twenty times :p The thing is, I’m a huge fan of making burgers at home. They’re usually way better than the ones you eat out, plus you make them to your own taste and load them with the ingredients you like best. This time we made the burger with blue cheese mixed right into the patty.

Pics and Cakes

What do we need?

(For each big-eater burger)

  • 200 g (7 oz) ground beef

  • 25-30 g (1 oz) blue cheese

  • 1 egg

  • Pepper

  • Salt

  • Breadcrumbs

  • Tomato

  • Lettuce

  • Onion

  • Burger bun

How do we make it?

  • Take the ground beef and dump it into a large bowl, since you’re going to be getting your hands in there.

  • Add the egg, a bit of freshly ground pepper, salt to taste, and a little breadcrumbs to give the meat some consistency.

  • Mix everything together with your hands.

  • Once all the ingredients are well combined, add the blue cheese cut into cubes. Try to work it into the meat but without pressing too hard so the cheese doesn’t break apart.

  • Wrap in cling film and shape into a burger.

  • Let the burger rest in the fridge for a couple of hours.

  • When you’re ready to eat, put a frying pan with a splash of oil over the heat and, while it’s warming up, start chopping the rest of the ingredients.

  • Cut the onion into rings, the lettuce into fairly large leaves (that way it’s easier to eat), and the tomato into slices.

  • Once the oil is hot, lower the heat a bit so the burger doesn’t burn on the outside while staying raw inside. Cook it to your liking (I like mine rare).

  • When it’s done, set it aside, wipe the pan clean with kitchen paper, and toast the bun for about half a minute.

  • Build your burger and enjoy.

Tips:

  • If you’re not going to use all the ground beef you bought, you can keep the formed patties in the freezer.

  • For me, as I said, I really enjoy a good burger, so 150 to 200 grams (5-7 oz) of ground beef is the “standard” size. Yes, that’s on the generous side, but hey, it’s a burger. Obviously you can make it with less.

  • If you want, you can dust the patty in flour before cooking it.

  • As my dad says when we play tute, “side dish requested.” A good beer or a cold Coke with fries (homemade or store-bought) is a must.

Pics and Cakes

[English version] **Ingredients:

(For each big hamburger)

  • 200 g de minced meat

  • 25-30 g de blue cheese

  • 1 egg

  • Pepper

  • Salt

  • Bread crumbs

  • Tomato

  • Salad

  • Onion

  • Hamburger bun

  • Place minced meat into a large bowl and mix well with your hands.

  • Add the egg, a bit of salt and pepper and some bread crumbs.

  • Mix well all ingredients.

  • Then chop blue cheese into small squares and add to the meat mix. Try to ‘knead’ the mix integrating the cheese but keeping it into pieces.

  • Make a ball, wrap in cling film and and flatten it with your hand to have hamburger shape.

  • Leave for a couple of hours in fridge.

  • Then, pour a bit of olive oil in the frying pan. Let it get warm and start preparing your fresh ingredients (onion, tomato and salad).

  • Cut onion into rings, tomato into slices and salad (lettuce) into big parts (it will be easier to eat).

  • Cook the hamburger according to your preferences (well done, medium or rare).

  • When it’s ready take it out from the pan, clean the frying pan with kitchen paper and toat the bread bun.

  • Prepare you hamburger sandwich with all the ingredients and enjoy it.

Tips:

  • You can freeze the prepared raw hamburgers and you will only need to defrost and cook in the pan whenever you need it.

  • This amount of minced meat is for a big hamburger but it’s up to you the size of your hamburger.

  • You can coat in flour the raw hamburger before cooking it.

  • It’s a must to serve the hamburger with a cold beer and chips or fries.


11 de diciembre de 2012 · 4 min · Cesmm

Hamburguesa con queso azul

Buenos y gélidos días. Hoy os presentamos una receta bien sencilla, de esas que hasta Jesús será capaz de hacer sin necesidad de llamar veinte veces :p El caso es que yo soy muy fan de hacer las hamburguesas en casa. Normalmente están mucho mejor que las que comes por ahí y encima las haces a tu gusto y le pones los ingredientes que más te gustan. En esta ocasión nosotros hicimos la hamburguesa integrando queso azul en ella.

Pics and Cakes

**¿Qué necesitamos? **

(Para cada hamburguesa de buen comedor)

  • 200 g de carne picada

  • 25-30 g de queso azul

  • 1 huevo

  • Pimienta

  • Sal

  • Pan rallado

  • Tomate

  • Lechuga

  • Cebolla

  • Pan de hamburguesa

¿Cómo lo hacemos?

  • Cogemos la carne picada la pasamos a un bol grande, ya que hay que manosear.

  • Añadimos el huevo, un poco de pimienta recién molida, sal al gusto y un poco de pan rallado para dar consistencia a la carne.

  • Mezclamos todo con las manos.

  • Cuando esté bien mezclado todos los ingredientes añadimos el queso azul cortado en cuadrados. Intentaremos integrarlo en la carne pero sin hacer mucha fuerza para que el queso no se rompa.

  • Envolvemos en film transparente y damos forma de hamburguesa.

  • Dejamos que la hamburguesa repose en la nevera un par de horas.

  • Cuando la vayamos a comer, ponemos una sartén con un chorrito de aceite en el fuego y mientras coge temperatura vamos cortando el resto de ingredientes.

  • Partimos la cebolla en aros, la lechuga en hojas más o menos grandes (así será más fácil de comer) y el tomate en rodajas.

  • Cuando el aceite esté caliente bajamos un poco la temperatura  para que no se nos queme mucho por fuera y se quede muy cruda por dentro. La hacemos a nuestro gusto (a mí me gusta poco hecha).

  • Cuando esté lista reservamos y limpiamos la sartén con papel de cocina y ponemos el pan medio minuto para tostarlo un poco.

  • Montamos la hamburguesa y a disfrutar.

Consejos:

  • Si no vais a consumir toda la carne picada que habéis comprado podéis conservar la hamburguesa ya hecha en el congelador.

  • Para mí, que como he dicho antes disfruto de las hamburguesas, de 150 a 200 gramos de carne picada es la medida “estándar” . Sí, es bastante tirando a mucho pero es que es una hamburguesa. Evidentemente podéis hacerla con menos cantidad.

  • Si queréis podéis pasar la hamburguesa por harina antes de hacerla en la sartén.

  • Como dice mi padre cuando jugamos al tute “se ruega acompañamiento”. Una buena cerveza o una coca-cola fría con patatas (hechas o compradas) son imprescindibles.

Pics and Cakes

[English version] **Ingredients:

(For each big hamburger)

  • 200 g de minced meat

  • 25-30 g de blue cheese

  • 1 egg

  • Pepper

  • Salt

  • Bread crumbs

  • Tomato

  • Salad

  • Onion

  • Hamburger bun

  • Place minced meat into a large bowl and mix well with your hands.

  • Add the egg, a bit of salt and pepper and some bread crumbs.

  • Mix well all ingredients.

  • Then chop blue cheese into small squares and add to the meat mix. Try to ‘knead’ the mix integrating the cheese but keeping it into pieces.

  • Make a ball, wrap in cling film and and flatten it with your hand to have hamburger shape.

  • Leave for a couple of hours in fridge.

  • Then, pour a bit of olive oil in the frying pan. Let it get warm and start preparing your fresh ingredients (onion, tomato and salad).

  • Cut onion into rings, tomato into slices and salad (lettuce) into big parts (it will be easier to eat).

  • Cook the hamburger according to your preferences (well done, medium or rare).

  • When it’s ready take it out from the pan, clean the frying pan with kitchen paper and toat the bread bun.

  • Prepare you hamburger sandwich with all the ingredients and enjoy it.

Tips:

  • You can freeze the prepared raw hamburgers and you will only need to defrost and cook in the pan whenever you need it.

  • This amount of minced meat is for a big hamburger but it’s up to you the size of your hamburger.

  • You can coat in flour the raw hamburger before cooking it.

  • It’s a must to serve the hamburger with a cold beer and chips or fries.


11 de diciembre de 2012 · 4 min · Cesmm

Pasta carbonara

La verdad es que ésta es una receta que llevamos haciendo mucho tiempo y que a mí me parece “la original”, la forma en que pensaba que este plato, típico italiano, era preparado por las *mammas *de toda Italia. Qué equivocado estaba… Todos los italianos que nos han visto preparar este plato se han sorprendido, reído e indignado por partes iguales al vernos preparar “su plato” con nata en lugar de utilizar uovo. Aquí podéis ver cómo lo preparan ellos y yo paso sin más dilación a presentaros nuestra forma (habiendo probado las dos me quedo con la nuestra :p)

Pics and Cakes

**¿Qué necesitamos? **

(Para 2 personas)

  • 200 gr. de espaguetis

  • 4 lonchas de beicon

  • 1/2 cebolla

  • 200 ml. de nata de cocinar

  • Sal y pimienta


¿Cómo lo hacemos?

  • Ponemos a cocer los espaguetis en abundante agua (cuando ya esté hirviendo) un poco sazonada.

  • Mientras la pasta está cociendo, la dejaremos en torno a los 15 minutos, ponemos un chorrito de aceite en una sartén y echamos la cebolla.

  • Dejamos que se sofría un poco y añadimos el beicon.

  • Cuando esté hecho añadimos la nata y dejamos que hierva.

  • Añadimos una pizca de sal, cuidado con pasarse ya que el bacón da sabor a la salsa, y un poco de pimienta. Reservamos si todavía no está cocida la pasta.

  • Escurrimos la pasta y mezclamos con la salsa carbonara.


Pics and Cakes


Consejos:

  • Dependiendo de vuestra cocina, olla y pasta puede que ésta esté lista un poco antes de los quince minutos o un poco más tarde. No dejéis de vigilarla si os gusta la pasta “al dente”.

  • El beicon puede ser sustituido por panceta.

  • Podéis espolvorear un poco de queso parmesano cuando sirváis la pasta.


Pics and Cakes

 [English version] SPAGHETTI CARBONARA* *Ingredients:

  • 200 g spaghetti

  • 4 slices of bacon

  • 1/2 onion

  • 200 ml cream

  • Salt and pepper

* *

  • *Add the spaghetti into a saucepan filled with boiling water with salt. *

  • *In the meanwhile (the pasta will be cooked after 15 minutes aprox.) add a bit of olive oil into a frying pan. Add the onion. *

  • *Fry lightly and add the bacon. *

  • *When it is cooked, add cream and leave simmer for a while. *

  • *Add salt and pepper. Set aside until pasta is ready. *

  • Strain the pasta and mix with the carbonara sauce.

Tips:- Depending on your saucepan, stove, etc. the pasta will need more or less minutes to be cooked. Watch out to get the perfect cooking, specially if you like pasta al dente. *- You can sprinkle the pasta dish with Parmesan cheese.


6 de noviembre de 2012 · 4 min · Cesmm

Pasta Carbonara

Truth is, this is a recipe we’ve been making for ages and one that I always thought was “the original” — the way I figured this typical Italian dish was prepared by mammas all over Italy. How wrong I was… Every Italian who’s seen us make this dish has been surprised, has laughed, and has gotten outraged in equal measure when watching us prepare “their dish” with cream instead of uovo. Here you can see how they make it, and without further ado I’ll show you our version (having tried both, I’ll stick with ours :p)

Pics and Cakes

What do we need?

(Serves 2)

  • 200 g (7 oz) spaghetti

  • 4 slices of bacon

  • 1/2 onion

  • 200 ml (3/4 cup) cooking cream

  • Salt and pepper

How do we make it?

  • Put the spaghetti to cook in plenty of water (once it’s boiling), lightly salted.

  • While the pasta is cooking — we’ll leave it for around 15 minutes — pour a splash of oil in a frying pan and add the onion.

  • Let it sauté a little and add the bacon.

  • Once it’s done, add the cream and let it come to a boil.

  • Add a pinch of salt — careful not to overdo it since the bacon already gives flavor to the sauce — and a bit of pepper. Set aside if the pasta isn’t ready yet.

  • Drain the pasta and mix with the carbonara sauce.

Pics and Cakes

Tips:

  • Depending on your stove, pot, and pasta, it may be ready a little before the fifteen minutes or a little after. Keep an eye on it if you like your pasta “al dente”.

  • The bacon can be swapped for pancetta.

  • You can sprinkle a bit of Parmesan cheese on top when you serve the pasta.

Pics and Cakes


Comments

Miguel (2012-11-07 12:01:29):

I usually make this same recipe, but when I add the salt and pepper, I take the chance to throw in a tiny bit (very, very little) of nutmeg.

And I also prefer the cream version over the egg one.

tía pi (2012-11-07 23:41:40):

For me, carbonara is without onion, with bacon, cream and egg, but I’ll give yours a try.

Palstelera (2012-11-09 21:26:49):

I love nutmeg. Truth is I always add it to béchamel but never to carbonara — I’ll try it next time :-)

Palstelera (2012-11-09 21:27:17):

Without onion? Try it, it’s delicious!

Vio (2012-12-07 20:44:34):

Boo! I love the blog, but you also know I couldn’t stay quiet knowing you call this carbonara. Maledetti!

I’ll take the chance to tell you that, aside from the amazing recipes, the site is super pretty and the photos rock ;-)

Big kiss!

Palstelera (2012-12-11 13:04:25):

hehe, Vio. It’s not that we call it carbonara… it’s that half of Spain does! That’s why, to avoid hurting any feelings, we started the post by making clear that what’s called carbonara in Spain has nothing to do with the Italian recipe… But honestly, I love the Spanish version :-)

Vio (2013-03-05 12:39:39):

Haha, sure — you, Spain… it’s all about complaining :-P

The truth is I do really like this version, but I think the Italian one is much tastier when it’s done right, with crispy bacon, lots of pepper, and nice juicy spaghetti. I will say a lot of Italians make a pretty lousy version and it really brings the dish down.

6 de noviembre de 2012 · 3 min · Cesmm