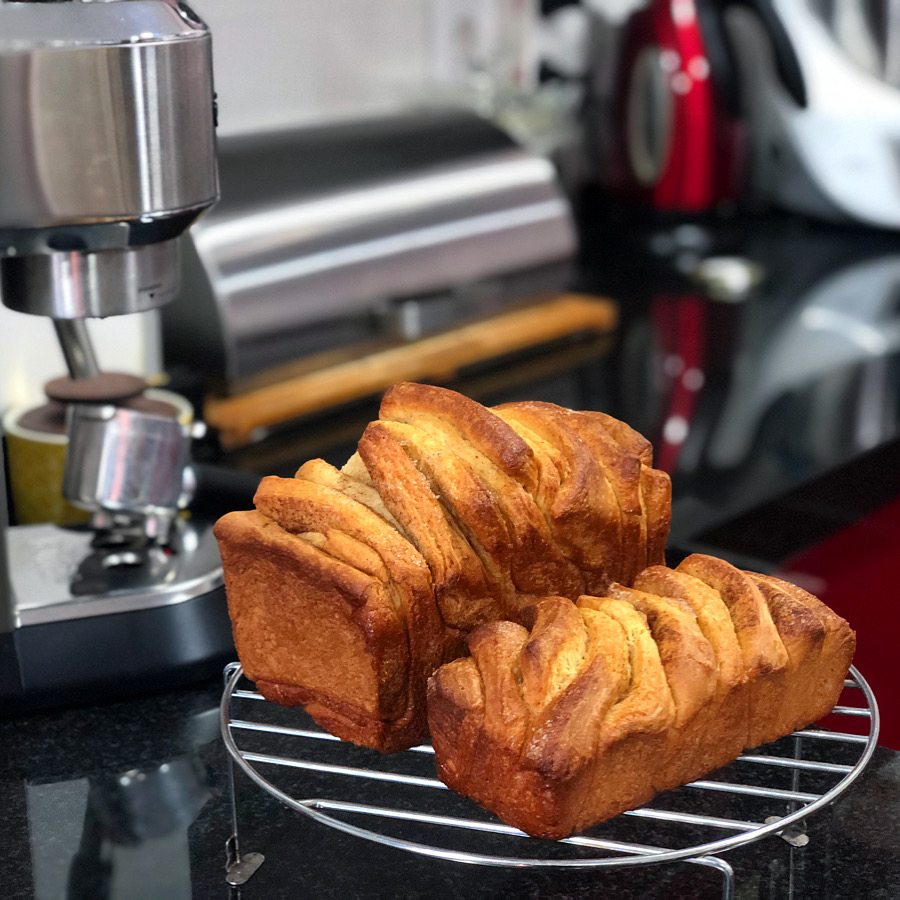
Cinnamon Pull-Apart Bread

One day I woke up, saw this gorgeous brioche-style sweet bread on Claudia&Julia's Instagram, and knew I had to make it. In my case, I made two loaves, a medium one and a small one to give away. I really liked the texture, though I think I should have been more patient with the first proof of the dough so it would rise more and be fluffier. My taste-testers loved it; I'll have to make it again to truly enjoy it once my brain decides to start picking up the aroma and flavor of cinnamon again, after fully recovering from the aftereffects of damn COVID-19.

Pics and Cakes

Ingredients

  • 330 g (2.6 cups) bread flour
  • 4 g (1.25 tsp) active dry yeast
  • 125 ml (1/2 cup) milk
  • 2 eggs
  • 75 g (6 tbsp) sugar
  • 1/2 teaspoon salt
  • 60 g (4 tbsp) butter (at room temperature)
  • 1 teaspoon ground cinnamon

Method

  1. Mix the bread flour and dry yeast in a bowl. Make a well in the center and add the lightly beaten eggs, the warm milk, 30 g (2 tbsp) of the sugar (reserve the rest), and the salt.
  2. Whisk the wet ingredients with a fork while gradually incorporating the flour and yeast mixture. Stir until the dough gets too stiff, then turn it out onto a clean work surface and knead for 10 minutes. You want to end up with a smooth dough.
  3. Next, add the butter, cut into small cubes, and keep kneading until it's fully incorporated.
  4. Grease a deep, roomy bowl with a touch of oil and let the dough rest inside it, covered with a clean dry kitchen towel, until it doubles in size (it'll depend on room temperature, but easily two hours).
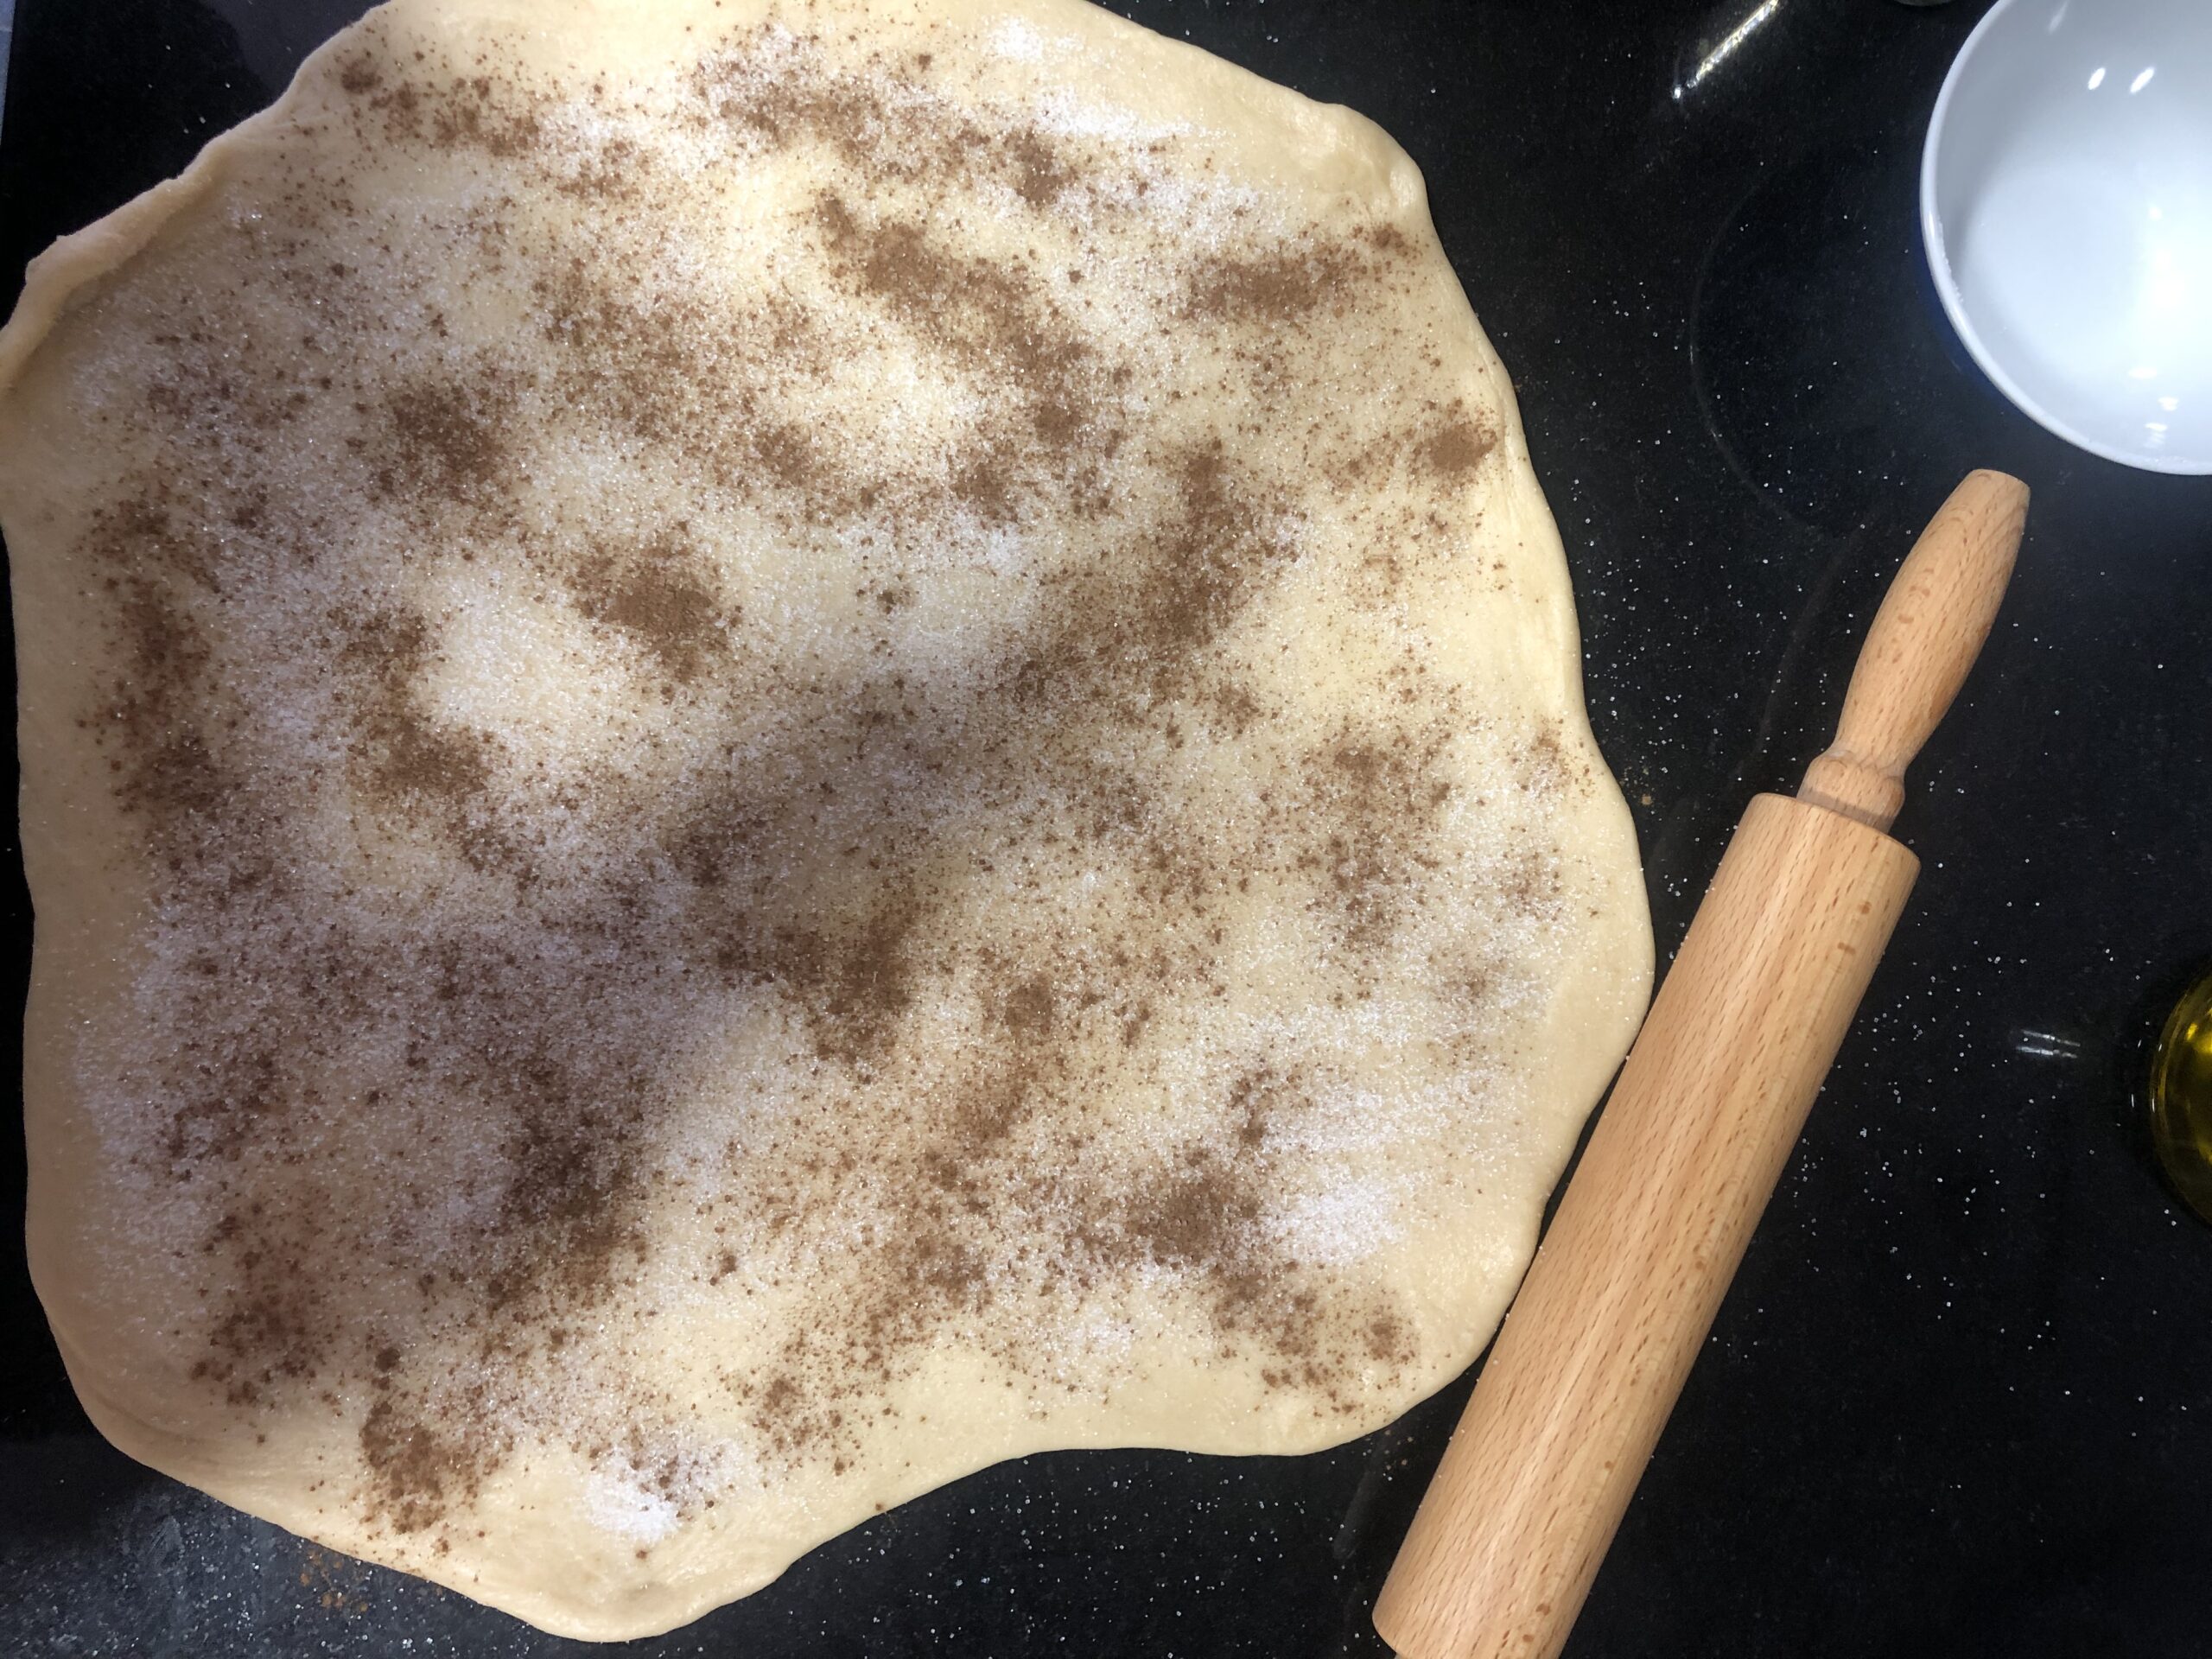
  5. Once the first rise is done, punch it down by pressing with your fingers a few times. Roll the dough out with a rolling pin to about one centimeter (about 3/8 inch) thick.
  6. Sprinkle with the rest of the sugar and the ground cinnamon and press down with your hands or the rolling pin so it sticks well.
  7. Cut the dough into squares slightly narrower than the loaf pan you're going to bake it in. Don't worry if they're a bit uneven.
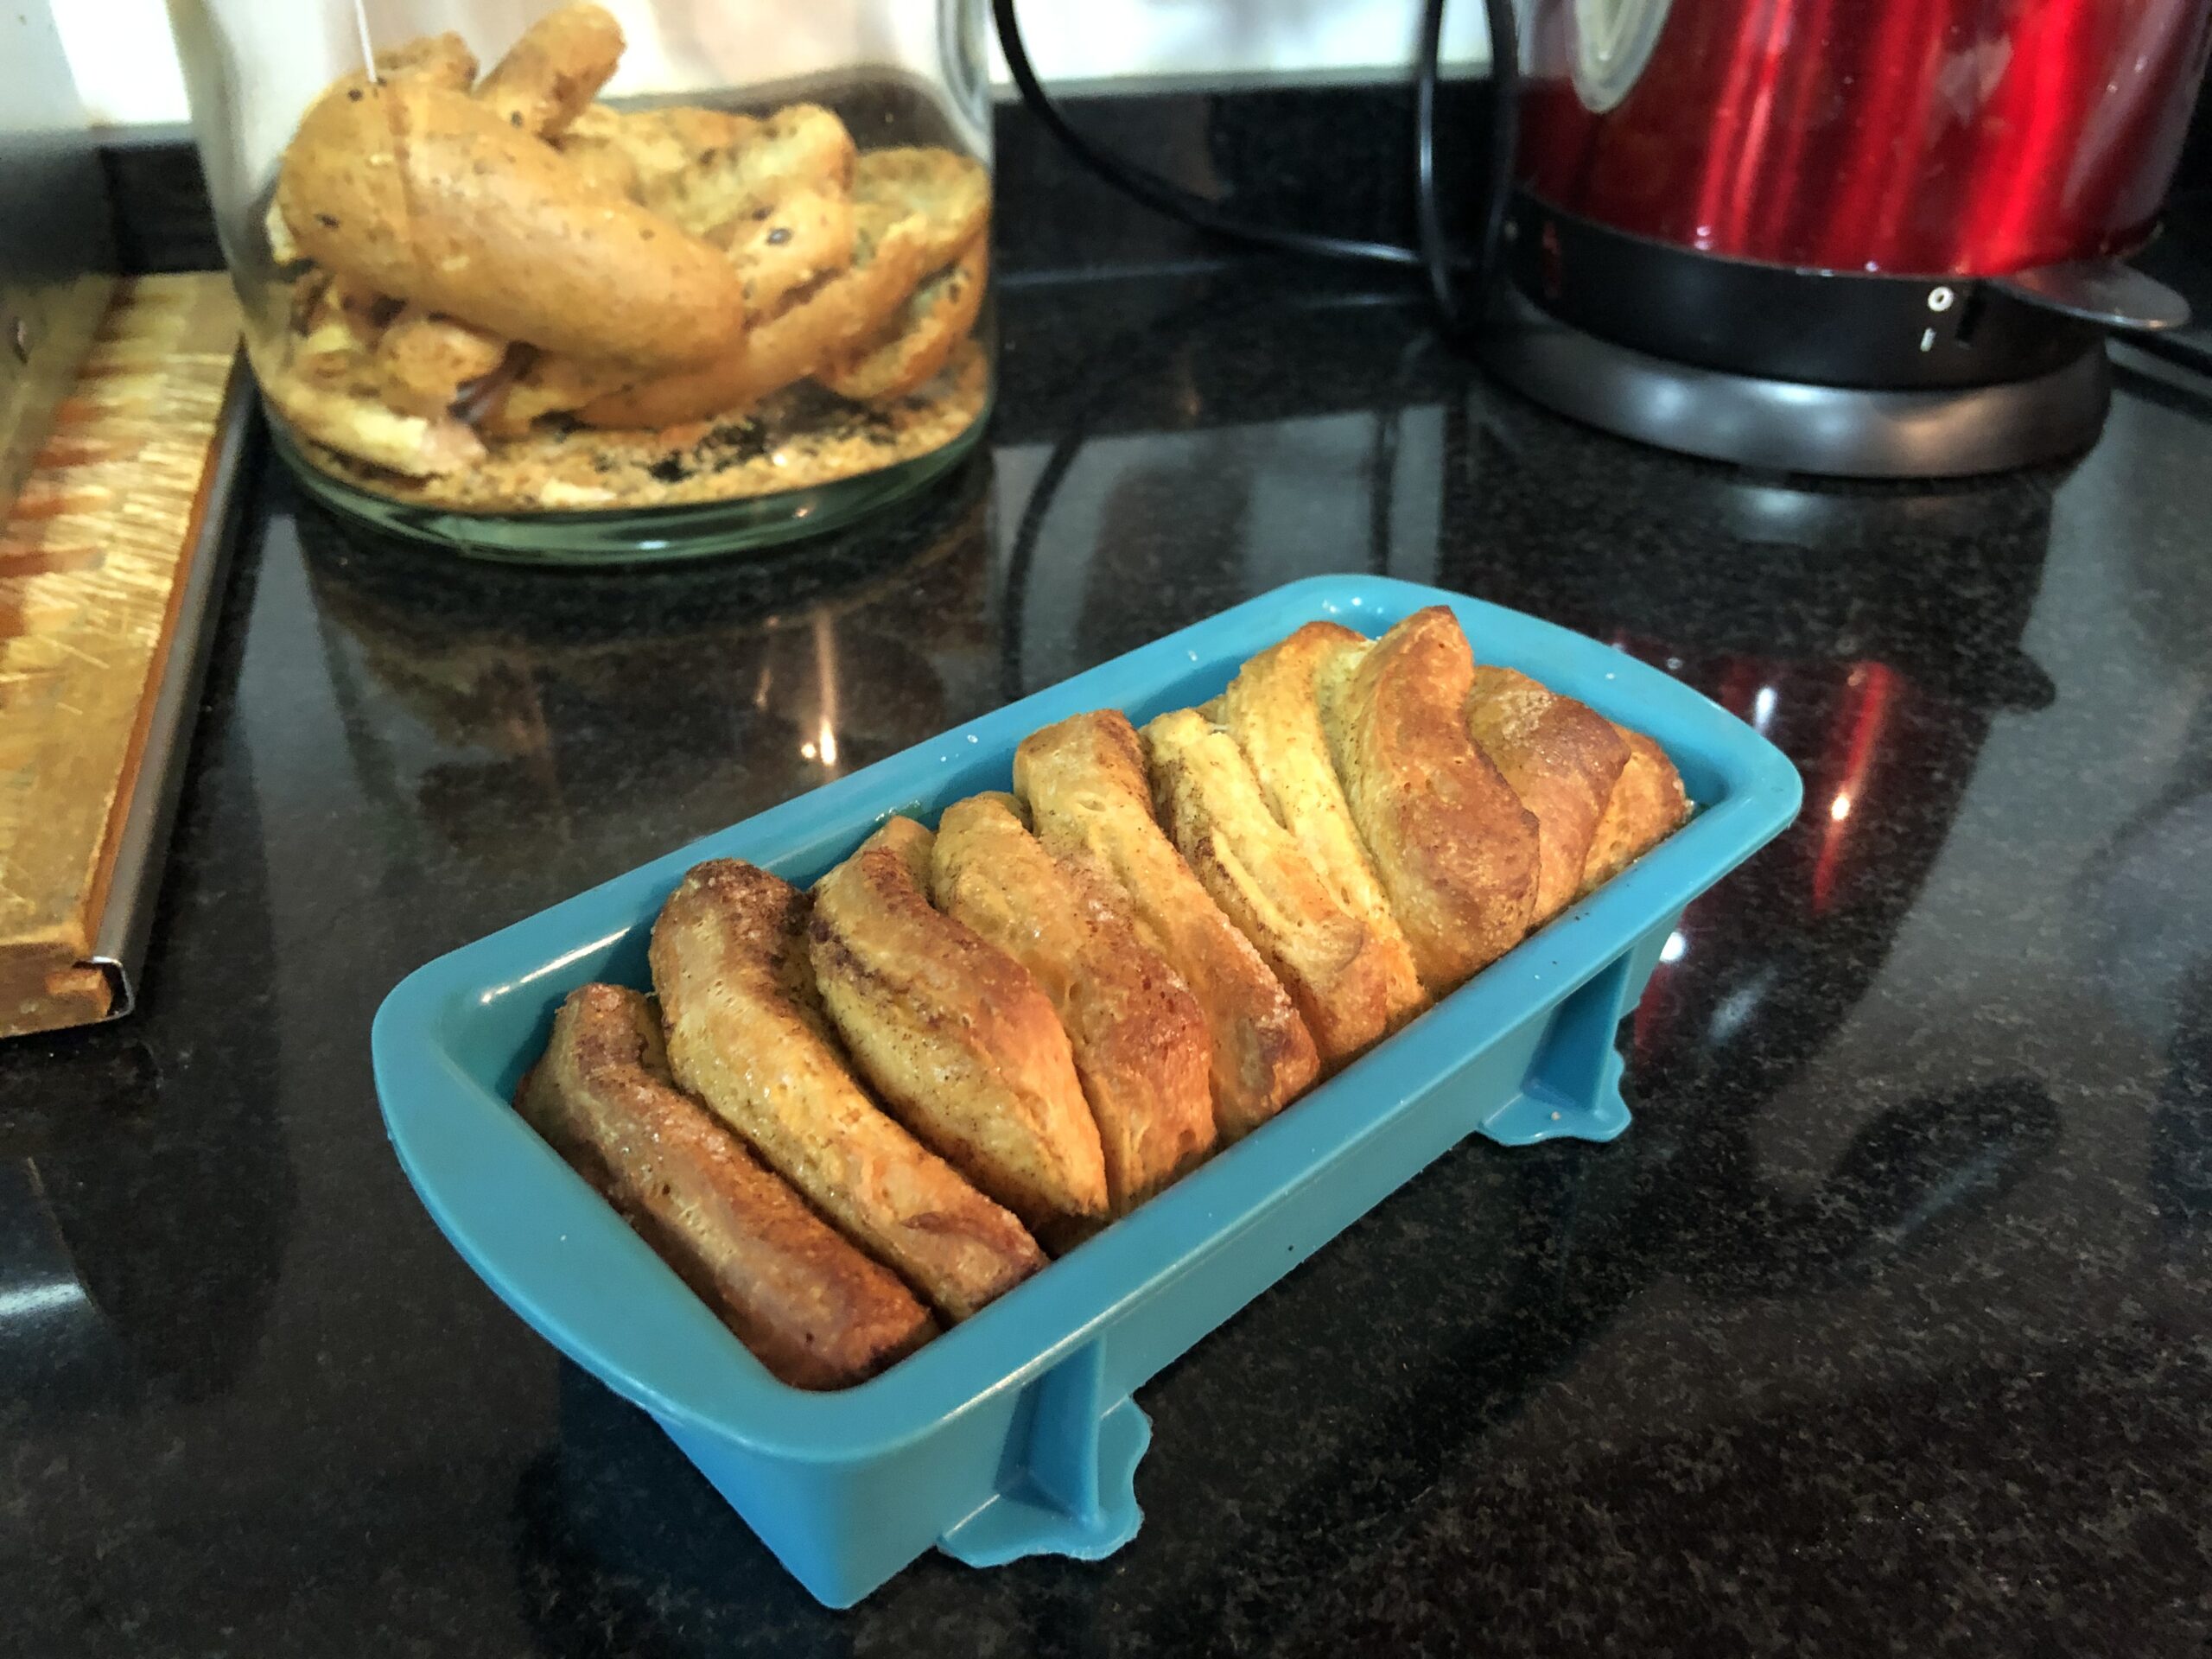
  8. Place the squares of dough vertically inside the previously greased loaf pan. Any sugar and cinnamon left on the counter from falling off the dough as you arranged it can be sprinkled over the top of the bread.
  9. Cover the pan with a clean dry kitchen towel and let it rise again for about 60 minutes, or until it nearly reaches the rim of the pan.
  10. Put the pan in the oven, preheated to 180°C (350°F) with top and bottom heat, and bake for 45-50 minutes. If you see it browning too much, cover with foil.
  11. Take it out of the oven and let it cool before unmolding and serving.
Pics and Cakes
Pics and Cakes
Pics and Cakes

PiC Tips

  • Be patient with the proofing times — they depend on room temperature, so in winter it'll take longer, but not waiting long enough can completely ruin the recipe.
  • If you don't like cinnamon, leave it out or swap it for something else. It won't be a cinnamon pull-apart bread anymore, but it'll be just as delicious.
30 de octubre de 2020 · 3 min · Palstelera

Pull-apart bread de canela

Un día me levanté, vi esta hermosura de pan dulce tipo brioche en el Instagram de Claudia&Julia y supe que tenía que hacerlo. En mi caso hice dos panes, uno mediano y otro pequeño para regalar. Me gustó mucho la textura aunque creo que tendría que haber sido más paciente con el primer levado de la masa para que creciera más y fuera más esponjoso. A mis catadores les gustó, yo tendré que repetirlo para degustarlo bien cuando mi cerebro decida volver a percibir el aroma y sabor de la canela tras haber superado totalmente las secuelas de la maldita COVID-19.

Pics and Cakes

Ingredientes

  • 330 g de harina de fuerza
  • 4 g de levadura seca de panadería
  • 125 ml de leche
  • 2 huevos
  • 75 g de azúcar
  • 1/2 cucharadita de sal
  • 60 g de mantequilla (a temperatura ambiente)
  • 1 cucharadita de canela en polvo

Elaboración

  1. Mezclamos la harina de fuerza y la levadura seca de panadería en un bol. Hacemos un hueco en el centro en el que añadimos los huevos, ligeramente batidos, la leche templada, 30 g de azúcar (reservamos el resto) y la sal.
  2. Batimos los ingredientes líquidos con un tenedor al tiempo que incorporamos, poco a poco, la mezcla de harina y levadura. Removemos hasta que la masa nos lo permita, entonces la pasamos a una superficie de trabajo limpia y amasamos durante 10 minutos. Tenemos que conseguir una masa lisa.
  3. A continuación añadimos la mantequilla, cortada en pequeños dados, y continuamos amasando hasta que quede bien incorporada.
  4. Engrasamos un recipiente hondo y amplio con una pizca de aceite y dejamos reposar la masa en su interior, cubierta con un trapo limpio y seco hasta que doble su volumen (dependerá de la temperatura ambiente pero podrán ser dos horas fácilmente).
  5. Pasado el tiempo del primer levado, desgasificamos presionando con los dedos varias veces. Extendemos la masa con un rodillo hasta obtener un altura de un centímetro de grosor aproximadamente.
  6. Espolvoreamos con el resto del azúcar y la canela molida y aplastamos con las manos o con el rodillo para que se incruste bien.
  7. Cortamos la masa en cuadrados un poco más estrechos que el molde en el que vayamos a hornearlo. No importa si son un poco irregulares.
  8. Colocamos los cuadrados de masa en el interior del molde previamente engrasado, en vertical. El azúcar y canela que te quede en la encimera porque se haya caído de la masa al colocarla, puedes echarla por encima del pan.
  9. Tapamos el molde con un trapo limpio y seco y dejamos levar nuevamente durante, aproximadamente, 60 minutos o hasta que casi alcance el borde del molde.
  10. Introducimos el molde en el horno, precalentado a 180ºC con calor arriba y abajo, y cocemos durante 45-50 minutos. Si vemos que se dora demasiado cubrimos con papel de aluminio.
  11. Retiramos del horno y dejamos enfriar antes de desmoldar y servir.
Pics and Cakes
Pics and Cakes
Pics and Cakes

Consejos PiC

  • Ten paciencia con los tiempos de levado, dependerá de la temperatura ambiente así que en invierno te llevará más tiempo pero no esperar lo suficiente puede arruinarte la receta por completo.
  • Si no te gusta la canela, omítela o sustitúyela. Ya no será un pull-apart bread de canela pero estará igual de rico.
30 de octubre de 2020 · 3 min · Palstelera

Custard Cream Tartlets

As strange as it sounds, this recipe could pass as an express one, even though we have to make a custard cream. And the secret of today’s recipe lies precisely in making that cream fast, easy, delicious, and in just 10 minutes. The trick: the microwave, that great forgotten appliance we only ever bother with to heat up the morning milk.

Pics and Cakes

What do we need?

For the cream:

  • 100 g (1/2 cup) sugar

  • 40 g (1/3 cup) cornstarch

  • 3 egg yolks

  • 1/2 liter (2 cups) milk

  • 1 tablespoon butter

For the tartlet:

  • 1 sheet of puff pastry

  • Sugar

  • Cinnamon

Pics and Cakes

How do we make it?

  • First we prepare the custard cream. Whisk the sugar and cornstarch together in one bowl, and the egg yolks with the milk in another.

  • Then mix everything together and pop it in the microwave for 8 minutes at max power, stopping every 2 minutes to stir.

  • Once the 8 minutes are up, add the butter, stir, and you’re done.

  • Next, roll the puff pastry sheet out a bit with a rolling pin and sprinkle it with sugar and cinnamon.

  • Roll the dough into a log, pressing it with your fingers so it doesn’t end up too uniform.

  • Cut it into several pieces and flatten each one to form a sort of mini-pizza.

  • Use a muffin tin (the kind with several holes, like little flan molds). Place each circle into one of the cavities and press it in to form a tartlet.

  • Pop it in the oven, preheated to 180°C (350°F), for about 12 minutes.

  • Keep an eye on it and press the dough down every now and then to keep the hollow where the cream will go.

  • Once baked, fill them with the cream, sprinkle with sugar, and brown them in the oven or with a blowtorch.

Tips:

  • Microwaves come in different wattages so the cooking time may vary. As you heat the cream, you’ll see it thicken until it reaches the consistency you want.

  • If you want to use the custard cream for another recipe that calls for a thinner cream, just cut down on the amount of cornstarch.

Pics and Cakes

25 de marzo de 2013 · 2 min · Palstelera

Pasteles de crema

Por raro que parezca, esta receta podría calificarse de exprés, incluso teniendo que preparar una crema pastelera. Y es que el secreto de la receta de hoy está precisamente en preparar esta crema de forma rápida, fácil, con resultados deliciosos y en sólo 10 minutos. El truco: el microondas, ese gran olvidado al que sólo dejamos el privilegio de calentar la leche por las mañanas.

Pics and Cakes


¿Qué necesitamos?

Para la crema:

  • 100 g de azúcar

  • 40 g maizena

  • 3 yemas

  • 1/2 litro de leche

  • 1 cucharada de mantequilla

Para la tartaleta:

  • 1 plancha de hojaldre

  • Azúcar

  • Canela


Pics and Cakes


¿Cómo lo hacemos?

  • En primer lugar preparamos la crema pastelera. Batimos bien el azúcar y la maizena por un lado y por otro las yemas con la leche.

  • Después mezclamos todo y lo metemos 8 minutos en el microondas a máxima potencia parándolo cada 2 minutos para removerlo.

  • Pasados los 8 minutos añadimos la mantequilla, removemos y listo.

  • A continuación estiramos un poco la plancha de hojaldre con un rodillo y espolvoreamos con azúcar y canela.

  • Hacemos un rollo con la masa aplastándolo con los dedos para que no quede uniforme.

  • Cortamos en varios trozos y aplanamos cada uno de ellos formando una especie de minipizza.

  • Utilizamos un molde de horno para magdalenas (de esos que tienen varios agujeros como si fueran flaneras pequeñas). Colocamos cada círculo en uno de los huecos y lo acomodamos para formar una tartaleta.

  • Lo metemos al horno previamente calentado a 180 grados durante 12 minutos aproximadamente.

  • Vamos vigilándolo para ir aplastando la masa de vez en cuando y así mantener el hueco donde luego pondremos la crema.

  • Una vez horneados, rellenamos con la crema, se espolvorean con azúcar y se gratinan en el horno o con soplete.


Consejos:

  • Los microondas pueden tener distintas potencias así que tal vez el tiempo de cocción varía. A medida que vayáis calentando la crema verás que irá espesando hasta obtener la consistencia deseada.

  • Si queréis utilizar la crema pastelera para otra receta que requiera una crema menos espesa, basta con disminuir la cantidad de maizena utilizada.

 Pics and Cakes [English version]  CUSTARD CREAM TARTALETTES* *

For the cream:

  • 100 g sugar

  • 40 g corn flour

  • 3 egg yolks

  • 1/2 l milk

  • 1 tbsp butter


For the tartalette:

  • 1 sheet of puff pastry

  • Sugar

  • Cinammon

* *

  • Firt prepare the custard cream. Mix corn flour and sugar. In a different bowl, beat egg yoks with milk.

  • Mix everything and put into microwave for 8 minutes (maximum power). Stop microwave every 2 minutes to stir well the mixture and keep cooking.

  • When time is over, add butter, stir well and set aside.

  • Roll out the puff pastry with the rolling pin and sprinkle with sugar and cinammon.

  • Make a roll and press with your fingers to have irregular shapes.

  • Cut several thick slices and press with the fingers to get a flat circle.

  • Use a baking tray for muffins and place each pastry circle in a hole. Create a tartalette using your fingers.

  • Bake in the oven (preheat at 180ºC) for around 12 min.

  • Keep an eye on it to press the pastry with a spoon to keep the hole where the cream will be placed later.

  • Once baked, stuff with cream, sprinkle with some sugar and burn it with a kitchen blowtorch or in the oven.

* *

Tips:

- Microwaves have different power so time may differ. You’ll see how the cream gets thicker and thicker when cooking.

- If you want a smoother cream, reduce the amount of the corn flour used.

* *

25 de marzo de 2013 · 3 min · Palstelera