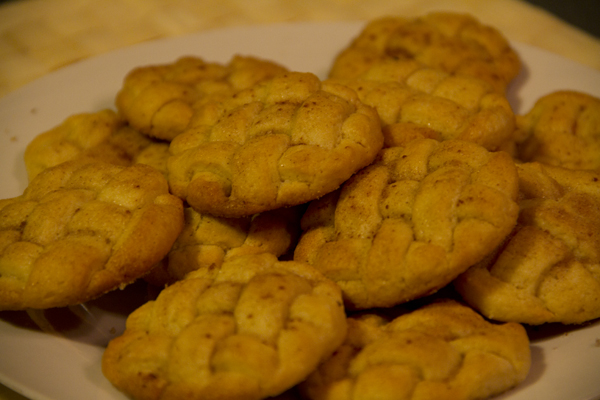
Shortcrust Pastry Cookies

On one of my regular visits to the La Receta de la Felicidad blog, I came across this recipe for express cookies. In my case they weren’t quite so express since I decided to make the shortcrust pastry myself instead of buying it. In any case, the idea of the woven cookies is striking for how simple it is and how pretty they look, so you have no excuse not to try them.

Pics and Cakes

What do we need?

  •   1 sheet of shortcrust pastry*
    
  •   1 tablespoon of butter
    
  •   Sugar and cinnamon
    

*If instead of buying it you’d rather make the shortcrust pastry yourselves, you’ll also need:

  •   200 g (1.5 cups) of flour
    
  •   100 g (7 tbsp) of cold butter
    
  •   1 egg
    
  •   A pinch of salt
    
  •   A pinch of sugar
    

Pics and Cakes

How do we make it?

Shortcrust pastry:

  • Put all the ingredients in a bowl. The butter has to be very cold and cut into small pieces.

  • Start kneading with your hands until you have a smooth dough, shape it into a ball and wrap it in plastic wrap. Let it rest in the fridge for an hour.

  • Once the waiting time is up, roll out the dough with a rolling pin until it’s quite thin (about 5 mm / 1/4 inch). You can do this with the help of a couple of sheets of baking paper or even plastic wrap.

Cookies:

  • Preheat the oven to 200°C (390°F).

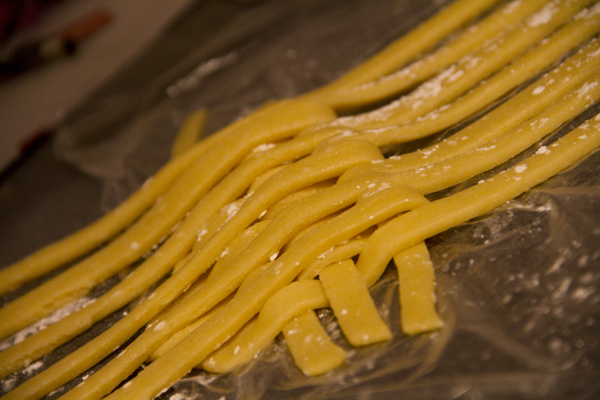
  • With the dough rolled out, cut strips of 1 cm (about 1/2 inch) with a sharp knife.

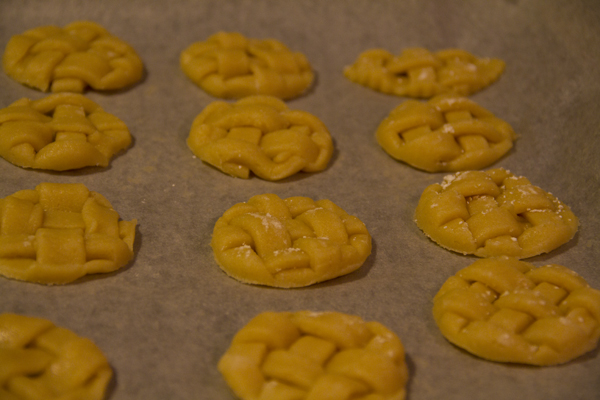
  • Now we weave the dough. To do this, place half of the strips together in a vertical position. Then place the other strips one by one horizontally, passing them through the vertical strips alternating over and under (since a picture is worth a thousand words, take a look at the photo).

  • With a round cookie cutter (or any shape you like), cut out the cookies from the freshly woven dough.

  • Brush them with melted butter and sprinkle with sugar and cinnamon (don’t be shy with the amount, since shortcrust pastry isn’t sweet).

  • Place the cookies on a tray lined with baking paper and bake them for 10 minutes.

Tips:

  • You can add any spice or flavoring you like. In my case I used a powdered sugar flavored with cinnamon and apple.
  • So they don’t lose their shape too much, the shortcrust pastry has to be very cold and you should handle it as little as possible (in this case, it’s easier with store-bought shortcrust pastry).
  • If you make them a bit bigger than a coffee cup, you can serve them in the original way that @SandeeA does.

Pics and Cakes

30 de agosto de 2012 · 3 min · Palstelera

Salmorejo

Salmorejo is one of my favorite dishes, and I can vouch for the fact that I’m not the only person in my family who, the moment we get back from a long trip abroad, the first thing we ask for at home is a good salmorejo and a proper Spanish potato omelette. This dish is typical of Córdoba and it shares similarities with gazpacho since, at the end of the day, it’s a kind of cold soup or cream with tomato as its base. Needless to say, the better the tomatoes you use, the better the salmorejo will turn out.

Pics and Cakes

What do we need?

(serves 6)

  •   1 kg (2.2 lb) ripe red tomatoes
    
  •   1 piece of bread
    
  •   150 ml (2/3 cup) olive oil (or to taste)
    
  •   1-2 cloves of garlic
    
  •   Salt
    
  •   Vinegar
    
  •   4 eggs
    
  •   200 g (7 oz) Serrano ham
    

How do we make it?

  • Wash the tomatoes, cut them into pieces and put them in a bowl.

  • Add the bread (it can be stale bread that we’ve soaked in water for a few minutes beforehand to soften it), salt, garlic, vinegar and a little olive oil.

  • Blend with the mixer until you get a smooth cream. Keep adding more olive oil until you get a soft, creamy texture. The amount of olive oil depends on personal taste. The more oil you add, the thicker it will get and the pinker it will look.

  • Taste and adjust the salt and vinegar to your liking. Set aside in the fridge.

  • Boil the eggs, peel them and cut them into small cubes.

  • Chop the Serrano ham into small cubes too.

  • Serve the salmorejo very cold with ham and egg on top.

Tips:

  • Some people prefer to peel the tomatoes for a finer result. To make this easier, you can blanch the tomatoes first to remove the skin comfortably.
  • You can make the salmorejo a bit lighter by skipping the bread and reducing the amount of oil.
  • As always, garlic is up to personal taste, but don’t go overboard or you’ll kill the flavor.

Pics and Cakes

*[English version] SALMOREJO (Spanish cold tomatoe soup)

  • **Ingredients (serves 6):- 1 kg ripe red tomatoes
  • Bread

  • 150 ml olive oil

  • Vinegar

  • Salt

  • 1-2 cloves of garlic- 4 eggs- 200 g cured ham

  • Wash and cut tomatoes into pieces. Place into a large bowl.

  • Add bread (you can use stale bread so put it before with some water in order to soften it), salt, garlic, vinegar and a bit of olive oil.

  • Blend all the ingredients with a mixer or blender until you get a smooth cream. Add more olive oil until creamy and soft. (The amount of olive oil is up to you).

  • Try and add more salt and vinegar if necessary. Place into fridge.

  • Boil the eggs, peel them and cut into small pieces.

  • Cut ham into small pieces.

  • Serve cold salmorejo with some egg and ham in the top.

    Tips:- You can peel the tomatoes. For making it easier, scald tomatoes in boiling water.

  • If you want to prepare a lighter version, avoid adding bread and reduce the amount of olive oil.

  • Use garlic according to your preferences but don’t add too much or you won’t taste the other flavours!


Comments

zordor (2012-08-21 05:56:31):

Haha I can vouch for it, I can vouch that the first thing we need to see on the table is salmorejo and potato omelette :) Ufff you’ve made me so hungry! Well, not even hungry! Salmorejo is something you can eat even when you’re not hungry!

Marisa (2012-08-21 09:26:34):

Yummmm! I’m making it tomorrow

20 de agosto de 2012 · 3 min · Palstelera

Ham Puff Pastry Twists

Knowing how little my dad cares for innovation in food (what he calls “chuminás” — fancy nonsense), whenever we put together appetizers for birthdays or special celebrations we always have to play the card of foods he considers “essentials”. So for my last birthday we went looking for appetizers he might actually like, and over at Directo al Paladar we found this one.

Pics and Cakes

What do we need?

  •   1 sheet of refrigerated puff pastry
    
  •   100 grams (3.5 oz) of serrano ham
    
  •   Oregano
    
  •   1 egg
    

How do we make it?

  • Preheat the oven to 200°C (390°F).

  • Cut the puff pastry sheet into strips roughly 1.5 cm (0.6 in) wide and 10 cm (4 in) long.

  • Brush them with beaten egg so they brown nicely in the oven, sprinkle oregano on top, and flip them over.

  • Cut the ham into strips the same length as the pastry and lay them on top.

  • Twist the sticks with the ham one by one. To do this, grab each strip by the ends and turn in opposite directions. Pop them in the oven for about 15 minutes.

Tips:

  • Every oven is its own beast, so temperature and time may vary. We recommend keeping a close eye on them, especially at the start, so the heat stays high but the pastry doesn’t get scorched.
  • The first time we made these we threw in two new versions: some with just oregano, and others with aged cheese. They were all delicious. That said, the serrano ham ones don’t need it, but for the others add a pinch of salt and you’ll see how much better they get.

Pics and Cakes

9 de agosto de 2012 · 2 min · Cesmm

Chicken and Pineapple Salad

A summer wouldn’t really be summer without this dish. In my family this salad has been around for as long as I can remember, and it feels like an old friend — you might go a while without seeing it, but just thinking about it brings a smile to your face and makes you want to enjoy its company. The first time I offered it to Cesmm, he frowned at the whole pineapple thing, but once he got past those first doubts he became yet another addict of this delicious salad.

Pics and Cakes

What do we need?

(serves 4)

  •   1 whole chicken
    
  •   1 can of pineapple, or fresh pineapple (even better)
    
  •   1 head of lettuce
    
  •   Mayonnaise
    

How do we make it?

  • First, boil the chicken in a pot with water and salt. Let it cook for a good while (2 hours) until you can see it’s well done and the meat practically falls off the thigh bone on its own.

  • Once the chicken is cooked and has cooled down a bit, shred it with your hands into medium-sized pieces (just right for a bite).

  • Wash the lettuce and slice it into very thin strips (julienne).

  • Separately, cut the pineapple slices (or fresh pineapple) into small pieces.

  • Build your salad by laying down a layer of lettuce, then pineapple, then chicken. Repeat the process, pressing down well with your hands so it packs together tightly.

  • Finally, add a layer of mayonnaise on top and let it rest in the fridge.

Tips:

  • It doesn’t matter if there are leftovers — once it’s “rested” the salad is just as good, or even better.
  • Don’t throw away the broth from boiling the chicken; you can use it for rice, soup, etc.
  • You can sprinkle some chopped walnuts or hazelnuts on top of the mayonnaise. They add the perfect finishing touch.

Pics and Cakes

*[English version] CHICKEN & PINEAPPLE SALAD

  • **Ingredients:- 1 whole chicken
  • 1 lettuce

  • Fresh pineapple or canned pineapple

  • Mayonnaise

  • Place chicken in a large pot and add water to cover. Add some salt, cover pot and bring to boil. Cook for about 2 hours or until chicken meat is falling off the bone.

  • When chicken is boiled and cooled shred chicken using your fingers.

  • Wash lettuce and chop finely.

  • Dice pineapple.

  • Place the ingredients by layers: lettuce, pineapple and chicken. Repeat the order and press with your hands.

  • Add some mayonnaise on the top.

    Tips:- If there is some salad left, no problem, it will be even better the day after!

  • Don’t discard the water from boiled chicken, you can use it to cook rice, soup, etc.

  • You can add some chopped nuts or hazelnuts on the top. Simply delicious!


Comments

Marisa (2012-08-07 08:24:55):

What lovely photos! I know this dish — although I don’t plate it as nicely, I chop the lettuce really, really finely and press the layers down as I go.

silvia (2012-08-07 21:39:01):

I’m getting hungry, and it looks so refreshing!! I tried it at Fuentes and I can confirm it was really tasty… maybe I’ll make it tomorrow for lunch…

zordor (2012-08-10 01:55:25):

Without a doubt this recipe is one of the crown jewels of our family wisdom, hehe. For me the best part is that one chicken yields a tooon of salad, it’s super refreshing, and you can make it the day before, for the next day, or even the day after that — just pull it out of the fridge and eat! A really refreshing dish, one of the best things going for summer.

Ociore (2012-08-30 17:23:25):

Oh, if you only knew that your brother revealed this secret family recipe of yours to me years ago, when I was just starting out with my blog (in London)… XD The truth is, looking at the photos, the salad looks amazing! By the way, congrats on your blog!! :) Greetings from Heidiland. ;)

Antz (2012-08-31 09:54:24):

Like Ces, I was wary of the whole pineapple thing… but after trying it last night, I have to say I’ve been converted to the pineapple world!! A 10/10 combo!!! :D

La Enana (2012-09-14 22:54:08):

Mmmmmmh I love this salad!!!!!!! :) I like to top mine with some lightly crushed hazelnuts!!

20 low-calorie salad recipes - Me Siento Guapa (2014-01-07 16:01:33):

[…] Chicken and pineapple salad […]

6 de agosto de 2012 · 4 min · Palstelera

Strawberry and orange blossom jelly with mint

I spotted this dessert in a supermarket catalog and thought it was a really original idea — eye-catching and looking absolutely delicious. The truth is, my last memory of attempting a strawberry jelly involved a sort of extra-runny pink flan with a petrified slab of gelatin on top that nobody could sink their teeth into. So with that track record, this simple recipe was quite a challenge for me. I have to confess the challenge was completely conquered and the dessert went down a treat.

Pics and Cakes

What do we need?

(Makes about 10 servings)

  •   500 g (1.1 lb) strawberries
    
  •   200 ml (about 0.85 cups) milk
    
  •   5 tablespoons orange blossom water
    
  •   1 packet of unflavored gelatin
    
  •   1 Greek yogurt
    
  •   Sugar
    
  •   Mint leaves
    

How do we make it?

  • Heat some water with two tablespoons of sugar (a little less water than the amount indicated on the gelatin packet) and, separately, dissolve the powdered gelatin in the orange blossom water. Combine the two liquids.

  • Wash the strawberries, slice them, and arrange them in individual molds (place the prettiest slices against the walls since those will be what shows later).

  • Once the water-and-gelatin mixture has cooled a bit, pour it into each mold and chill in the fridge for at least 3 hours.

  • Meanwhile, gently heat the milk with two tablespoons of sugar and a few mint leaves for five minutes. Remove from heat, strain, and discard the mint. Once the milk is cold, add the yogurt and whisk it together.

  • Serve in a shallow dish, with a layer of the yogurt mixture on the bottom, the unmolded jelly on top, and a few mint leaves to garnish.

Tips:

  • Before pouring the liquid gelatin into the molds, make sure it isn’t too hot — otherwise it could ‘ugly up’ the strawberries a bit.
  • A neat trick for hulling strawberries: grab a plastic straw and push it into the strawberry from underneath, on the opposite side from the stem. Push the straw all the way through the fruit. This removes the green stem and the harder white core in one go. (It works better with slightly wider straws, like the ones at McDonald’s or Burger King.)
  • To unmold the jellies, you can dip the base of the molds in hot water so they release more easily. If you’re using disposable aluminum molds, you can just snip them open with scissors — no problem.

*[English version] ORANGE BLOSSOM & STRAWBERRY JELLY WITH MINT

  • **Ingredients (serves 10 approx.):- 500 g strawberries
  • 2 dl milk

  • 5 tbsp orange blossom water

  • 1 package of gelatine (flavour less)

  • 1 yoghurt (Greek style)

  • Sugar- Mint leaves

  • Heat some water (according to package instructions) with two tablespoons of sugar. Place the orange blossom water into a bowl and stir in the gelatin until it has dissolved. Mix both liquids.

  • Prepare the strawberries, remove the green leaves and slice them. Place these slices into individual moulds.

  • Set aside until temperature decreases. Pour over the gelatin mixture into the moulds and place in the fridge to set for at least three hours.

  • Pour the milk with two tablespoons and some mint leaves in a small saucepan and heat gently. Cook for 5 minutes, strain the milk and discard mint leaves. Once cold, add the yoghurt and beat the mixture.

  • To serve, remove the jelly from the mould and place into a dish with some yoghurt-mint milk and garnish with a leave of mint.

    Tips:- Before pouring the gelatine, let it cool a bit. Otherwise, strawberries will become ‘ugly’.

  • To clean the strawberries you can use a drinking straw. Insert the straw into the opposite side of the green leaves and pierce the fruit until you remove completely the leaves and the hard white core.

  • To remove the jelly from the mould you can place the bottom of it into some hot water. It will be much easier!


Comments

Marisa (2012-08-03 11:50:26):

I can confirm that, on top of being a really beautifully presented dessert, it’s absolutely delicious. I had the luck of being the guinea pig. :)

2 de agosto de 2012 · 4 min · Palstelera

Chicken Sandwich

Sometimes dinner at home — and I’m sure this has happened to all of you — boils down to “I’ll just settle for a yogurt”… It always happens to me the same way: I think “okay, a yogurt… and what else.” You peek into the fridge and the freezer and the gates of heaven swing open. You’ve got a quick rescue! That’s how this recipe was born — only within reach of the great chefs :p

Pics and Cakes

What do we need?

  •   1 chicken breast fillet
    
  •   4 teaspoons of mayonnaise
    
  •   2 slices of country-style bread (pan payés)
    
  •   2 lettuce leaves
    

How do we make it?

  • Put a bit of oil in a frying pan.

  • While the oil heats up, season the chicken and wash and chop the lettuce.

  • Cook the chicken to your liking. I prefer not to cook it too much — like with almost any meat — so it stays tender and juicy.

  • Grab the two slices of country bread and pop them in the toaster.

  • Take out the chicken and the bread and assemble the sandwich.

Tips:

  • We buy the country bread already sliced at any supermarket. If we’re not going to eat it within a short time, we freeze it.
  • Another option for the sauce is to make a “mustardnaise” — mayonnaise and mustard in a 4-to-1 ratio.
  • You can pair the dish with some bagged potato chips.

Pics and Cakes

[English version] CHICKEN SANDWICH **Ingredients:- Chicken breast steak

  • 4 tsp mayonnaise

  • 2 lettuce leaves

  • 2 slices of bread

  • Put some olive oil into the pan.

  • Wash the lettuce and salt and pepper the chicken.

  • Grill the chicken.

  • Creat your sandwich with mayo sauce, chicken and lettuce.

Tips:- We buy the sliced bread and we place it in the freezer. When we need it, we just take out a couple of slices and place them directly into the toaster.

  • Instead of mayonnaise you can use ‘mustardnaise’. Just mix mayonnaise and mustard (proportion 4:1).
  • You can serve it with some crisps.

30 de julio de 2012 · 3 min · Cesmm

Stuffed Crescent Rolls

Did you know that croissant in French means crescent moon? Literally, it means ‘waxing,’ which is the phase of the moon we commonly call a crescent. Well, with that same shape but a completely different dough and a savory filling, we present this easy dish. We rescued the recipe from a Thermomix Christmas magazine and thought it would be a great idea to offer as an afternoon snack at home or to pack along on a trip and enjoy during a roadside stop. For those of you who are wary of complicated gadgets and kitchen robots, don’t worry — we made these with our own little hands and they turned out wonderfully.

Pics and Cakes

What do we need?

  •   400-500 g (3.25-4 cups) pastry flour
    
  •   250 g (1 cup) quark cheese
    
  •   250 g (1 cup / 2 sticks) cold butter
    
  •   1/2 teaspoon salt
    
  •   1 packet baking powder
    
  •   1 beaten egg (for glazing)
    

For the filling:

  •   100 g (3.5 oz) cooked ham
    
  •   200 g (7 oz) Emmental cheese
    
  •   2 tomatoes
    
  •   Dried oregano
    

How do we make it?

  • Cut the butter into small pieces and mix with the rest of the ingredients. Start by stirring with a fork and then finish kneading with your hands.

  • Form the dough into a ball, wrap it in cling film and let it rest in the fridge for 30 minutes.

  • Preheat the oven to 180°C (355°F).

  • Divide the dough in two and roll out each piece with a rolling pin into a thin circle (about 3 mm / 1/8 inch).

  • Using a knife or pizza cutter, cut 8 triangular portions (just like a pizza).

  • Place a bit of cooked ham and cheese on each portion and roll them up starting from the wide end and finishing at the tip to give them that croissant shape.

  • Slice the mozzarella and tomato into rounds and then cut those in half. Use them to fill the portions from the second circle of dough, adding a bit of oregano. Roll them up the same way.

  • Place all the croissants on a baking tray lined with parchment paper and brush them with beaten egg.

  • Bake for about 20 minutes.

Tips:

  • You can vary the filling however you like. In fact, the original recipe was just ham and cheese, and we introduced the tomato-mozzarella variety and liked it even more.
  • The dough isn’t particularly salty, so why not try a sweet filling?

Pics and Cakes

[English version] FILLED CROISSANTS **Ingredients:-400-500 g flour

  • 250 g quark cheese

  • 250 g butter

  • 1/2 tsp salt

  • 1 package baking powder

  • 1 egg

  • Dice the butter and mix with the rest of ingredients. First stir well by using a fork and then use your hands.

  • Make a ball with the dough, wrap it in cling film and place in the fridge for 30 min.

  • Preheat oven at 180ºC

  • Divide the dough into two pieces and roll out to two thin circles (3 mm).

  • Cut each circle into 8 portions (like pizza slices).

  • Put some york ham and cheese over each slice and roll it from the biggest side to the narrowest to create the croissant shape.

  • Slice mozzarella and tomato and then cut into halves. Use them and oregano to fill the second circle of dough. Roll it in the same way.

  • Place the croissants on a baking tray covered by baking paper. Glaze croissants with egg.

  • Bake for 20 min approximately.

    Tips:- You can vary the filling. The original recipe was done with ham and cheese and we decided to create the mozarella-tomato flavour and we liked it even more! - The dough itself is not really salty. So why not a sweet filling?


25 de julio de 2012 · 4 min · Palstelera

Risotto My Way

It’s been a while since I made my first risotto. I think I learned it from Arguiñano, back when my mom and I used to watch him at lunchtime. I have a feeling I also followed the recipe from some Wii video game once. Anyway, I’ve been tweaking, adapting and improvising on top of the fundamental rule for a good risotto: never stop stirring.

Pics and Cakes

What do we need?

(serves two)

  •   1 ½ cups short-grain rice
    
  •   Warm water
    
  •   2 cloves of garlic
    
  •   A quarter of a large onion
    
  •   Wild mushrooms / button mushrooms
    
  •   100 g (3.5 oz) blue cheese
    
  •   Salt
    

How do we make it?

  • Add a splash of olive oil to a saucepan.

  • Dice the blue cheese into small cubes. Finely chop the garlic and onion.

  • Add the garlic and onion to the pan and turn the heat down a bit so they don’t burn. Once they’ve softened a little, add the mushrooms cut into medium-sized pieces.

  • Let everything cook together for a few minutes and add a pinch of salt.

  • Once the sofrito is ready, add the rice and stir well so the rice soaks up the flavor.

  • Now, the usual thing would be to add twice as much water as rice and let it cook. We’re going to add just a bit of water — about half a cup (120 ml / 4 fl oz) if we used a cup and a half of rice.

  • While stirring, add salt and a bit of blue cheese. Once everything is well mixed and the water has reduced, lower the heat a little.

  • Without stopping stirring, keep adding more water (as much as your risotto asks for) and blue cheese.

  • When you see the rice is cooked, turn off the heat, cover, and let it rest for as long as it takes you to slice some thin strips of blue cheese to decorate the plate.

Tips:

  • We used blue cheese, but you can use any other kind. If you don’t like strong cheese, an aged cheese will thicken it more and barely taste of cheese.
  • For decoration you can also add hazelnuts, walnuts or almonds.
  • If you don’t have wild mushrooms, you can swap them for button mushrooms.

Pics and Cakes

[English version] RISOTTO MY WAY **Ingredients:- 1 ½ medium-grain rice

  • 3 cups warm water

  • 2 cloves of onion

  • ¼ large onion

  • Mushrooms

  • 100 g blue cheese

  • Salt

  • Add a splash of olive oil in a sauce pan.

  • Dice blue cheese and chop garlic and onion.

  • Add garlic and onion to the sauce pan and fry slowly to avoid burning. When they have softened, add the mushrooms (if they are too big, you can cut them into medium-size pieces).

  • Cook slowly for some minutes and add a pinch of salt.

  • When ready, add the rice and keep stirring while everything is cooking and flavors are melting.

  • Usually we add 2 parts of water to 1 part of rice. For risotto recipe we will be adding all the water needed progressively.

  • While stirring, add some salt and part of blue cheese. Stir well and turn down the heat to a simmer.

  • Keep stirring and adding the water and blue cheese, allowing each ladle to be absorbed before adding the next.

  • When rice is cooked and soft, place a lid on the pan and allow to sit. Slice some blue cheese for decoration.

    Tips:- You can use any kind of cheese. Blue cheese has quite a strong flavour but you can substitute it by any other softer.

  • For decoration, you can add some walnuts, almonds or nuts.

  • You can use mushrooms (champignons) or any other wild mushrooms.


22 de julio de 2012 · 3 min · Cesmm

Cake Pops

Or pop cakes. Any name works for these little lollipop-shaped treats stuffed with cake. The original idea is to use up the trimmings from a cake you’ve made for something else, or one that didn’t turn out pretty enough — so you don’t feel bad destroying it (literally).

Pics and Cakes

What do we need?

  •   Cake*
    
  •   Cream cheese
    
  •   Chocolate for melting
    
  •   Chocolate sprinkles, colored sprinkles, crushed nuts, colored sugar...
    
  •   Lollipop sticks
    

Buttercream:

  •   250 g (1 cup + 2 tbsp) butter, at room temperature
    
  •   500 g (4 cups) powdered sugar
    
  •   1 tsp vanilla extract
    
  •   1 tbsp water
    
  •   Food coloring
    
  • If you don’t have any cake on hand, you can make a nice fluffy sponge cake with the following ingredients:
  •   4 eggs
    
  •   250 g (1 1/4 cups) sugar
    
  •   1 tsp vanilla extract
    
  •   250 ml (1 cup) milk
    
  •   55 g (4 tbsp) butter
    
  •   250 g (2 cups) all-purpose flour
    
  •   2 tsp baking powder
    
  •   1/4 tsp salt
    

How do we make it?

Making the sponge cake:

  • Beat the eggs with the whisk attachment of the mixer (this step is essential for getting a fluffy texture).

  • Add the sugar and keep beating for another 4 minutes until creamy. Add the vanilla extract and mix well.

  • In another bowl, mix the dry ingredients. Then add the egg-and-sugar cream and beat on low speed until everything is incorporated.

  • Heat the milk and butter in the microwave until the butter melts. Add to the rest of the mixture and stir well.

  • Pour into a greased and floured baking pan.

  • Bake at 170°C (340°F) until a skewer (or knife tip) inserted into the cake comes out clean.

Pics and Cakes

And now on to the cake pops themselves:

  • Once the cake has cooled, cut a piece and set aside roughly the same volume of cream cheese (making cake pops with a whole cake can be madness unless you’ve got a huge party and don’t mind spending the entire day rolling little balls).

  • Take your piece of cake, crumble it with your hands into a bowl and add the cream cheese. Mix well with your hands. (The mixture you get shouldn’t be too dry or too sticky — if either happens, fix it with more cake or more cream cheese.)

  • Now roll small balls with your new mixture. It’s important they come out very smooth, with no cracks visible.

  • Melt a little chocolate in the microwave.

  • Take a ball and stick a lollipop stick into it. Then pull the stick out, dip it in chocolate, drop a bit of melted chocolate inside the hole, and finally push the stick back into the ball for good. (This step matters so the ball doesn’t fall off the stick later.)

  • Repeat until you’ve used up all the mixture and put them in the fridge for half an hour, if possible.

  • Melt the chocolate in the microwave, being careful not to burn it (heat for a few seconds, take it out and stir. Repeat until you get the texture you want).

  • Take your skewered ball and dip it in the chocolate. Pull it out and rotate it so the whole surface gets coated.

  • Let it dry stuck into a piece of styrofoam, a potato or an egg carton (in any case, poke the holes ahead of time with a skewer so you don’t ruin the cake pop’s stick). Repeat with all the balls.

  • Once they’re coated in chocolate, all that’s left is to use your imagination and decorate them with chocolate of another color, sprinkles, colored sugar, chocolate jimmies, etc.

  • Another option is to decorate your cake pops with buttercream. To do that, mix all the buttercream ingredients with the whisk attachment (low speed if you don’t want a powdered-sugar blizzard in your kitchen). You can tint the buttercream with food coloring, transfer it to a piping bag, and pipe little mounds until the ball is fully covered.

Tips:

  • Instead of cream cheese for the mixture, you can use dulce de leche, Nutella, or any other spreadable filling.
  • If you use white chocolate, you can tint it with food coloring — but make sure it’s gel-based or chocolate-specific, never water-based. You can also use the colored chocolate buttons sold at baking shops (candy melts).
  • When melting the chocolate, if you want it runnier so the cake pops are easier to dip, you can add a bit of sunflower oil, butter, or Crisco (vegetable shortening). Never water!
  • If you don’t have sprinkles, jimmies or crushed nuts, you can make colored sugar very easily. Just put a few tablespoons of sugar in a plastic bag, add a couple of drops of food coloring (this one can be liquid), close the bag and shake. You’ll have lovely sugar tinted in whatever color you like.
  • If you’re after inspiration and want to enjoy some real artistry, definitely check out Bakerella’s website.

Pics and Cakes


Comments

Esther (2012-07-28 13:28:38):

Hi!

Just looking at this is making my mouth water! So much so that I think in a few days I’ll be getting to work on it, and I wanted to know where I can buy lollipop sticks in Madrid.

Thanks so much,

EPS

Palstelera (2012-07-28 15:09:13):

I’ll tell you the shops I usually buy from in Madrid, but with how popular all this stuff is getting, I’m sure you can find them in more places too: Decake, in the Estrella neighborhood, La tienda americana, near Plaza de Cristo Rey (Islas Filipinas metro stop), or Comercial Mínguez (downtown area).

I’ve seen that most of them close in August, so hurry up! And I’m waiting for the photos of the result…

Esther (2012-07-28 15:19:44):

Thanks so much!!! I promise photos if they turn out halfway decent, although yours have set the bar pretty high, hehe

19 de julio de 2012 · 5 min · Palstelera

Chicken Pitas

After a two-week delay and a move in between, we’re kicking off this new adventure in the world of food and new technologies. Since I’m a person who loves to eat, I’ll mostly be in charge of the simple recipes — the kind that save you when dinnertime rolls around. And one of those recipes I love most is the chicken pita. Simple and really tasty.

Pics and Cakes

What do we need?

  •   1 chicken breast
    
  •   1/2 red bell pepper (if you have green, throw that in too)
    
  •   1/2 onion
    
  •   3 lettuce leaves
    
  •   Salt and pepper
    

How do we make it?

  • Slice the bell pepper and onion into julienne strips, and cut the chicken into strips.

  • Put a little oil in a frying pan.

  • When it’s hot, add the pepper and onion. Add a pinch of salt.

  • When they’re partly cooked — we like the pepper “al dente” — season the chicken with salt and pepper and add it to the pan.

  • While the chicken is cooking, wash and cut the lettuce leaves into strips.

  • Once the chicken is golden, set aside.

  • Pop two pita breads in the toaster and wait until they’re lightly toasted.

  • Cut off the top of the bread and tuck in the ingredients with the help of a spoon.

Tips:

  • Up to you whether you want to marinate the chicken with lemon or not. To do that, before frying it, put the chicken in a bowl with the juice of one squeezed lemon, salt and pepper for a few hours.
  • You can also add a sauce (mayo, ketchup, mustard thinned with mayo, etc.)

Pics and Cakes

[English version] PITA BREAD FILLED WITH CHICKEN AND PEPPERS **Ingredients:- 1 chicken breast

  • 1/2 red pepper (you can also use green pepper)

  • 1/2 onion

  • 3 lettuce leaves

  • Salt and pepper

  • Slice pepper, onion and chicken into strips.

  • Put some olive oil in a frying pan.

  • Stir fry pepper and onion. Add some salt.

  • Salt and pepper chicken strips and add to the pan.

  • Meanwhile, wash and cut lettuce.

  • When chicken is golden, put it aside.

  • Toast pita bread and fill it with lettuce, chicken and veggies.

    Tips:- You can marinate the chicken by putting it with salt, pepper and fresh lemon juice for some hours before cooking it.- You can add some sauces to your pita sandwich (mayonaise, ketchup, mustard+mayo, etc.) Pics and Cakes


Comments

ReimonStar (2012-07-17 13:20:02):

Cuz, those look great. I make them with fajita wraps instead of pita and I add some really spicy mojo picón from Carrefour and a touch of guacamole from Mercadona and yum yum yum. By the way, the photos are really cool. Keep it up! Next up TVLaElipa

Cesmm (2012-07-17 16:37:37):

Duly noted, Don Reimon.

15 de julio de 2012 · 3 min · Cesmm