Ají de Gallina

This dish is a classic of Peruvian cuisine. I’m not claiming this recipe is the authentic or one true version — it’s simply the one my mother and her family have made all their lives. They brought this recipe with them from Peru and honestly, I love it. I’ve tried ají de gallina at several Peruvian restaurants and the recipe isn’t even the same in all of them. So, as the saying goes, “to each their own,” and here I’m offering you a finger-licking-good Peruvian ají de gallina.

Pics and Cakes

What do we need?

  • 1 chicken

  • 4 onions

  • 4 slices of sandwich bread

  • A splash of milk

  • Turmeric

  • Ground ají paste (Peruvian hot pepper)

  • 4 potatoes

  • 4 eggs

  • Salt

How do we make it?

  • First, cook the chicken in a large pot with plenty of water and a bit of salt. Cook it until it’s nice and tender (you’ll know it’s done when the meat falls off the bone easily).

  • Take the chicken out, strain the broth, and set it aside.

  • Once the chicken has cooled down a bit, remove the skin and bones and shred it. Set the shredded chicken aside.

  • Boil the potatoes and eggs and set aside.

  • Meanwhile, crumble the slices of sandwich bread and soak them in milk.

  • Chop the onions very finely and toss them into a pan with olive oil to sweat them down. Cook them over medium-low heat slowly so they soften without browning. We want them really soft, almost like a yellow paste.

  • Once the onion is ready, add the milk-soaked bread and stir well.

  • Slowly add the chicken broth bit by bit, stirring continuously so it all comes together.

  • Add a couple of teaspoons of turmeric, which will give it that signature yellow color.

  • Add the shredded chicken and stir again. If it looks too thick, add a bit more chicken broth. The texture shouldn’t be like mashed potatoes, but not like soup either — somewhere in between.

  • Adjust the salt and add a bit of heat (ground ají paste).

  • On the side, peel the potatoes and cut them into thick slices. Peel the eggs and cut them into quarters.

  • And there you have it — your ají de gallina. All that’s left is to serve it alongside the boiled potatoes and hard-boiled eggs. Now dig in, nomás!

Tips:

  • A whole chicken makes a pretty generous amount of ají de gallina, so if you’d like, you can use half of the cooked chicken for this recipe and save the other half for a delicious chicken and pineapple salad, for example. :-)

  • At some restaurants I’ve had this dish served with white rice instead of boiled potatoes.

Pics and Cakes

4 de marzo de 2013 · 3 min · Palstelera

Fideuá

Today we bring you an adaptation of the fideuá from Spain’s eastern coast, which is mainly made with fish and seafood. Everyone knows my dislike for fish, so when my mom made this dish, swapping the fish for pork secreto, I jumped right on it.

Pics and Cakes

What do we need?

  • 200 g (7 oz) pork secreto

  • 200 g (7 oz) fideuá pasta

  • Water

  • Mushrooms

  • Saffron

  • Salt

  • Olive oil

  • Paprika

  • Garlic

  • Parmesan cheese

How do we make it?

  • Pour a splash of olive oil into a large pot, sauté the garlic, add the meat and mushrooms with a pinch of salt, and cook everything together. Add a bit of paprika.

  • Once it’s nicely sautéed, toss in the noodles and stir everything together so they pick up the flavor.

  • Add twice as much water as pasta (or a bit more if you want it slightly brothy).

  • Let it cook for about 15-20 minutes, adding a pinch of saffron and a little more paprika along the way.

  • When plating, shave a few slices of parmesan cheese and lay them on top.

Tips:

  • We used shiitake mushrooms, but it turns out great with any kind of mushroom.

  • If you don’t have pork secreto, you can use any tender cut of pork.

  • The original recipe calls for ñoras (dried sweet red peppers), which are crushed and added to the sofrito. If you can find them (and don’t get scared off by the price), they give the dish a special touch.

Pics and Cakes *[English version] FIDEUÁ ** *Ingredients:

  • 200 g (7 oz) pork meat

  • 200 g (7 oz) fideuá pasta

  • Water

  • Mushrooms

  • Saffron

  • Salt

  • Olive oil

  • Paprika

  • Garlic

  • Parmesan cheese

  • Gently fry the chopped garlic with a bit of olive oil in a cooking pot. Add meat and mushrooms, some salt, and cook. Add paprika.

  • When it is slightly cooked, add the pasta and gently fry all the ingredients together to mix the flavors.

  • Add the water (twice the amount of pasta. For instance, if you used 2 cups of pasta, add 4 cups of water. You can add a bit of extra water if you like a soupy dish.)

  • Add some saffron and a bit more paprika and cook for around 15-20 minutes.

  • Slice parmesan cheese and place it over the fideuá before serving.

Tips:

- We used shiitake mushrooms, but any kind of mushroom will be delicious.

- The original recipe uses ‘ñora’ (dried red spicy pepper). You can use it if you like spicy flavors. Add it when slightly frying all the ingredients (step 1).


Comments

la enana (2013-03-04 13:40:11):

The recipe was delicious! I made it the other day and we loved it! I used paprika instead of pimentón because I haven’t been able to find it around here, and although the result was very good, in my opinion the flavor pimentón gives is even better.

27 de febrero de 2013 · 3 min · Cesmm

Lemon Pay

You might be wondering about the name and why I’m not just calling it lemon tart or lemon pie. The thing is, I made this tart for my mom and for her it brought back childhood memories. Apparently, when they were kids in Peru they used to eat this tart and they called it “pay de limón.” If we already use more and more anglicisms in Spain, you can imagine how common they are in Latin American countries and the kind of Spanglish that reigns there. In any case, whether or not this is the authentic Peruvian recipe, and whether you call it tart, pie, or pay, this dessert turned out absolutely delicious.

Pics and Cakes

What do we need?

  • 150 g (5.3 oz) ground digestive-style biscuits

  • 110 g (1/2 cup) butter

  • 400 g (14 oz) condensed milk

  • Half a cup of lemon juice

  • 4 egg yolks

  • 4 egg whites

  • 85 g (3/4 cup) powdered sugar

How do we make it?

  • First, melt the butter in the microwave and mix it with the ground biscuits until you get a uniform paste. Put this mixture into a shallow oven-safe pie pan. Press with your fingers until you’ve covered the bottom and sides of the pan well.

  • Pop it in the oven (preheated to 180°C / 350°F) and bake for 15 minutes. Take it out and let it cool.

  • To prepare the filling, mix the condensed milk well with the lemon juice and egg yolks. Pour the mixture over the biscuit base in the pan and put it back in the oven for another 15 minutes. Take it out and let it cool.

  • To make the meringue, whip the egg whites to stiff peaks with a pinch of salt using a whisk (electric is better; it’ll save you time and sore arms). Gradually add the sugar until you get a firm consistency.

  • Now all that’s left is to put the meringue on top of the lemon tart. You can use a piping bag or just spoon it on, forming peaks.

  • Finally, when it’s completely covered, put it back in the oven for a few minutes so the meringue browns slightly.

Tips:

  • If you don’t love the tangy lemon flavor, you can reduce the amount of juice.

  • When you make the meringue, you need to get it really firm (you should even be able to flip the bowl upside down and have it stay put). It’s really important that neither the bowl nor the whisk have any grease on them so the whites whip up properly. Also, be careful in the oven because meringue burns really quickly, so never leave it unattended.

  • If you prefer, you can make a shortcrust pastry for the base.

Pics and Cakes

[English version] LEMON PIE* *Ingredients:

  • *2 cups ground biscuits *

  • 1/2 cup butter

  • 400 g condensed milk

  • 1/2 cup lemon juice

  • 4 egg yolks

  • 4 egg whites

  • 3/4 confectioner’s sugar

  • *First, melt butter in the microwave and stir well with ground biscuits. Put this mix into a pie mould using your fingers to press. Cover the bottom and the sides of the mould. *

  • Bake in preheated oven (to 180º) for 15 minutes.

  • *For the filling, mix together condensed milk, lemon juice and egg yolks. Pour the lemon mixture into the baked biscuit pastry. Bake in oven for 15 minutes. *

  • *Whip egg whites with a pinch of salt (use an electric whisk for better results and saving time). Add sugar gradually and keep whipping until getting a firm meringue. *

  • *Pour the meringue over the lemon pie. You can use a piping bag or use a spoon to make peaks. *

  • *Bake in oven for a few minutes until slightly golden brown. *

Tips:

- If you don’t like strong lemon flavour, you can reduce the amount of lemon juice.

- When making meringue you need a firm mixture (you could even put the mixing bowl upside down and it will keep there). To get good results, the mixing bowl has to be completely free of grease. Be careful when baking meringue because it get burnt very easily.

- You can also make shortbread pastry instead of biscuit pastry.


Comments

Marisa (2013-04-03 10:48:50):

Yum! I love this tart. Make it for me one day, please. :)

19 de febrero de 2013 · 4 min · Palstelera

Cabbage Rolls

I know, we’ve gone ages without posting (as Palstelera would say), but we have an excuse: we were studying because we’re cultured people XD. That’s why today we’re going to introduce you to two new recipes so you can see that even though we’ve set the page aside a bit, we’re always ready and thinking about what new recipes we can share with you.

Pics and Cakes

What do we need?

  • 4 cabbage leaves

  • 1 chicken breast

  • Half an onion

  • Half a green bell pepper

  • Oil

  • Salt

  • Moroccan spices

  • Flour for coating

How do we make it?

  • Separate the largest cabbage leaves and blanch them in boiling water with salt.

  • After three minutes, take them out and lay them on paper towels to dry. Set aside.

  • Cut the onion into julienne strips and the bell pepper into small strips. Pour some oil into a frying pan and add the ingredients.

  • Cut the chicken into strips and season. Add to the pan.

  • Throw in some Moroccan spices, for example Ras el hanout, into the mix.

  • Once the chicken is cooked, remove from the heat and set aside.

  • Spread out the leaves and fill them with the mixture.

  • Coat the rolls in flour and deep-fry them in plenty of oil.

  • Leave them in for just a short time, turning them carefully so they don’t open up.

Tips:

  • If you see the rolls opening up, you can use a toothpick to help — just remember to remove it before eating… — or a piece of string to tie them up.

  • You can swap the chicken for ground meat.

Pics and Cakes

19 de febrero de 2013 · 2 min · Cesmm

Scones

Whole Kitchen, in their Sweet Proposal for January, invites us to make a Scottish classic: Scones

We almost ran out of time with this recipe because — unusual for us — we made it the same day it was published. Luckily, it’s super easy and takes very little time. As usual, the baking time is what stretches the recipe out the most, but hey, the little wait is well worth it. We followed the recipe from www.joyofbaking.com

Pics and Cakes

What do we need?

  • 260 g (2 cups) all-purpose flour

  • 50 g (¼ cup) sugar

  • 1 sachet of Royal baking powder

  • a pinch of salt

  • 75 g (5 tbsp) very cold butter, cubed

  • 1 beaten egg

  • 120 ml (½ cup) heavy cream

How do we make it?

  • Preheat the oven to 190°C (375°F).

  • In a bowl, mix the flour with the sugar, baking powder and salt. Add the butter and rub it in with your fingertips — it should look like crumbs. Set aside.

  • In a separate bowl, mix the egg with the cream.

  • Combine both mixtures until well integrated, but don’t overwork the dough.

  • Roll out lightly until you have a fairly thick dough (about 1.5 cm / ½ inch). (Our first ones came out too thin.) Using a cookie cutter or a glass, cut out circles about 6 cm (2.5 inches) wide.

  • Place them on a baking tray lined with parchment paper and brush with a little milk.

  • Bake for 15 to 18 minutes, until golden.

  • Take them out of the oven and let them cool on a wire rack.

Tips:

  • We forgot to brush the scones with milk and they still turned out delicious, so if you forget too, it’s not the end of the world.

  • You can add chocolate chips, nuts, raisins… to the dough. This time we used dried cranberries.

  • To eat them, just split them in half and spread on butter and jam, whipped cream, lemon curd or anything else you fancy.

Pics and Cakes

[English version] SCONES* Ingredients: *

  • 260 g all-purpose flour

  • 50 g granulated white sugar

  • *1 sachet baking powder *

  • 1/4 teaspoon salt

  • 75 g cold unsalted butter

  • 1 large egg

  • 120 ml milk, half-and-half, or heavy cream

  • *Preheat oven to 190 degrees C. Line a baking sheet with parchment paper. *

  • In a large bowl, whisk or sift together the flour, sugar, baking powder and salt. Cut the butter into small pieces and blend into the flour mixture with a pastry blender, two knives, or with your fingertips. (The mixture should look like coarse crumbs.) In a small measuring cup whisk together the milk or cream and beaten egg. Add this mixture to the flour mixture. Stir just until combined. Do not over mix.

  • Transfer to a lightly floured surface and knead the dough gently four or five times and then pat into a 1,5cm of thickness. Then, using a 6 cm round cookie cutter, cut the dough into rounds. Place the rounds on the prepared cookie sheet, spacing a few centimetres apart. Brush the tops of the scones with a little cream.(This helps to brown the tops of the scones during baking.)

  • *Bake for about 15 -18 minutes or until nicely browned and a toothpick inserted into the center of a scone comes out clean. Remove from oven and transfer to a wire rack to cool. *

Tips:

*- We forgot brushing the scones with milk before baking. The result was wonderful anyway, so in case you forget it too, don’t panic! *

- You can add to the dough chocolate chips, nuts, raisins… We used dried cranberries.

*- You can serve them with butter and jam, marmalade, whipped cream, lemon curd or anything you like. *


Comments

Marivi (2013-01-26 00:39:22):

They look fantastic, and with the filling I’m sure they were even better.

Cristina (2013-01-26 00:55:54):

I really like your version, with cranberries they must be really good ;) and judging by the photos they look delicious!

A kiss!

PIlarHG (2013-01-26 00:59:03):

The same thing happened to me! I ended up making the recipe today too! Lucky it’s a quick one! They turned out great! ;)

Apfelstrudelkuchen (2013-01-26 01:55:06):

Hi!!!

Yeah, it’s true that nothing happens if you don’t brush them, because those scones look absolutely delicious.

A little kiss, Sandra von Cake

Palstelera (2013-01-26 12:48:42):

The truth is they were really tasty, and since I used the leftover cream to whip it up with a bit of sugar, even better. :-)

Palstelera (2013-01-26 12:49:39):

So glad you like them. The cranberries were a last-minute decision and they worked out really well.

Palstelera (2013-01-26 12:50:13):

Yes! Thank goodness they were quick :-)

Palstelera (2013-01-26 12:51:02):

Although now I’ll have to make them again to make them thicker and brushed with milk to see how they turn out :-)

Gri (2013-01-28 11:20:08):

I love your scones… they look fantastic!

A hug Gri http://eltallerdelosviernes.blogspot.com.es/2013/01/hoy-toca-receta-del-cwk.html

mara (2013-01-28 16:49:19):

They turned out so well and look so good with cranberries. I made mine plain because my daughters don’t like them. Here’s my version http://masdulcequesaladopuntocom.blogspot.com.es/2013/01/scones.html

zordor (2013-01-30 05:45:23):

This had a rhyme to it, but honestly I can’t remember what it was right now… :P

guillus (2013-02-27 20:27:45):

Scones! Do we also have to explain how to eat them? :P

guillus (2013-02-27 20:28:47):

Scones! Do we also have to explain how to eat them? :P And with clotted cream they’re even better…

25 de enero de 2013 · 5 min · Palstelera

Sweet and Sour Pork

Whole Kitchen, in their Savory Proposal for January, invites us to make a Chinese classic: sweet and sour pork.

**For us, this is THE go-to dish whenever we have Chinese food, so it couldn’t be missing from our blog. To be honest, I don’t even know exactly where I got the recipe from, because I ended up mashing together a bunch of different websites and now I can’t recall the exact source. But hey, like with any dish, the trick is to give it a go, and if there’s something you don’t love, tweak it to your taste — that’s what your own kitchen is for.

Pics and Cakes

What do we need?

  • 400 g (14 oz) lean pork

  • 1 large onion

  • 1 red bell pepper

  • 1 carrot

  • 4 pineapple slices

  • Oil

  • Salt

For the batter:

  • 3 tablespoons all-purpose flour

  • 2 tablespoons cornstarch

  • 1 egg

  • 1 teaspoon baking powder

  • Water

For the sweet and sour sauce:

  • 3/4 cup sugar

  • 1/3 cup apple cider vinegar

  • 2/3 cup water

  • 1/4 cup soy sauce

  • 2 tablespoons ketchup

  • 2 tablespoons Worcestershire sauce

  • 2 tablespoons cornstarch

Pics and Cakes

How do we make it?

  • First, we make the sweet and sour sauce. Put all the ingredients except the cornstarch into a medium saucepan and cook over high heat so that everything mixes and dissolves well.

  • Let it come to a boil and then simmer over medium heat for a few minutes so the sauce reduces and thickens. Dissolve the cornstarch in a cup with a little water and add it to the sauce. Once it has the consistency you want, take it off the heat.

  • Cut the onion and bell pepper into medium-sized squares (about 1.5 cm / 1/2 inch).

  • Slice the carrot thinly on the diagonal.

  • Cut the pineapple into chunks.

  • In a pan with a little oil, stir-fry all the veggies (add the pineapple last). Don’t overcook them — we want them to stay crunchy.

  • Once they’re ready, take them out and add them to the saucepan with the sweet and sour sauce.

  • Cut the pork into bite-sized cubes (similar in size to the veggies) and season with salt.

  • In a bowl, mix the two flours and the baking powder, then add the egg and very cold water. The amount of water varies, so it’s better to add it little by little until you get the texture of a light béchamel.

  • While the oil heats up in a frying pan, drop the pieces of pork into the bowl with the batter.

  • Once the oil is good and hot, fry the coated pieces one by one. When they’re golden, take them out onto a plate lined with paper towels.

  • Finally, add the fried pork to the saucepan with the sweet and sour sauce and veggies. If the sauce has cooled down by now, warm it back up before adding the meat.

  • Serve with white rice, basmati rice, or three delights fried rice.

Tips:

  • When making the sweet and sour sauce, I’d recommend not pouring in all the vinegar at once, as it can come out really strong. Better to add it bit by bit, to taste.

  • If the pineapple you used is canned (in its own juice), you can add that juice to the sweet and sour sauce.

  • The battered meat goes in right at the end so the coating stays crispy. That’s why I recommend serving and eating it right away.

18 de enero de 2013 · 3 min · Palstelera

PiC Giveaway Winner

Thanks so much to everyone who took part. We already have a winner for the first Pics and Cakes giveaway. To prove there’s no funny business, as some wagging tongues out there have suggested :p, we recorded a video of the moment (and Santa Claus and the Guardian Angel were there too — and lying in front of them would be really uncool…). To watch the video, click the link below:

PiC Giveaway

Congrats to Edu and thanks to everyone for taking part and following us. By the way, stay tuned because there’ll be more giveaways.

;

Pics and Cakes


7 de enero de 2013 · 1 min · Cesmm

Gorgonzola and Muesli Croquettes

I made these croquettes for the first time as an appetizer for a New Year’s Eve dinner, and honestly, everyone loved them. Even the ones who wrinkled their noses a bit when they saw the muesli coating ended up enjoying the strong contrast between the crispy outside and the creamy filling. Whether for the holidays or any random day, we encourage you to give these a try because the recipe is absolutely worth it.

Pics and Cakes

What do we need?

  • 4 tablespoons of flour

  • Half a liter of milk (about 2 cups)

  • 100g (3.5 oz) of gorgonzola cheese

  • 2 tablespoons of olive oil

  • 2 tablespoons of butter

  • Salt

  • Black pepper

  • 2 eggs

  • Breadcrumbs

  • Muesli without fruit

  • Olive oil for frying

How do we make it?

  • First, we make the béchamel. To do this, put the oil and butter in a frying pan.

  • Once the butter has melted and the pan is good and hot, add the flour. Stir well and let it cook for a moment (so it doesn’t taste raw later).

  • Next, gradually pour in the milk little by little, stirring constantly and energetically to prevent lumps from forming. We want a fairly thick béchamel since it’s going to be used for croquettes and will also have a very creamy cheese mixed in.

  • Toss in the cheese cut into chunks and keep stirring until it’s fully melted, then season with salt and pepper.

  • Pour the béchamel into a wide dish so it spreads out nicely. It needs to cool for at least two hours, finishing in the fridge so it firms up properly.

  • Once the mixture is cold, shape it into balls. Since the flavor is intense, try not to make them too big.

  • Roll the balls in breadcrumbs.

  • Set up three bowls: one with the beaten eggs, another with the muesli, and another with breadcrumbs. Pass each ball through the three bowls in this order (egg-muesli-breadcrumbs).

  • Heat a frying pan with oil, and once it’s nice and hot, drop the croquettes in and fry them until golden brown.

  • Once they’re out, place them on a plate lined with paper towel to soak up the excess oil.

Tips:

  • It’s best to fry them right before serving so the coating stays crispy and the filling stays creamy. If you want, you can prep them ahead of time and leave them in the fridge, or even freeze them and fry them whenever you fancy a bite.

  • If the béchamel gets the better of you and lumps end up forming, you can blitz them out with a hand blender before adding the cheese. It’s not the proper method, but hey, sometimes these things happen, and a well-timed blender can save you a lot of trouble :-)

Pics and Cakes


30 de diciembre de 2012 · 3 min · Palstelera

Pics&Cakes Giveaway

6 months up and running, almost 100 comments, more than 300 visits, nearly 40 sweet and savory recipes… For us those are more than enough reasons to celebrate, and what better way than holding a little giveaway among our readers.

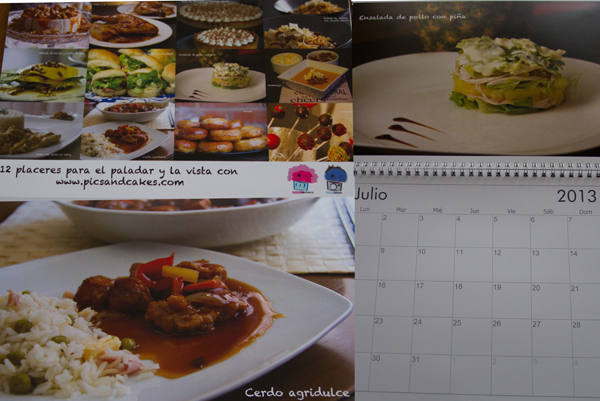
So we’ve decided that to kick off the year right, we’d love for one of you to win the fabulous 2013 Pics&Cakes calendar in full color. (Limited edition)

Pics and Cakes

The rules of our mini giveaway are as follows:

  • To enter you have to leave a comment on this post (wishing us happy holidays, telling us how wonderful we are, how nice the photos are, or how delicious everything looks). Whatever you write, you’ll have the same chances of winning, but it’ll make us happy to read it :-)

  • We’re asking for only one comment per person.

  • Since we’re not exactly a big empire yet, the prize winner will have to pick it up in person. Unless, of course, the lucky winner is so excited about it that they’re willing to pay shipping costs (or negotiate with us).

  • The drawing will happen with the arrival of the Three Kings, so we’ll publish the result on the 6th.

  • To pick the winner we’ll use http://www.random.org/.


Comments

monic (2012-12-27 12:30:57):

mmmm, count me in for the giveaway!!! I really hope I win the calendar :) I wish you… all the best for 2013, we won’t be getting out of the crisis but I hope we find a job that excites us.

Lots of kisses, tomorrow I’ll make the cookies again so I’ll let you know how it goes, this time… I hope to have baking soda :)

a thousand kisses

monic

Ana (2012-12-27 12:40:06):

Hey!!! Of course I’m joining!!! With how much I love calendars hahaha I really like the page, you know that; so keep going with those great photos and dishes: us readers love them. A big kiss and Merry Christmas!

Asun dr la Peña (2012-12-27 12:47:50):

Merry Christmas and many congratulations on your humor and your excellent work.

Concha (2012-12-27 12:49:44):

Happy Holidays, Palstelera and Cesmm! You have a beautiful page and exquisite recipes that I hope keep growing in 2013. Long live Pics&Cakes! Lots of kisses

Aníbal Rodríguez Morales (2012-12-27 12:50:31):

Pics&Cakes Christmas and Pics&Cakes New Year!! Although I’ve only made two of the recipes (delicious, BTW), I admit they didn’t turn out as good as the originals… But the best thing of all is how Pics&Cakes and lucky I feel for having met you! A huge hug and kiss!!!

maría (2012-12-27 13:01:33):

Oh my, the suspense!! I want the calendar :) well, well, well, what to say… MERRY CHRISTMAS TO EVERYONE!! For me Christmas-time is the time of year I love the most and even more so when sampling the wonderful dishes from “Pics&Cakes”, now I just need to convince Ramoncita to cook for me ;) I guess being the first will give me an advantage, right?? hehehe

Ángel again (2012-12-27 13:02:28):

I love all your recipes. This is the best website in the world. Kisses to everyone.

maría (2012-12-27 13:02:48):

oh no! you snuck in!! damn telefónica calling at the most inopportune moments…

Sebas (2012-12-27 13:21:23):

What a cool idea! I love your page, and what I love most is winning contests.

So good luck to me!!!!

Mon (2012-12-27 16:47:08):

Merchandising woohoo! I want more delicious recipes and I wish you a happy new year. Kisses, gorgeous!

Gema (2012-12-27 19:17:37):

I want that calendar!!!! Merry Christmas and happy new year to this sooooo cool page and especially for how delicious its recipes are!!!! :)

Isaac (2012-12-27 20:36:23):

I’m gonna see if I can swipe the calendar from Sebas…

Antz (2012-12-27 21:17:26):

A calendar, awesome!!! Great idea and great recipes, especially the pineapple and chicken salad, already a classic in Madera… That said, let’s see if I get lucky and Happy Holidays and Happy 2013 to everyone!!!!

Diedadri (2012-12-27 21:29:07):

To the great giveaway!!! :-P delicious recipes, all that’s missing in my house is a good cook, haha. Merry Christmas and an even better 2013!! :-D

Titokitt (2012-12-28 00:39:25):

The best page with the best recipes cooked by the best cooks. Does that work for you to give me the calendar? ;-) HAPPY NEW YEAR!!

Esther (2012-12-28 04:28:23):

MERRY CHRISTMAS AND A HAPPY 2013 full of desserts and tasty dishes proposed by pics&cakes!!!!!

May luck be with you, dear warriors!

Marmotona (2012-12-28 08:18:01):

What do you want me to say, that it’s the best of the best in its style and other styles Plus everything is tested and no animal has been mistreated. What more do you want, Baldomero. (Get Rajoy out)

ReimonStar (2012-12-28 21:20:11):

Even though you sweeten my unemployed moments, I think I deserve, in order to organize my life and find a job, that wonderful calendar. I hope you appear enjoying a succulent dish made by your silky, greasy hands. If I shed my tears they should be rewarded with a delicious appetizer. We know that winning isn’t the important thing, but getting used to losing isn’t cool either. Sugar kisses.

Germán (2012-12-31 21:37:41):

Keep it up, guys. So much art on this page!

Jesús (2013-01-05 22:50:02):

Keep it up, guys. So much art on this page!

Anusky (2013-01-05 22:51:31):

Keep it up, guys. So much art on this page!

I love your little recipes and I want your calendar.

Eduardo (2013-01-05 22:56:12):

I love your recipes. Happy new year.

Zordor (2013-01-06 04:04:19):

That calendar is mine!!! And this is the best website in the whole wide world!!!

FranTasar (2013-01-06 04:16:35):

I just got back from a little party with some friends to drop off some gifts and it seemed like the best moment “and the last” to wish you happy holidays and may you keep creating art. To enjoy by savoring or watching it.

sil (2013-01-06 12:35:31):

Happy Three Kings!!!!!! I hope 2013 brings lots of good things for everyone….muuuuah,,,

Palstelera (2013-01-06 20:00:44):

Thanks to everyone for participating. We hope the Three Kings brought you lots of goodies and that you’re enjoying the last days of the holidays. We’re now closing the entry period for our first giveaway (any comment after this one won’t be entered). Good luck and we’ll announce the winner shortly.

Nadia (2013-01-06 20:37:28):

ooh, fixed!! :)

27 de diciembre de 2012 · 5 min · Palstelera

Stuffed Potatoes

I have to admit we’re a bit like sponges — anything we see and like, we try to make at home. That’s exactly what happened with today’s recipe. A few years ago we went with friends to spend Easter week in Camposancos, a lovely little village in Pontevedra, and there Ana (with Germán’s help) made us some delicious stuffed potatoes that could have fed a regiment (well, maybe we weren’t quite that many…). The thing is, we loved the idea and ever since it’s been part of our recipe book.

Pics and Cakes

What do we need?

  • 4 medium potatoes

  • 5 slices of bacon

  • 1 onion

  • Cheese

  • Salt

  • Pepper

How do we make it?

  • Bake the potatoes in the oven. (You can check here if you’re not sure how to do it.)

  • Meanwhile, chop the bacon and onion and sauté them in a pan with a little olive oil.

  • When the potatoes are ready — you can check by poking them with a kitchen skewer — take them out of the oven and cut them in half.

  • Carefully, with the help of a spoon, scoop out the halves, leaving the skin with a thin layer of potato.

  • Mix the scooped-out potato with the sautéed bacon and onion. Season with salt and pepper.

  • Fill the potato halves with the mixture, add a bit of cheese on top, and put them in the oven to broil.

Tips:

  • Any kind of cheese works. We like it with Emmental (elementary, my dear Watson).

  • If you don’t feel like baking the potatoes, you can boil them instead, but we recommend at least broiling them with the cheese in the oven.

  • This is just our take on the filling. Feel free to adapt it to your taste.

Pics and Cakes

27 de diciembre de 2012 · 2 min · Cesmm