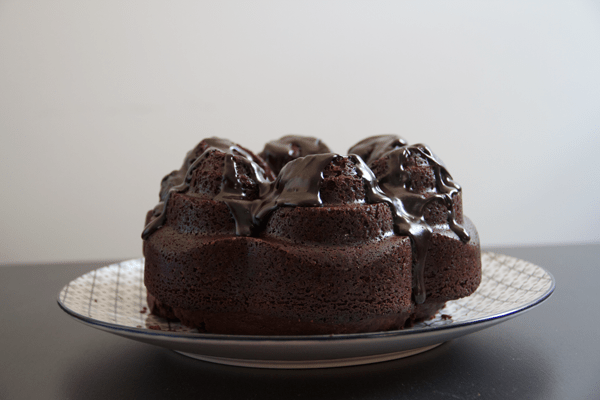
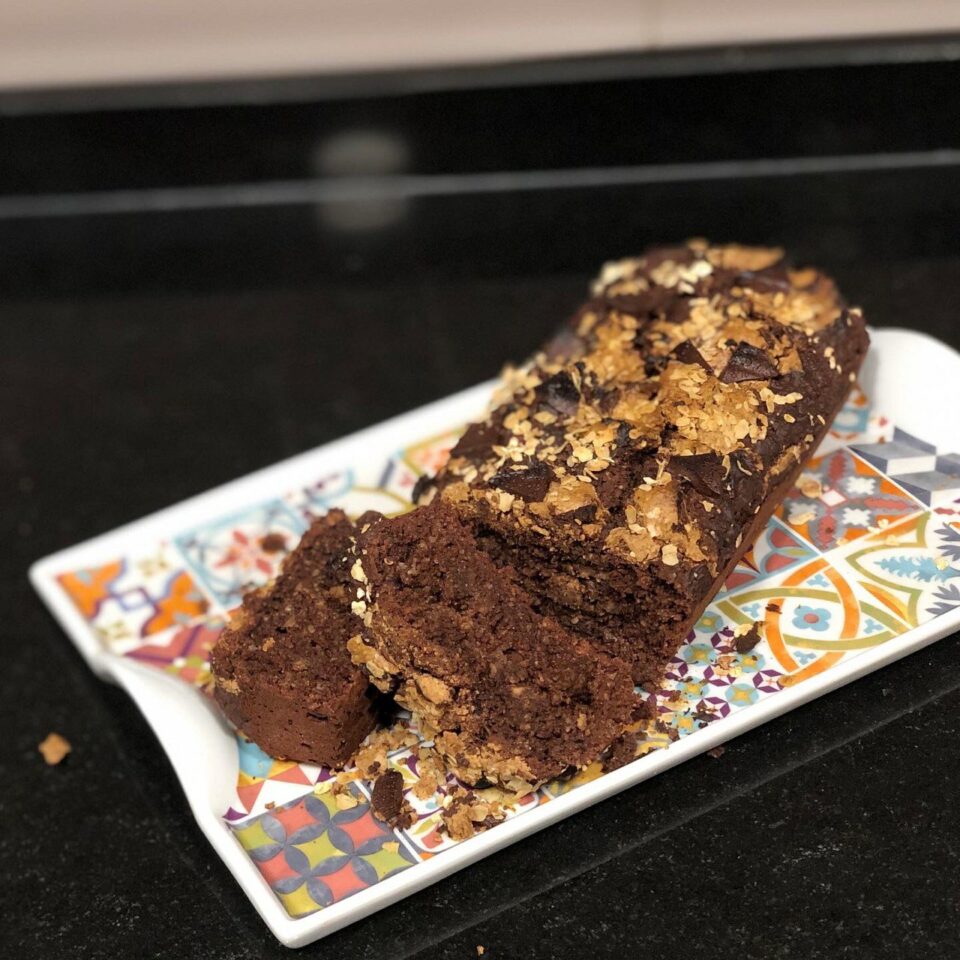
Banana, Cocoa and Peanut Butter Loaf

A healthy loaf cake with a moist texture and a strong peanut butter flavor. Definitely not for everyone, but I'm crazy about it. These flavors are addictive for me and I can't really hold back. The good news is that the ingredients are healthy and, even though we can't really call it diet food — especially because of the peanut butter — we know it's a pretty moderate treat.

I got the recipe from @petit_fit's Instagram profile, but I tweaked it a little. Here's my version. Hope you like it.

Pics and Cakes

Ingredients

  • 3 ripe bananas
  • 50 g (1.75 oz) honey
  • 40 g (1.4 oz) extra virgin olive oil
  • 50 ml (3.5 tbsp) milk
  • 1 egg
  • 4 tablespoons peanut butter
  • 175 g (6 oz / about 1.75 cups) ground oats or oat flour
  • 50 g (1.75 oz) pure unsweetened cocoa powder
  • 5 g (1 tsp) baking powder (Royal-type)
  • A pinch of salt
  • A couple of squares of dark chocolate and some oat flakes (for topping)

Method

  1. Preheat the oven to 180°C (355°F).
  2. Mash the bananas in a bowl with a fork and add the wet ingredients (honey, milk, oil and the lightly beaten egg).
  3. Stir until everything comes together.
  4. Add the dry ingredients (oats, cocoa, salt and baking powder) and mix well.
  5. Grab a loaf pan (plumcake-style) and grease it with a bit of oil.
  6. Pour half of the batter into the pan and drop two tablespoons of peanut butter on top. Then, using a knife, swirl the peanut butter into the batter to get a kind of marbled effect.
  7. Add the other half of the reserved batter and another two tablespoons of peanut butter. Repeat the marbling process.
  8. Finally, chop the chocolate into chunks and scatter them on top along with a few oat flakes.
  9. Bake for about 45-50 minutes and it's ready to enjoy (technically you should wait for it to cool… I never can).
Pics and Cakes

PiC Tips

  • Try to use peanut butter that's 100% peanuts, with no added sugar, salt or weird stuff, because it doesn't need any of that. It's pretty easy to find this kind these days at Mercadona, Ahorramás or sports/nutrition supplement shops.
  • Same goes for the cocoa. It's really easy to find pure 100% cocoa (I usually use Mercadona's store brand). Don't be fooled by advertising for "intense" cocoas because they tend to contain added sugars, sweeteners or even some kind of flour as a thickener.
  • If you don't have oat flour but do have oat flakes, you can blitz them in a food processor or Thermomix. You can choose how fine you want them. In my case, I used roughly ground oats.
  • As always, you can swap the honey for another sweetener of your choice, or for dates that have been soaked and blended into a paste. Also keep in mind that the riper the bananas, the more sweetness they'll add.
October 15, 2020 · 3 min · Palstelera

Chocolate and Mango-Passion Roll Cakes

This recipe comes from Ettore Cioccia, who I call "my master" because I've followed several recipes from his blog Bavette and they all turn out amazing. On top of that, I had the luck of attending a pastry course he gave in Madrid and I couldn't have enjoyed it more. So if you feel like making a delicious dessert and spending a good while in the kitchen putting together different components, you can pick any of Ettore's recipes and you'll be guaranteed success. Today I'm sharing my version of his chocolate and mango-passion fruit roll cakes. The only thing I did differently from his recipe was the pionono sponge, since I used the one from another pastry great: Osvaldo Gross.

Pics and Cakes

Ingredients

For the dark chocolate ganache

  • 100 g (3.5 oz) heavy cream (30-35% fat)
  • 100 g (3.5 oz) chocolate (66% cocoa)
  • 210 g (7.4 oz / about 1 cup) cold heavy cream

For the pionono-style sponge

  • 5 eggs
  • 50 g (1.75 oz / about 1/4 cup) sugar
  • 50 g (1.75 oz / about 1/3 cup) flour
  • A pinch of salt
  • One tablespoon of honey (about 25 g / 0.9 oz)

For the exotic jam

  • 265 g (9.3 oz) mango purée
  • 85 g (3 oz) passion fruit purée
  • 70 g (2.5 oz / about 1/3 cup) granulated sugar
  • 13 g (0.5 oz) pectin

For the Ferrero Rocher glaze

  • 250 g (8.8 oz) chocolate (60% cocoa)
  • 50 g (1.75 oz / about 1/4 cup) sunflower oil
  • 70 g (2.5 oz / about 1/2 cup) granulated almonds

Method

Dark chocolate ganache

  1. In a small saucepan, bring 100 g (3.5 oz) of cream to a boil. Pour the boiling cream over the chocolate (which we've previously melted in the microwave) in two or three additions, mixing well after each one.
  2. Then add the cold cream and mix until everything is well combined. Cover with cling film pressed against the surface and chill in the fridge for at least 4 hours.

For the pionono-style sponge

  1. Preheat the oven to 190ºC – 200ºC (375ºF – 390ºF).
  2. Put the eggs into the bowl of your stand mixer along with the sugar, salt, and honey, and whisk until you reach what's called "ribbon stage" (this is when you can lift a spoonful of batter and drizzle it over the rest, drawing lines on the surface that don't disappear right away). Since it takes a good while, it's best to use a stand mixer.
  3. Sift the flour and fold it in with the mixer at minimum speed. Bump the speed up to maximum for a few seconds.
  4. Using a spatula, fold everything together with gentle, sweeping motions.
  5. Prepare the oven tray with parchment paper greased with butter or margarine.
  6. Pour the batter onto the prepared tray and spread it out so the surface is level (we want a thin sponge, about 4-5 mm / 1/6 inch thick).
  7. Bake for 8 to 10 minutes until the surface is golden and the bottom is too — you can check by lifting it with the help of the paper (carefully, so you don't burn yourself).

For the exotic jam

  1. Mix the sugar with the pectin.
  2. Gently heat both fruit purées together to about 40ºC (105ºF) and add the sugar-pectin mixture. Bring to a boil for a few seconds.
  3. Remove from the heat and transfer the purée to a clean bowl.
  4. Let it cool to 36ºC (97ºF), stirring frequently.
  5. Finally, spread a thin, even layer of the jam over the sponge sheet. Chill in the fridge until the jam firms up a little.

For the Ferrero Rocher glaze

  1. Melt the chocolate to about 50ºC (120ºF) in the microwave.
  2. Stir in the sunflower oil and mix well.
  3. Add the granulated almonds and mix again so they're evenly distributed.
  4. Let the coating cool down to 35ºC (95ºF).

Assembling the dessert

  1. With electric beaters, whip a little more than half of the chocolate ganache and keep the rest in the fridge. At medium speed, whip just until you get a creamy texture.
  2. Spread a thin, even layer of ganache over the jam we placed on the sponge. Let it firm up in the fridge.
  3. Cut the sponge — with its layers of jam and ganache — into strips. I made mine 5 cm (2 inches) wide.
  4. Roll up each strip with the filling on the inside, being careful not to tear the sponge.
  5. Freeze the rolls for about 10-15 minutes (or you can leave them in the freezer until you need them if you've prepared the recipe ahead).
  6. Take the rolls out of the freezer and dip each one into the chocolate coating we prepared, going about halfway up.
  7. Whip the rest of the ganache with electric beaters at medium speed until you get a medium-firm consistency.
  8. Using a piping bag fitted with a star tip, pipe little chocolate roses on top of each roll. You can decorate with cocoa nibs.
  9. Let them temper a bit and enjoy.

PiC tips

  • Even though I followed the exact proportions, my jam didn't set as much as I'd have liked (no idea why), so if you see it's too runny, you can add a bit more pectin (that's the ingredient that gels it). I'd also suggest not using all of the jam you make — pay attention to the thickness and aim for a thin layer over the sponge base.
  • In his recipe, Ettore Cioccia makes 4 large roll cakes; I preferred bite-sized portions — or rather, two- or three-bite ones ;-). You can adjust this however you like when you cut the sponge.
September 30, 2020 · 5 min · Palstelera

American Pancakes

And this is the exact title of recipe number 1029 in the book «1080 Recetas» by Simone Ortega, a classic of Spanish kitchens. It really can't get any simpler or more delicious. There are loads of pancake variations out there, but let's start with the basics and just enjoy ;-).

Pics and Cakes
Pancakes with dark chocolate and toasted coconut

Ingredients

  • 200 g (1 ⅔ cups) flour
  • ½ teaspoon of salt (in Simone's words: «the mocha-spoon kind», so really tiny)
  • 3 teaspoons of Royal-type baking powder
  • 1 tablespoon of sugar
  • 1 tablespoon of olive oil
  • 2 eggs
  • 1 glass (a water glass) of cold milk (about 200 ml / ¾ cup + 1 tbsp)

Method

Here I'm not going to follow the traditional recipe, I'm going to make it way easier for you, so you can whip up some pancakes even before heading off to work.

  1. Put all the ingredients in a blender jug or bowl and blitz them with a hand blender or any kitchen robot until you get a smooth, even batter.
  2. Heat a pan and, when it's nice and hot, pour a bit of the batter in the center. It'll form a perfect circle. Cook it over medium heat.
  3. When you see bubbles forming all over the surface, that's the moment to flip it with a spatula and cook it for a similar time on the other side.
  4. Repeat with all the batter.
  5. Serve with syrup, jam, chocolate, fruit, or whatever you like best.

PiC Tips

  • If you don't quite trust your pan's non-stick coating, you can add a little butter or oil to keep them from sticking.
  • If the olive oil flavor is too strong for you, you can swap it for sunflower oil.
  • If you don't want to make all the batter at once, you can keep the raw batter in the fridge and make the rest of the pancakes the next day (two days of guaranteed happiness). Or you can just halve the recipe directly (it divides easily).
Pics and Cakes
Pancakes with cherries and maple syrup
September 27, 2020 · 2 min · Palstelera

Pure Cocoa Bundt Cake

To kick off the weekend, the holidays, celebrate Madrid's La Paloma festivities… any excuse is a good one to bake this wonderful, fluffy cocoa cake. I got this recipe from Alma Obregón's blog and only made a few small tweaks (Cesmm always tells me I'm incapable of following a recipe to the letter… could it be true?). Made with pure cocoa instead of chocolate, it feels lighter, and the syrup on top is perfect for those who love bitter, not-too-sweet chocolate. Bundt cakes are those ring-shaped cakes with a hole in the middle. Technically, only Nordic Ware® brand cakes are bundt cakes, but the name is generally used for any cake of this shape. If you want to learn more about its history and even when its international day is celebrated, you can read about it here.

bundt

What do we need?

  • 125 g (4.4 oz / 1 stick + 1 tbsp) butter
  • 2 eggs
  • 250 ml (1 cup) milk
  • 360 g (1¾ cups) white sugar
  • 60 g (⅔ cup) unsweetened pure cocoa powder (I use the Valor brand)
  • 260 g (2 cups) all-purpose flour
  • ½ teaspoon baking soda
  • ½ teaspoon baking powder
  • 1 pinch of salt

For the syrup:

  • 40 g (scant ½ cup) unsweetened pure cocoa powder
  • 3 tablespoons white sugar
  • 1 tablespoon cornstarch
  • 3 tablespoons corn syrup
  • 120 ml (½ cup) milk


How do we make it?

  1. Preheat the oven to 180°C (350°F).
  2. Melt the butter in the microwave and once fully melted, add the eggs and the milk and mix well. It's best if the milk is at room temperature so the butter doesn't solidify into little lumps (if it does, it's not a big deal, the cake will be just as delicious).
  3. In another bowl, mix all the dry ingredients together (sifted flour, sugar, baking soda, baking powder, and salt).
  4. Then add the wet mixture to the dry one and stir well with a whisk until you have a smooth, lump-free batter. You don't need to use an electric mixer, a hand whisk works perfectly.
  5. Pour the batter into the previously greased pan (with a baking spray or with butter/margarine/sunflower oil) and bake at 180°C (350°F) for 45-50 minutes. You'll know it's done when a skewer inserted into the cake comes out clean.
  6. Let it rest for at least 20 minutes inside the pan while you prepare the syrup.
  7. For the syrup, mix all the dry ingredients in a small saucepan and then add the rest.
  8. Heat over low heat and stir constantly until it thickens and reaches the desired consistency.
  9. Once the resting time is up, unmold the cake and pour the syrup over the top. Enjoy!

bundt2

Tips:

– You can easily find corn syrup in creative baking shops, which are popping up in more and more places. One of the most common brands is Karo, which is what I used for this recipe.

– As tempting as it is to dig in straight out of the oven, it's really important to let it rest. Otherwise, the cake will fall apart. So, patience…

– It's best to pour the syrup while it's still hot so it runs nicely down the sides of the cake, since it solidifies very quickly (it never goes completely hard, but it sets into a kind of gooey cream).

bundt3

August 12, 2016 · 3 min · Palstelera

Strawberry and orange blossom jelly with mint

I spotted this dessert in a supermarket catalog and thought it was a really original idea — eye-catching and looking absolutely delicious. The truth is, my last memory of attempting a strawberry jelly involved a sort of extra-runny pink flan with a petrified slab of gelatin on top that nobody could sink their teeth into. So with that track record, this simple recipe was quite a challenge for me. I have to confess the challenge was completely conquered and the dessert went down a treat.

Pics and Cakes

What do we need?

(Makes about 10 servings)

  •   500 g (1.1 lb) strawberries
    
  •   200 ml (about 0.85 cups) milk
    
  •   5 tablespoons orange blossom water
    
  •   1 packet of unflavored gelatin
    
  •   1 Greek yogurt
    
  •   Sugar
    
  •   Mint leaves
    

How do we make it?

  • Heat some water with two tablespoons of sugar (a little less water than the amount indicated on the gelatin packet) and, separately, dissolve the powdered gelatin in the orange blossom water. Combine the two liquids.

  • Wash the strawberries, slice them, and arrange them in individual molds (place the prettiest slices against the walls since those will be what shows later).

  • Once the water-and-gelatin mixture has cooled a bit, pour it into each mold and chill in the fridge for at least 3 hours.

  • Meanwhile, gently heat the milk with two tablespoons of sugar and a few mint leaves for five minutes. Remove from heat, strain, and discard the mint. Once the milk is cold, add the yogurt and whisk it together.

  • Serve in a shallow dish, with a layer of the yogurt mixture on the bottom, the unmolded jelly on top, and a few mint leaves to garnish.

Tips:

  • Before pouring the liquid gelatin into the molds, make sure it isn’t too hot — otherwise it could ‘ugly up’ the strawberries a bit.
  • A neat trick for hulling strawberries: grab a plastic straw and push it into the strawberry from underneath, on the opposite side from the stem. Push the straw all the way through the fruit. This removes the green stem and the harder white core in one go. (It works better with slightly wider straws, like the ones at McDonald’s or Burger King.)
  • To unmold the jellies, you can dip the base of the molds in hot water so they release more easily. If you’re using disposable aluminum molds, you can just snip them open with scissors — no problem.

*[English version] ORANGE BLOSSOM & STRAWBERRY JELLY WITH MINT

  • **Ingredients (serves 10 approx.):- 500 g strawberries
  • 2 dl milk

  • 5 tbsp orange blossom water

  • 1 package of gelatine (flavour less)

  • 1 yoghurt (Greek style)

  • Sugar- Mint leaves

  • Heat some water (according to package instructions) with two tablespoons of sugar. Place the orange blossom water into a bowl and stir in the gelatin until it has dissolved. Mix both liquids.

  • Prepare the strawberries, remove the green leaves and slice them. Place these slices into individual moulds.

  • Set aside until temperature decreases. Pour over the gelatin mixture into the moulds and place in the fridge to set for at least three hours.

  • Pour the milk with two tablespoons and some mint leaves in a small saucepan and heat gently. Cook for 5 minutes, strain the milk and discard mint leaves. Once cold, add the yoghurt and beat the mixture.

  • To serve, remove the jelly from the mould and place into a dish with some yoghurt-mint milk and garnish with a leave of mint.

    Tips:- Before pouring the gelatine, let it cool a bit. Otherwise, strawberries will become ‘ugly’.

  • To clean the strawberries you can use a drinking straw. Insert the straw into the opposite side of the green leaves and pierce the fruit until you remove completely the leaves and the hard white core.

  • To remove the jelly from the mould you can place the bottom of it into some hot water. It will be much easier!


Comments

Marisa (2012-08-03 11:50:26):

I can confirm that, on top of being a really beautifully presented dessert, it’s absolutely delicious. I had the luck of being the guinea pig. :)

August 2, 2012 · 4 min · Palstelera