Curry Chicken with Rice

After a crushing victory by four votes, against the two for the Crispy Chicken (irony mode on), today we bring you a delicious recipe we’ve been making for a long time and that we’ve been in love with ever since we first tried it.

Pics and Cakes

What do we need?

  • One chicken breast

  • One cup of rice

  • Half an onion

  • 200 ml (3/4 cup) heavy cream

  • Curry powder to taste

  • Salt

  • 2 garlic cloves

How do we make it?

  • Pour a bit of oil into a small pot. Chop a garlic clove and add it. When the garlic is slightly golden, add the rice.

  • Stir-fry the rice for a moment and add twice as much water as rice. Add salt.

  • When it starts to boil, lower the heat to medium-low and cover. It’ll be ready in 15-20 minutes.

  • While the rice cooks, slice the onion into thin strips.

  • Place a frying pan with a splash of oil over the heat and add the onion.

  • Cut the chicken into strips and toss it into the pan.

  • When the chicken is partly cooked, add a couple of tablespoons of curry powder.

  • Let everything cook together for a bit and stir in the cream.

  • Bring to a boil and add more curry and salt to taste. You’ll have to keep tasting as you go.

Tips:

  • If you want a nice presentation, you can fill half a glass with the cooked rice. Press it down a bit with a spoon so it packs together. Flip it onto the plate and you’ll have a little rice tower.

  • The first time Pastelera tried it, it was served with grilled peaches in syrup. Give it a try.

Pics and Cakes

[English version] CURRY CHICKEN WITH RICE* *Ingredients:

  • 1 chicken breast

  • 1 cup of rice

  • 1/2 onion

  • 200 ml cream

  • *Curry *

  • Salt

  • 2 garlic cloves

  • *First prepare the rice. In a cooking pot, pour a bit of olive. Peel and chop the garlic cloves and stir fry. When it’s slightly golden brown, add the rice. *

  • *Stir fry the rice and add 2 cups of water. Add some salt. *

  • When the water boils, turn the heat down and cover with the lid. It will be ready in 15-20 minutes.

  • *Now, slice the onion. *

  • *Pour some olive into a frying pan and add the onion. *

  • *Cut chicken breast into strips and add to the frying pan. *

  • *After a few minutes, add a couple of tsp of curry. *

  • Stir fry again and add the cream.

  • *Simmer for a while and add more curry and salt if needed. *

Tips:

- You can have an easy and nice presentation just using a cup to create a rice tower. Fill a cup with cooked rice, press with a spoon and turn the cup upside down over the dish.

- You can serve it with some canned peaches. Just grill them a bit and serve them as a garnish.

May 7, 2013 · 3 min · Cesmm

Chocolate and Salted Caramel Tart

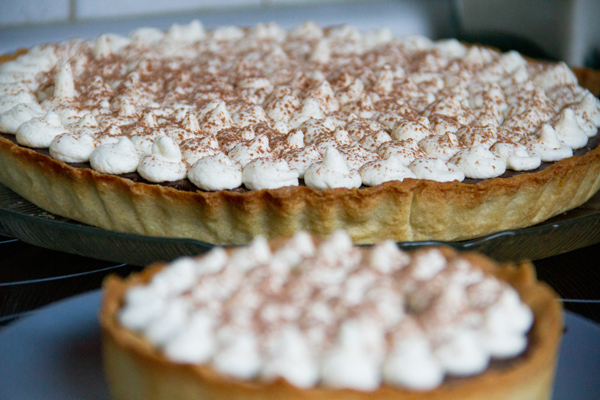
Even though putting the words ‘caramel’ and ‘salted’ together in the same phrase sounds weird, it’s a delicious combination that I tried for the first time thanks to French delicatessens. So as soon as I saw this recipe on La receta de la felicidad I couldn’t resist giving it a go, and I knew it’d be a guaranteed success. Even those weird beings who aren’t crazy about chocolate end up liking it, thanks to the crunchy bite of the crust and the creaminess of the filling. So what are you waiting for to try it?

Pics and Cakes

What do we need?

For the special shortcrust pastry:

  • 250 g (2 cups) all-purpose flour

  • 30 g (1/4 cup) ground almonds

  • 150 g (2/3 cup) butter

  • 80 g (1/3 cup) sugar

  • 1 egg

  • 1 pinch of salt

  • 1 pinch of powdered vanilla

For the salted caramel sauce:

  • 70 g (1/3 cup) sugar

  • 70 ml (1/3 cup) heavy cream

  • 1 teaspoon butter

  • a pinch of salt

For the chocolate cream:

  • 500 ml (2 cups) heavy cream

  • 350 g (12 oz) dark chocolate

For the whipped cream:

  • 300 ml (1 1/4 cups) heavy whipping cream, very cold (at least 35% fat)

  • 2 heaping tablespoons of powdered sugar

  • Optional: cocoa powder for dusting on top

Pics and Cakes

How do we make it?

  • We start by preparing the crust. Mix the very cold butter, cut into small cubes, with the rest of the ingredients. You can use the dough attachment on your mixer or use a spoon and finish kneading by hand. It’ll come out crumbly and you’ll have to keep squeezing the butter with your hands to incorporate everything well, but don’t despair. Wrap in plastic wrap and chill in the fridge for half an hour.

  • Meanwhile, prepare a 24 to 26 cm (9.5 to 10 in) springform tin by lightly greasing it and placing a sheet of baking paper on the bottom.

  • Roll out the dough on a floured surface or between two sheets of baking paper or plastic wrap (so it doesn’t stick) until it’s about 3 mm (1/8 in) thick.

  • Roll the dough onto the rolling pin and unroll it over the tin. Press it well into the tin, patching any gaps with bits of dough. Trim the edges by running the rolling pin over the top of the tin and pressing down.

  • Put the tin with the dough in the fridge for 30 minutes.

  • Preheat the oven to 180°C (355°F).

  • Cover the bottom of the tart with baking paper and fill with dried chickpeas (just like when making quiches — this keeps the dough from rising in the oven). Bake the crust for about 25 minutes.

  • Take it out and once it’s cooled, unmold and place on a plate or tray.

  • Now we’ll prepare the salted caramel sauce. Have the cream and butter ready beforehand. Put the sugar in a saucepan over medium heat and wait without stirring until it turns into caramel (2 or 3 minutes). Once you have a golden caramel, lower the heat to minimum and add the butter, salt, and cream, stirring constantly until you get a smooth sauce. If any caramel lumps form, keep stirring vigorously over low-medium heat until they fully dissolve.

  • Once it’s cooled a bit, pour the caramel over the tart base and put it in the fridge for half an hour.

  • Next we make the chocolate cream. Bring the cream to a boil in a saucepan while you chop the chocolate. When it boils, remove from the heat and add the chopped chocolate. Let it sit for a few minutes and stir until you get a smooth cream. Once the chocolate cream has cooled a bit, pour it over the tart that you had reserved in the fridge and let it chill overnight.

  • Finally, whip the cream. Beat the very cold cream with the sugar using a whisk until it reaches the desired consistency (be careful not to overdo it or it’ll turn into butter).

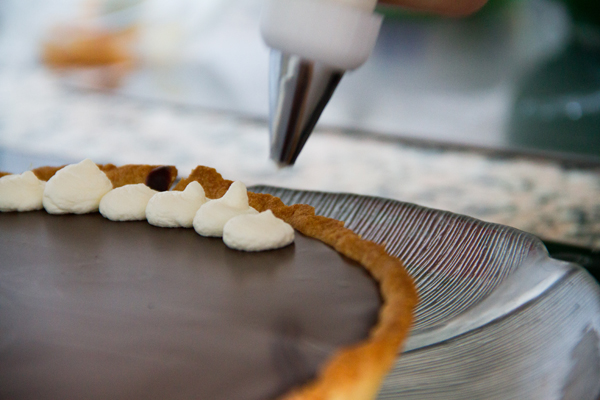
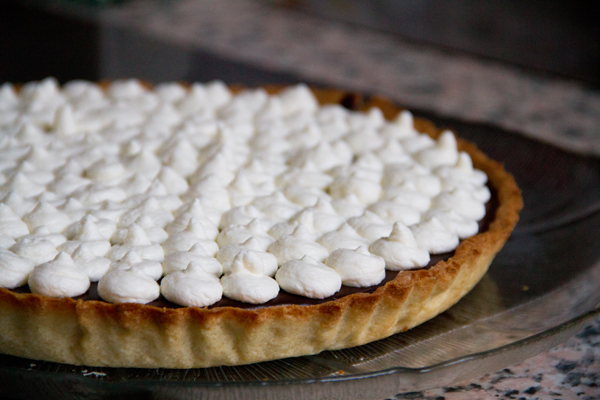
  • Put the whipped cream into a piping bag with a round tip and pipe little mounds of cream over the tart. Using a sieve, dust with cocoa powder and keep in the fridge until ready to serve.

Tips:

  • When whipping the cream you can use regular sugar, but store-bought powdered sugar will help keep the consistency longer since it usually contains a small amount of starch.

  • If you don’t want to even turn on the oven, you can swap the shortcrust base for a cookie base. Crush digestive-type cookies, for example, and mix with melted butter. Cover the tin pressing down well so it’s nice and compact, let it chill before pouring the caramel and you’re done.

  • If you don’t have a piping bag or tip, you can use a plastic bag (like a freezer bag) and snip a small hole in the corner.

Pics and Cakes

[English version] CHOCOLATE AND SALTED CARAMEL TART* *

For the crust:

  • *250 g all purpose flour *

  • *30 g powdered almonds *

  • *150 g butter, cold, cut into cubes *

  • *80 g sugar *

  • 1 egg

  • 1 pinch of salt

  • 1 pinch powdered vanilla

For the salted caramel sauce:

  • *70 g sugar *

  • *70 ml heavy cream *

  • 1 teaspoon butter

  • pinch of salt

For the chocolate cream:

  • *500 ml heavy cream *

  • *350 g dark chocolate *

For the whipped cream:

  • 300 ml heavy cream, very cold (1 cup aprox)

  • 2 tablespoons sugar

  • Optional: unsweetened cocoa powder for dusting

* *

  • Prepare the crust. Whizz all the ingredients in a food processor to a dough and finish by hand until getting a homogeneous dough. Wrap the dough and chill for 30 minutes. Roll out the pastry and line a deep 24-26 cm tart tin with it; patch any holes if crumbly. Cover and chill for at least 30 minutes.

  • Preheat oven to 180 ºC. Prick the tart shell all over with a fork or use baking beans and bake about 25 minutes.

  • Transfer to a rack and let cool.

  • Prepare the caramel sauce. Place sugar a small saucepan and bring to a boil over medium heat. Look for the caramel to turn a rich amber colour, then lower the heat and whisk in butter and cream (the mixture will bubble up, so be careful!). Pour caramel into cooled tart shell and let cool slightly; refrigerate 1/2 hour.

  • Prepare the chocolate cream. Chop the chocolate. Bring heavy cream to boil in a small saucepan over medium heat. Put chocolate into a medium bowl and pour in the hot cream. Let sit for a few minutes, then stir until smooth. Pour ganache evenly over tart and refrigerate 24 hours .

  • Before serving, prepare the whipped cream. In a bowl, using an electric mixer, beat the cream with the sugar until firm. Pipe the whipped cream on top of the pie and dust with some cocoa powdered if desired.

Tips:**- If you use confectioners’ sugar when whipping the cream, you’ll get a firmer cream.

- If you don’t want even to switch on the oven you can prepare the crust with biscuits. Just smash the biscuits and mix with melted butter. Cover the tart mold with it, pressing well with your fingers.Refrigerate before pouring the caramel sauce.

- If you don’t have piping bag, you can use a plastic bag instead.


April 16, 2013 · 6 min · Palstelera

Caramelised Garlic Tart

And then we say the poor Brits have nothing in their cuisine beyond fish & chips and porridge… I tried this recipe at my aunt’s house in Edinburgh and it was honestly a surprise. A savoury tart whose main ingredient is garlic but which, contrary to what you might think, isn’t sharp or strong-tasting at all. It’s creamy, smooth and light on the palate. Hope you enjoy it…

Pics and Cakes

What do we need?

  • 1 sheet of puff pastry

  • 3 heads of garlic (cloves separated and peeled)

  • 1 tablespoon olive oil

  • 1 tablespoon balsamic vinegar of Modena

  • 220 ml (¾ cup + 2 tbsp) water

  • 1 teaspoon icing sugar

  • 1 tablespoon chopped rosemary

  • 1 tablespoon chopped thyme, plus a few whole leaves for garnish

  • 120 g (4 oz) soft goat’s cheese

  • 120 g (4 oz) hard, mature goat’s cheese

  • 2 eggs

  • 100 ml (scant ½ cup) heavy cream

  • 100 ml (scant ½ cup) crème fraîche (can be replaced with heavy cream)

  • Salt and pepper

How do we make it?

  • Roll out the sheet of puff pastry over a round, shallow tart tin so it covers the bottom and the sides. Prick the dough with a fork, place a sheet of baking paper on top and add two handfuls of raw chickpeas (this stops the dough from puffing up while baking). Let it rest in the fridge.

  • Preheat the oven to 180°C (355°F). Bake the pastry case for about 20 minutes. Remove the paper and chickpeas and bake for another 5-10 minutes. Take it out of the oven and set aside. Leave the oven on.

  • While the pastry is baking, make the caramelised garlic. Put the garlic cloves in a pan and cover with water. Bring to a boil and blanch for 3 minutes. Drain well.

  • Dry the pan and put the garlic cloves back in with the olive oil. Fry over high heat for 2 minutes. Add the balsamic vinegar and water and bring to a boil. Let it simmer gently for 10 minutes.

  • Add the sugar, rosemary, thyme and salt. Keep cooking over medium heat for another 10 minutes, or until almost all the liquid has evaporated and the garlic cloves are coated in a kind of dark syrup.

  • To assemble the tart, break up both types of cheese and scatter them over the baked pastry case. Then spoon the caramelised garlic and syrup over the whole surface.

  • In a bowl, whisk the eggs, creams, salt and pepper. Pour this mixture into the tart, trying to fill the gaps left between the cheese and the garlic but without completely covering the ingredients (you should still be able to see them).

  • Lower the temperature to 160°C (320°F). Bake for 35-45 minutes or until you see the filling has set and the top has turned golden.

  • Remove from the tin and serve with a little thyme sprinkled on top.

Tips:

  • To unmould the tart easily once it’s done, you can use a loose-bottomed tin, or otherwise place baking paper before lining it with the puff pastry to prevent sticking.

  • It’s delicious served with a salad. Why not with a rocket and mango salad?

The recipe is from this website: http://britishfood.about.com/od/adrecipes/r/caramelisedgarlictart.htm

*[English version] CARAMELISED GARLIC TART

  • **Ingredients:
  • 1 puff pastry sheet

  • 3 medium heads of garlic (cloves separated and peeled)

  • 1 tbsp olive oil

  • 1 tsp balsamic vinegar

  • 220ml water

  • ¾ tbsp fine sugar

  • 1 tsp chopped rosemary

  • 1 tsp chopped thyme, plus a few whole sprigs to finish

  • 120g soft, creamy goat’s cheese

  • 120g hard, mature goat’s cheese

  • 2 free-range eggs

  • 100ml heavy/double cream

  • 100ml crème fraîche

  • salt and black pepper

  • Have ready a shallow, loose-bottomed, 28cm fluted tart tin. Roll out the puff pastry into a circle that will line the bottom and sides of the tin, plus a little extra. Line the tin with the pastry. Place a large circle of greaseproof paper on the bottom and fill up with baking beans. Leave to rest in the fridge.

  • Preheat the oven to 180°C. Place the tart case in the oven and bake blind for 20 minutes. Remove the beans and paper, then bake for a further 5-10 minutes, or until the pastry is golden. Set aside. Leave the oven on.

  • While the tart case is baking, make the caramelized garlic. Put the cloves in a small saucepan and cover with plenty of water. Bring to a simmer and blanch for 3 minutes, then drain well.

  • Dry the saucepan, return the cloves to it and add the olive oil. Fry the garlic cloves on a high heat for 2 minutes. Add the balsamic vinegar and water and bring to the boil, then simmer gently for 10 minutes.

  • Add the sugar, rosemary, chopped thyme and ¼ teaspoon salt. Continue simmering on a medium flame for 10 minutes, or until most of the liquid has evaporated and the garlic cloves are coated in a dark caramel syrup. Set aside.

  • To assemble the tart, break both types of goat’s cheese into pieces and scatter in the pastry case. Spoon the garlic cloves and syrup evenly over the cheese.

  • In a jug whisk together the eggs, creams, ½ teaspoon salt and some black pepper. Pour this custard over the tart filling to fill the gaps, making sure that you can still see the garlic and cheese over the surface.

  • Reduce the oven temperature to 160°C and place the tart inside. Bake for 35-45 minutes, or until the tart filling has set and the top is golden brown. Remove from the oven and leave to cool a little.

  • Then take out of tin, trim the pastry edge if needed, lay a few sprigs of thyme on top and serve warm.

    Tips:- To take it out of tin in an easy way you can use a quiche pan with the bottom removable or you can just place some oven paper on the tin before rolling out the pastry. - Serve with salad. Why not with mango and rocket salad? Recipe from this website: http://britishfood.about.com/od/adrecipes/r/caramelisedgarlictart.htm


Comments

Sergio (2012-11-16 00:32:29):

Wow!!

This looks incredible. Who would have thought — what a surprise from the Brits.

Palstelera (2012-11-22 19:05:14):

Poor things, we really do underestimate them on the food front…

November 9, 2012 · 5 min · Palstelera

Fresh Stuffed Pasta

Whole Kitchen in their Savory Proposal for the month of September invites us to make an Italian classic: “Stuffed Pasta.” With this recipe we kick off a new adventure on this amazing food blog, where every month we’re challenged to make a savory dish and a sweet one. We love the idea — it’s original and pretty useful, since it pushes you to make dishes you might not normally tackle, and it also lets you check out what the other participants come up with.

Pics and Cakes

What do we need?

(Serves 4)

  • For the dough:
  •   300 g (2.5 cups) flour
    
  •   1 egg and 1 egg white
    
  •   2 tbsp olive oil
    
  •   1/2 tsp salt
    
  •   1 tsp vinegar
    
  • For the filling:
  •   2 small onions, finely chopped
    
  •   1 clove of garlic, finely chopped
    
  •   300 g (10.5 oz) mushrooms
    
  •   2 tbsp parsley
    
  •   Salt
    
  •   40 g (1.5 oz) aged cheese
    
  • For the sauce:
  •   200 ml (3/4 cup + 1 tbsp) heavy cream
    
  •   4 slices of bacon (thick-cut)
    
  •   Salt and pepper
    

Pics and Cakes

How do we do it?

  • Put the flour in a bowl, make a well in the center, and add the egg, the egg white, the salt, the oil, and the vinegar.

  • Knead until you get an elastic dough, adding a splash of water if needed.

  • Wrap the dough in plastic wrap and let it rest in the fridge for at least an hour.

  • Heat a little oil in a large pan, add the onions, garlic, and mushrooms. Cook gently over low heat until all the liquid has evaporated.

  • Stir in the parsley and season. Add the finely chopped aged cheese and mix well (with the heat off). Let it cool.

  • Once the dough has rested, divide it in two and roll out one half with a rolling pin until very thin. Ideally you’d use a pasta machine, but not everyone has one at home, so a rolling pin will do the trick.

  • Place small mounds of filling on the pasta sheet, leaving space between them.

  • Roll out the second half of the dough very thin and lay it over the first one. With your hands, press around the mounds to shape the ravioli.

  • Finally, cut out the ravioli with a round cutter (like a pizza cutter) with fluted edges. Set the ravioli aside while you prepare the sauce.

  • If instead of ravioli you’d rather make tortellini, roll out the dough very thin, fill it, and fold as shown in this [video](

{{}}

).

  • For the sauce, use the leftover filling. Sauté the bacon cut into small cubes, add the leftover filling and the cream, and bring to a boil. Simmer for a few minutes and adjust salt and pepper to taste.

  • Cook the pasta, drain it, add the sauce, and… buon appetito!

Pics and Cakes

Tips:

  • The dough has to be very thin. If you’re using a rolling pin, that means once you think it’s thin enough, roll it out at least three more times. I also recommend making your ravioli or tortellini small, since they’ll grow when cooked.
  • If you don’t have a pasta cutter, you can use a regular knife, but make sure to seal the edges well afterward or you’ll lose the filling during cooking. You can seal them with your fingers, a fork, or the edge of a serrated knife.
  • Our pasta took quite a while to cook (15 minutes) because the pieces were too big and chunky.

Pics and Cakes


September 18, 2012 · 4 min · Palstelera