Brownie

Whole Kitchen’s Sweet Proposal for October invites us to make an American classic: brownies

And what a treat, seriously. I’ve made dozens of brownies in my life and I have to confess I almost always pull out a different recipe and they all turn out delicious. The secret is that a brownie is a compact but fluffy cake (sometimes even moist), since it usually doesn’t have any leavening and therefore doesn’t rise. I read somewhere that the brownie was actually discovered thanks to someone forgetting to add the leavening to a chocolate cake. All I can say is… blessed mistake!

Pics and Cakes

What do we need?

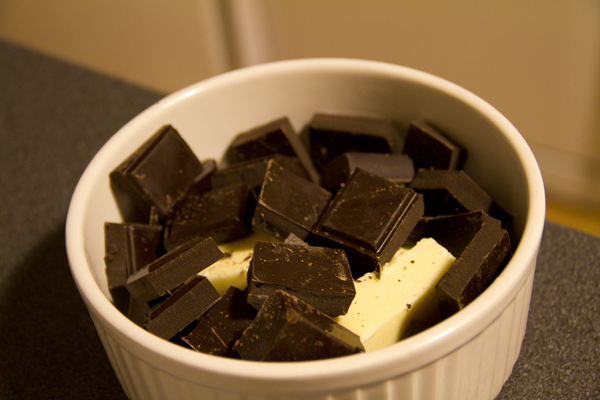
  • 200 g (7 oz) baking chocolate

  • 100 g (3.5 oz / 7 tbsp) butter
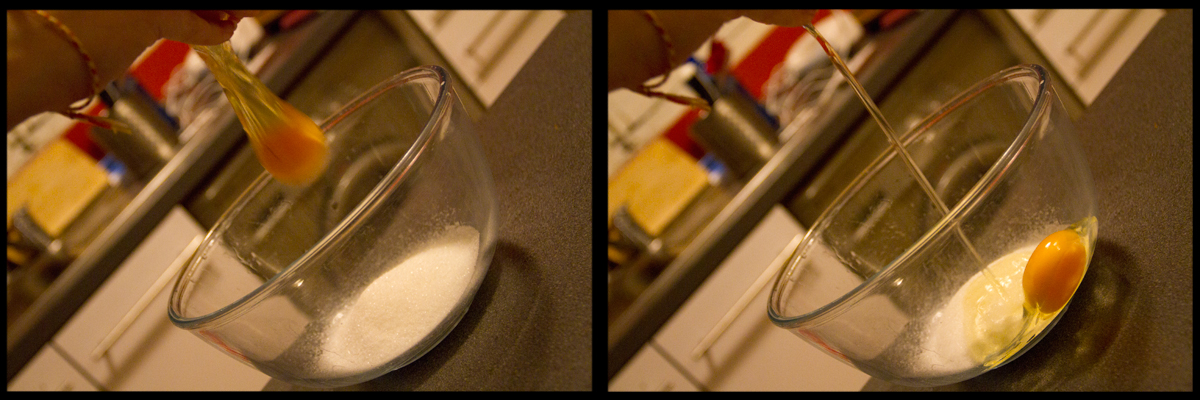
  • 2 eggs

  • 100 g (1/2 cup) regular sugar

  • 1/2 teaspoon baking soda

  • 1/2 teaspoon salt

  • 80 g (2/3 cup) flour

  • 100 g (3.5 oz / about 1 cup) walnuts

Pics and Cakes

How do we make it?

  • Chop the chocolate and put it in a microwave-safe bowl together with the butter. Melt in 20-30 second intervals, stirring each time so it doesn’t burn.

  • In another large bowl, whisk the eggs with the sugar until you get a foamy mixture.

  • Add the chocolate to this foamy mixture and stir well.

  • Mix the flour with the salt and baking soda. Sift it and add it to the previous mixture.

  • Stir well and add the walnuts.

  • Prepare a baking pan, greasing and flouring it so the cake doesn’t stick, and pour the mixture into it.

  • Put it in the oven (preheated to 180°C / 350°F) and bake for about 30 minutes.

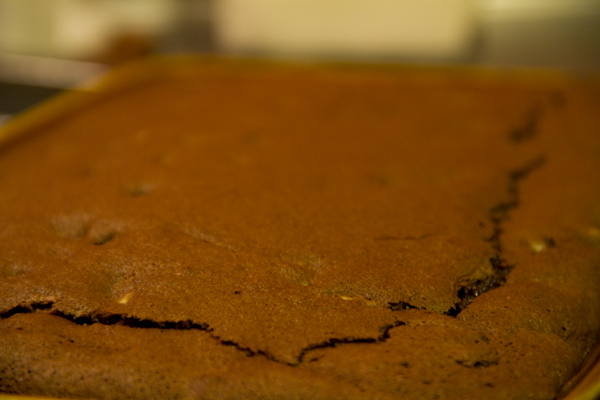
  • It’ll be ready when you see a light brown crust has formed on top. Remember that the toothpick won’t come out perfectly clean since this is a moist cake. The important thing is that it’s not completely liquid.

Pics and Cakes

Tips:

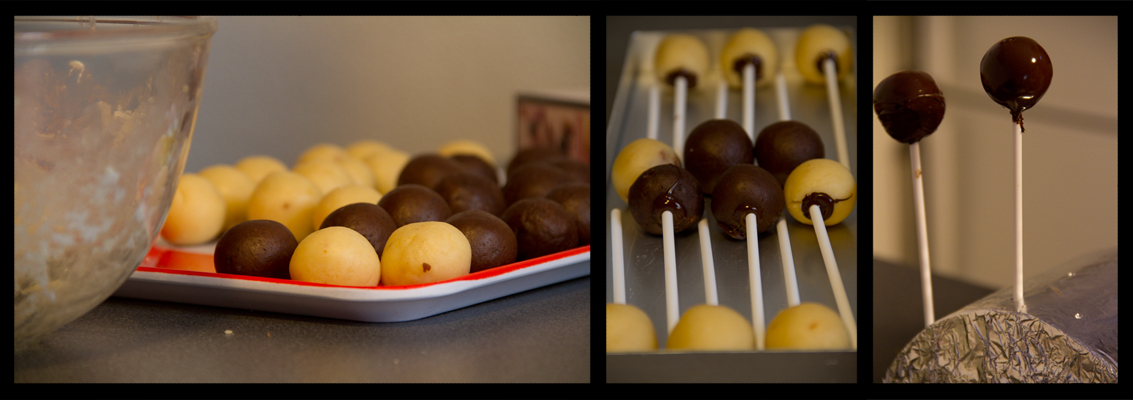
  • Even though brownie batter is pretty dense and it’s usually not necessary, a trick to keep the walnuts from sinking to the bottom of the pan is to coat them in flour or cocoa first.

  • To turn the brownie into a proper dessert, serve it with a scoop of vanilla ice cream and hot chocolate sauce on top.

Pics and Cakes

[English version] BROWNIES* *Ingredients:

  • 200 g chocolate

  • 100 g butter

  • 2 eggs

  • 100 g sugar (sugar or confectioners’ sugar)

  • 1/2 tsp baking soda

  • 1/2 tsp salt

  • 80 g flor

  • *100 g walnuts *

  • Cut chocolate into chunks and put into a microwave bowl with butter. Melt it slowly (stop every 20-30 seconds and stir with a spoon).

  • *In a large bowl, whisk the eggs and the sugar together to get a fluffy mix. *

  • Add chocolate cream and stir well.

  • *Mix flour, salt and baking soda. Sift the flour mix and add to the previous cream. *

  • *Stir well and add walnuts. *

  • *Prepare the baking pan (butter and flour it!) and pour the mixture on it. *

  • *Put into oven (preheated at 180ºC) and bake for 30 minutes. *

  • *It will be ready when you see a brown crust created on the top. If you insert a needle or knife to check the baking, it might not be clean because it’s supposed to be a ‘wet’ cake. *

  • ** Tips:- Normally this tip is not needed with brownies recipe because the dough is very thick. However, when you add nuts to a cake and you don’t want to have all of them at the bottom of your baking pan, you can coat the walnuts in flour or cocoa powder. *- For a perfect dessert result, serve the brownie with a scoop of vanilla ice-cream and hot chocolate sauce over it!

October 25, 2012 · 4 min · Palstelera

Cake Pops

Or pop cakes. Any name works for these little lollipop-shaped treats stuffed with cake. The original idea is to use up the trimmings from a cake you’ve made for something else, or one that didn’t turn out pretty enough — so you don’t feel bad destroying it (literally).

Pics and Cakes

What do we need?

  •   Cake*
    
  •   Cream cheese
    
  •   Chocolate for melting
    
  •   Chocolate sprinkles, colored sprinkles, crushed nuts, colored sugar...
    
  •   Lollipop sticks
    

Buttercream:

  •   250 g (1 cup + 2 tbsp) butter, at room temperature
    
  •   500 g (4 cups) powdered sugar
    
  •   1 tsp vanilla extract
    
  •   1 tbsp water
    
  •   Food coloring
    
  • If you don’t have any cake on hand, you can make a nice fluffy sponge cake with the following ingredients:
  •   4 eggs
    
  •   250 g (1 1/4 cups) sugar
    
  •   1 tsp vanilla extract
    
  •   250 ml (1 cup) milk
    
  •   55 g (4 tbsp) butter
    
  •   250 g (2 cups) all-purpose flour
    
  •   2 tsp baking powder
    
  •   1/4 tsp salt
    

How do we make it?

Making the sponge cake:

  • Beat the eggs with the whisk attachment of the mixer (this step is essential for getting a fluffy texture).

  • Add the sugar and keep beating for another 4 minutes until creamy. Add the vanilla extract and mix well.

  • In another bowl, mix the dry ingredients. Then add the egg-and-sugar cream and beat on low speed until everything is incorporated.

  • Heat the milk and butter in the microwave until the butter melts. Add to the rest of the mixture and stir well.

  • Pour into a greased and floured baking pan.

  • Bake at 170°C (340°F) until a skewer (or knife tip) inserted into the cake comes out clean.

Pics and Cakes

And now on to the cake pops themselves:

  • Once the cake has cooled, cut a piece and set aside roughly the same volume of cream cheese (making cake pops with a whole cake can be madness unless you’ve got a huge party and don’t mind spending the entire day rolling little balls).

  • Take your piece of cake, crumble it with your hands into a bowl and add the cream cheese. Mix well with your hands. (The mixture you get shouldn’t be too dry or too sticky — if either happens, fix it with more cake or more cream cheese.)

  • Now roll small balls with your new mixture. It’s important they come out very smooth, with no cracks visible.

  • Melt a little chocolate in the microwave.

  • Take a ball and stick a lollipop stick into it. Then pull the stick out, dip it in chocolate, drop a bit of melted chocolate inside the hole, and finally push the stick back into the ball for good. (This step matters so the ball doesn’t fall off the stick later.)

  • Repeat until you’ve used up all the mixture and put them in the fridge for half an hour, if possible.

  • Melt the chocolate in the microwave, being careful not to burn it (heat for a few seconds, take it out and stir. Repeat until you get the texture you want).

  • Take your skewered ball and dip it in the chocolate. Pull it out and rotate it so the whole surface gets coated.

  • Let it dry stuck into a piece of styrofoam, a potato or an egg carton (in any case, poke the holes ahead of time with a skewer so you don’t ruin the cake pop’s stick). Repeat with all the balls.

  • Once they’re coated in chocolate, all that’s left is to use your imagination and decorate them with chocolate of another color, sprinkles, colored sugar, chocolate jimmies, etc.

  • Another option is to decorate your cake pops with buttercream. To do that, mix all the buttercream ingredients with the whisk attachment (low speed if you don’t want a powdered-sugar blizzard in your kitchen). You can tint the buttercream with food coloring, transfer it to a piping bag, and pipe little mounds until the ball is fully covered.

Tips:

  • Instead of cream cheese for the mixture, you can use dulce de leche, Nutella, or any other spreadable filling.
  • If you use white chocolate, you can tint it with food coloring — but make sure it’s gel-based or chocolate-specific, never water-based. You can also use the colored chocolate buttons sold at baking shops (candy melts).
  • When melting the chocolate, if you want it runnier so the cake pops are easier to dip, you can add a bit of sunflower oil, butter, or Crisco (vegetable shortening). Never water!
  • If you don’t have sprinkles, jimmies or crushed nuts, you can make colored sugar very easily. Just put a few tablespoons of sugar in a plastic bag, add a couple of drops of food coloring (this one can be liquid), close the bag and shake. You’ll have lovely sugar tinted in whatever color you like.
  • If you’re after inspiration and want to enjoy some real artistry, definitely check out Bakerella’s website.

Pics and Cakes


Comments

Esther (2012-07-28 13:28:38):

Hi!

Just looking at this is making my mouth water! So much so that I think in a few days I’ll be getting to work on it, and I wanted to know where I can buy lollipop sticks in Madrid.

Thanks so much,

EPS

Palstelera (2012-07-28 15:09:13):

I’ll tell you the shops I usually buy from in Madrid, but with how popular all this stuff is getting, I’m sure you can find them in more places too: Decake, in the Estrella neighborhood, La tienda americana, near Plaza de Cristo Rey (Islas Filipinas metro stop), or Comercial Mínguez (downtown area).

I’ve seen that most of them close in August, so hurry up! And I’m waiting for the photos of the result…

Esther (2012-07-28 15:19:44):

Thanks so much!!! I promise photos if they turn out halfway decent, although yours have set the bar pretty high, hehe

July 19, 2012 · 5 min · Palstelera