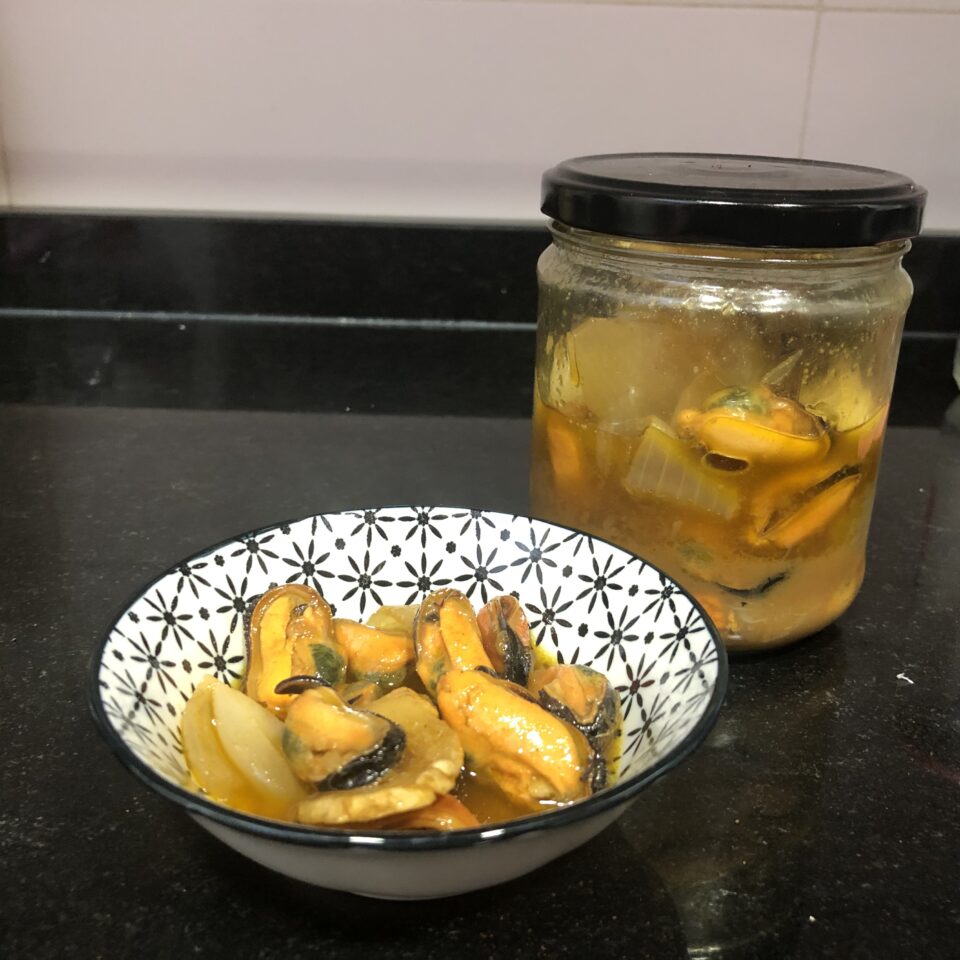
Pickled Mussels

At first I thought this would be one of those recipes that wasn't worth making at home, but how wrong I was. I felt like making the escabeche, seeing the method, and checking whether I could pull off that characteristic flavor. I liked it so much that I've repeated the process about three times this summer. They go a long way and keep for several days in the fridge, so there's no excuse not to have a really tasty homemade appetizer on hand.

Ingredients

  • 1 kg (2.2 lb) mussels
  • 300 ml (1.25 cups) olive oil
  • 100 ml (scant ½ cup) sherry vinegar
  • 50 ml (3 tbsp + 1 tsp) white vinegar (I used rice vinegar)
  • 100 ml (scant ½ cup) white wine
  • 1 head of garlic (cloves separated, unpeeled)
  • 1 large onion, julienned
  • 3 slices of fresh ginger
  • Whole peppercorns (I used allspice)
  • 2-3 dried chili peppers
  • 3 bay leaves
  • Salt
  • 2 teaspoons paprika (sweet, hot, or a mix)
Pics and Cakes

Method

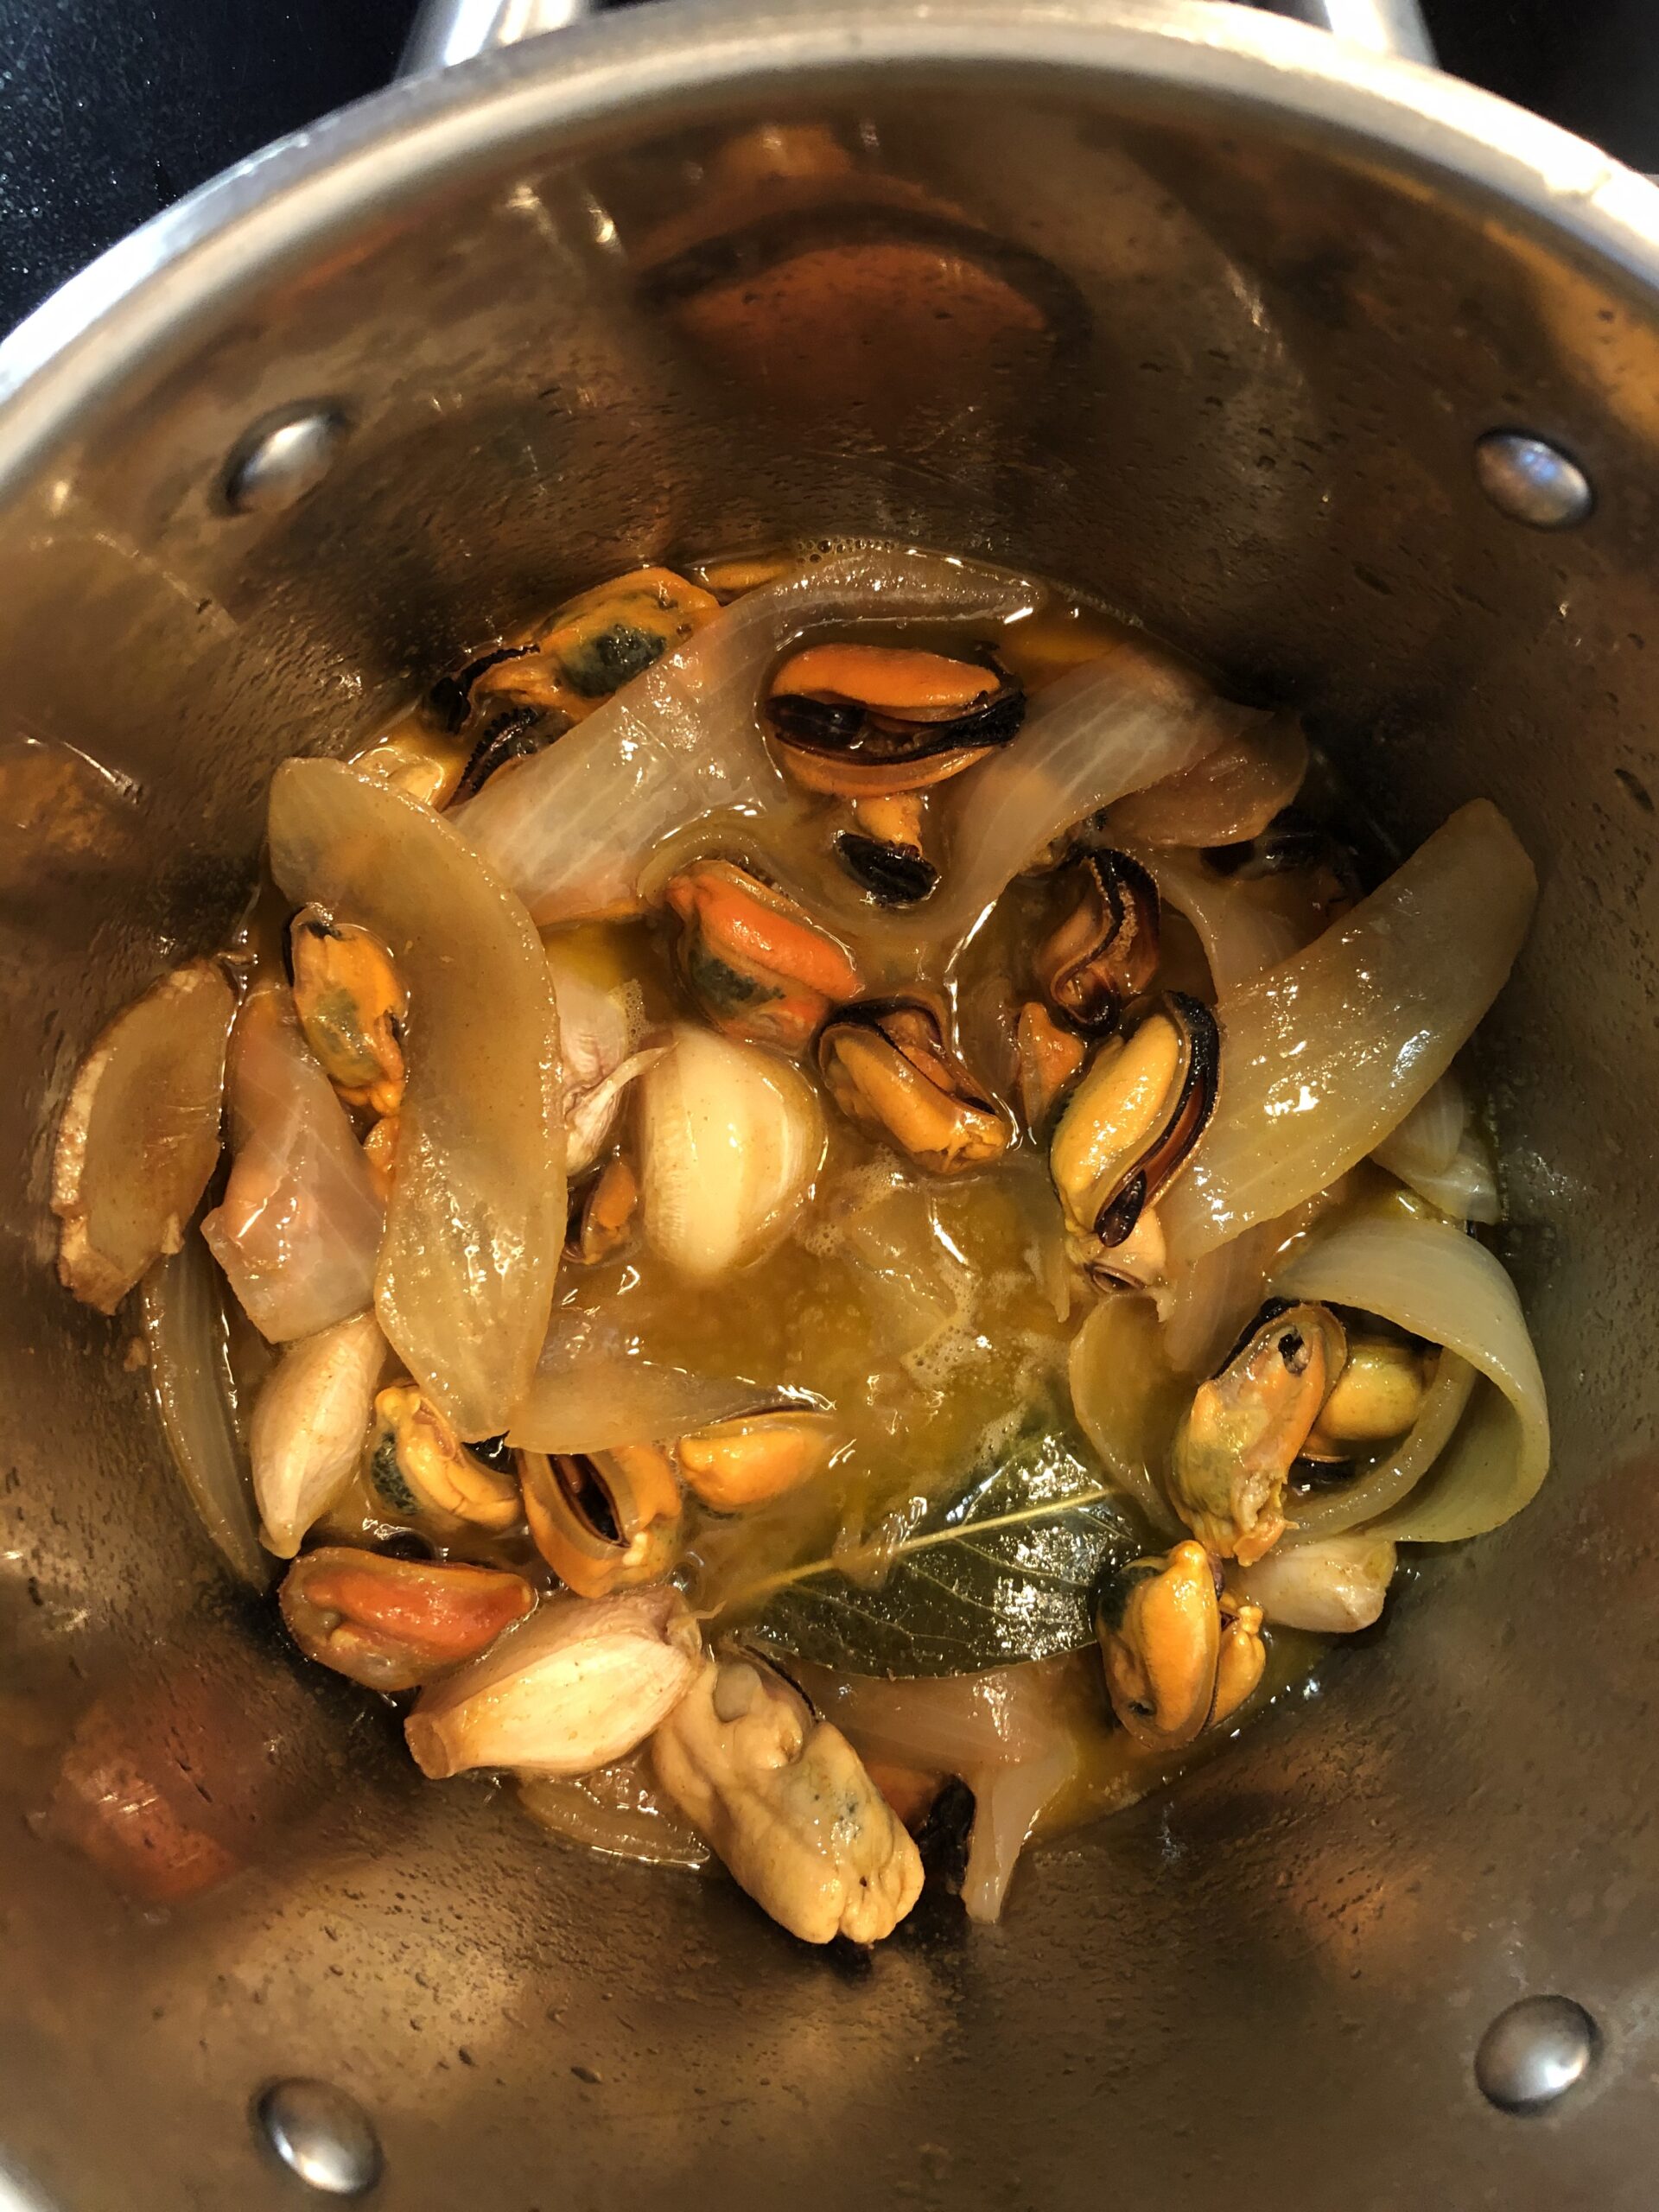
  1. Steam the mussels just until they open but stay tender. Remove the shells and beards. Set aside.
  2. Heat the oil in a saucepan and add all the ingredients except the cooked mussels and the paprika.
  3. Let it simmer over medium heat for 30 minutes.
  4. Once the time is up, take it off the heat and add the paprika. Stir well and add the mussels.
  5. Put it back on the heat for a few seconds just to warm the mussels through.
  6. All that's left is to transfer everything to jars and they're ready to enjoy. Although it's better to leave them for a few hours so the flavors settle in nicely.

PiC Tips

  • You can sterilize the jars beforehand by boiling them in water for 15-20 minutes.
  • With this recipe we're not creating a true preserve since we haven't vacuum-sealed them or boiled them afterwards, so I recommend keeping them in the fridge. When you want to enjoy them, take them out of the fridge a bit ahead of time so they come to room temperature and the oil isn't so solid.
  • You can add other herbs or spices to taste, depending on what you have in your pantry.
Pics and Cakes
Pics and Cakes

September 30, 2020 · 2 min · Palstelera

Curry Chicken with Rice

After a crushing victory by four votes, against the two for the Crispy Chicken (irony mode on), today we bring you a delicious recipe we’ve been making for a long time and that we’ve been in love with ever since we first tried it.

Pics and Cakes

What do we need?

  • One chicken breast

  • One cup of rice

  • Half an onion

  • 200 ml (3/4 cup) heavy cream

  • Curry powder to taste

  • Salt

  • 2 garlic cloves

How do we make it?

  • Pour a bit of oil into a small pot. Chop a garlic clove and add it. When the garlic is slightly golden, add the rice.

  • Stir-fry the rice for a moment and add twice as much water as rice. Add salt.

  • When it starts to boil, lower the heat to medium-low and cover. It’ll be ready in 15-20 minutes.

  • While the rice cooks, slice the onion into thin strips.

  • Place a frying pan with a splash of oil over the heat and add the onion.

  • Cut the chicken into strips and toss it into the pan.

  • When the chicken is partly cooked, add a couple of tablespoons of curry powder.

  • Let everything cook together for a bit and stir in the cream.

  • Bring to a boil and add more curry and salt to taste. You’ll have to keep tasting as you go.

Tips:

  • If you want a nice presentation, you can fill half a glass with the cooked rice. Press it down a bit with a spoon so it packs together. Flip it onto the plate and you’ll have a little rice tower.

  • The first time Pastelera tried it, it was served with grilled peaches in syrup. Give it a try.

Pics and Cakes

[English version] CURRY CHICKEN WITH RICE* *Ingredients:

  • 1 chicken breast

  • 1 cup of rice

  • 1/2 onion

  • 200 ml cream

  • *Curry *

  • Salt

  • 2 garlic cloves

  • *First prepare the rice. In a cooking pot, pour a bit of olive. Peel and chop the garlic cloves and stir fry. When it’s slightly golden brown, add the rice. *

  • *Stir fry the rice and add 2 cups of water. Add some salt. *

  • When the water boils, turn the heat down and cover with the lid. It will be ready in 15-20 minutes.

  • *Now, slice the onion. *

  • *Pour some olive into a frying pan and add the onion. *

  • *Cut chicken breast into strips and add to the frying pan. *

  • *After a few minutes, add a couple of tsp of curry. *

  • Stir fry again and add the cream.

  • *Simmer for a while and add more curry and salt if needed. *

Tips:

- You can have an easy and nice presentation just using a cup to create a rice tower. Fill a cup with cooked rice, press with a spoon and turn the cup upside down over the dish.

- You can serve it with some canned peaches. Just grill them a bit and serve them as a garnish.

May 7, 2013 · 3 min · Cesmm

Stuffed Potatoes

I have to admit we’re a bit like sponges — anything we see and like, we try to make at home. That’s exactly what happened with today’s recipe. A few years ago we went with friends to spend Easter week in Camposancos, a lovely little village in Pontevedra, and there Ana (with Germán’s help) made us some delicious stuffed potatoes that could have fed a regiment (well, maybe we weren’t quite that many…). The thing is, we loved the idea and ever since it’s been part of our recipe book.

Pics and Cakes

What do we need?

  • 4 medium potatoes

  • 5 slices of bacon

  • 1 onion

  • Cheese

  • Salt

  • Pepper

How do we make it?

  • Bake the potatoes in the oven. (You can check here if you’re not sure how to do it.)

  • Meanwhile, chop the bacon and onion and sauté them in a pan with a little olive oil.

  • When the potatoes are ready — you can check by poking them with a kitchen skewer — take them out of the oven and cut them in half.

  • Carefully, with the help of a spoon, scoop out the halves, leaving the skin with a thin layer of potato.

  • Mix the scooped-out potato with the sautéed bacon and onion. Season with salt and pepper.

  • Fill the potato halves with the mixture, add a bit of cheese on top, and put them in the oven to broil.

Tips:

  • Any kind of cheese works. We like it with Emmental (elementary, my dear Watson).

  • If you don’t feel like baking the potatoes, you can boil them instead, but we recommend at least broiling them with the cheese in the oven.

  • This is just our take on the filling. Feel free to adapt it to your taste.

Pics and Cakes

December 27, 2012 · 2 min · Cesmm

Blue Cheese Burger

Good and freezing morning. Today we’re bringing you a really simple recipe, the kind that even Jesús will be able to pull off without having to call twenty times :p The thing is, I’m a huge fan of making burgers at home. They’re usually way better than the ones you eat out, plus you make them to your own taste and load them with the ingredients you like best. This time we made the burger with blue cheese mixed right into the patty.

Pics and Cakes

What do we need?

(For each big-eater burger)

  • 200 g (7 oz) ground beef

  • 25-30 g (1 oz) blue cheese

  • 1 egg

  • Pepper

  • Salt

  • Breadcrumbs

  • Tomato

  • Lettuce

  • Onion

  • Burger bun

How do we make it?

  • Take the ground beef and dump it into a large bowl, since you’re going to be getting your hands in there.

  • Add the egg, a bit of freshly ground pepper, salt to taste, and a little breadcrumbs to give the meat some consistency.

  • Mix everything together with your hands.

  • Once all the ingredients are well combined, add the blue cheese cut into cubes. Try to work it into the meat but without pressing too hard so the cheese doesn’t break apart.

  • Wrap in cling film and shape into a burger.

  • Let the burger rest in the fridge for a couple of hours.

  • When you’re ready to eat, put a frying pan with a splash of oil over the heat and, while it’s warming up, start chopping the rest of the ingredients.

  • Cut the onion into rings, the lettuce into fairly large leaves (that way it’s easier to eat), and the tomato into slices.

  • Once the oil is hot, lower the heat a bit so the burger doesn’t burn on the outside while staying raw inside. Cook it to your liking (I like mine rare).

  • When it’s done, set it aside, wipe the pan clean with kitchen paper, and toast the bun for about half a minute.

  • Build your burger and enjoy.

Tips:

  • If you’re not going to use all the ground beef you bought, you can keep the formed patties in the freezer.

  • For me, as I said, I really enjoy a good burger, so 150 to 200 grams (5-7 oz) of ground beef is the “standard” size. Yes, that’s on the generous side, but hey, it’s a burger. Obviously you can make it with less.

  • If you want, you can dust the patty in flour before cooking it.

  • As my dad says when we play tute, “side dish requested.” A good beer or a cold Coke with fries (homemade or store-bought) is a must.

Pics and Cakes

[English version] **Ingredients:

(For each big hamburger)

  • 200 g de minced meat

  • 25-30 g de blue cheese

  • 1 egg

  • Pepper

  • Salt

  • Bread crumbs

  • Tomato

  • Salad

  • Onion

  • Hamburger bun

  • Place minced meat into a large bowl and mix well with your hands.

  • Add the egg, a bit of salt and pepper and some bread crumbs.

  • Mix well all ingredients.

  • Then chop blue cheese into small squares and add to the meat mix. Try to ‘knead’ the mix integrating the cheese but keeping it into pieces.

  • Make a ball, wrap in cling film and and flatten it with your hand to have hamburger shape.

  • Leave for a couple of hours in fridge.

  • Then, pour a bit of olive oil in the frying pan. Let it get warm and start preparing your fresh ingredients (onion, tomato and salad).

  • Cut onion into rings, tomato into slices and salad (lettuce) into big parts (it will be easier to eat).

  • Cook the hamburger according to your preferences (well done, medium or rare).

  • When it’s ready take it out from the pan, clean the frying pan with kitchen paper and toat the bread bun.

  • Prepare you hamburger sandwich with all the ingredients and enjoy it.

Tips:

  • You can freeze the prepared raw hamburgers and you will only need to defrost and cook in the pan whenever you need it.

  • This amount of minced meat is for a big hamburger but it’s up to you the size of your hamburger.

  • You can coat in flour the raw hamburger before cooking it.

  • It’s a must to serve the hamburger with a cold beer and chips or fries.


December 11, 2012 · 4 min · Cesmm

Pasta Carbonara

Truth is, this is a recipe we’ve been making for ages and one that I always thought was “the original” — the way I figured this typical Italian dish was prepared by mammas all over Italy. How wrong I was… Every Italian who’s seen us make this dish has been surprised, has laughed, and has gotten outraged in equal measure when watching us prepare “their dish” with cream instead of uovo. Here you can see how they make it, and without further ado I’ll show you our version (having tried both, I’ll stick with ours :p)

Pics and Cakes

What do we need?

(Serves 2)

  • 200 g (7 oz) spaghetti

  • 4 slices of bacon

  • 1/2 onion

  • 200 ml (3/4 cup) cooking cream

  • Salt and pepper

How do we make it?

  • Put the spaghetti to cook in plenty of water (once it’s boiling), lightly salted.

  • While the pasta is cooking — we’ll leave it for around 15 minutes — pour a splash of oil in a frying pan and add the onion.

  • Let it sauté a little and add the bacon.

  • Once it’s done, add the cream and let it come to a boil.

  • Add a pinch of salt — careful not to overdo it since the bacon already gives flavor to the sauce — and a bit of pepper. Set aside if the pasta isn’t ready yet.

  • Drain the pasta and mix with the carbonara sauce.

Pics and Cakes

Tips:

  • Depending on your stove, pot, and pasta, it may be ready a little before the fifteen minutes or a little after. Keep an eye on it if you like your pasta “al dente”.

  • The bacon can be swapped for pancetta.

  • You can sprinkle a bit of Parmesan cheese on top when you serve the pasta.

Pics and Cakes


Comments

Miguel (2012-11-07 12:01:29):

I usually make this same recipe, but when I add the salt and pepper, I take the chance to throw in a tiny bit (very, very little) of nutmeg.

And I also prefer the cream version over the egg one.

tía pi (2012-11-07 23:41:40):

For me, carbonara is without onion, with bacon, cream and egg, but I’ll give yours a try.

Palstelera (2012-11-09 21:26:49):

I love nutmeg. Truth is I always add it to béchamel but never to carbonara — I’ll try it next time :-)

Palstelera (2012-11-09 21:27:17):

Without onion? Try it, it’s delicious!

Vio (2012-12-07 20:44:34):

Boo! I love the blog, but you also know I couldn’t stay quiet knowing you call this carbonara. Maledetti!

I’ll take the chance to tell you that, aside from the amazing recipes, the site is super pretty and the photos rock ;-)

Big kiss!

Palstelera (2012-12-11 13:04:25):

hehe, Vio. It’s not that we call it carbonara… it’s that half of Spain does! That’s why, to avoid hurting any feelings, we started the post by making clear that what’s called carbonara in Spain has nothing to do with the Italian recipe… But honestly, I love the Spanish version :-)

Vio (2013-03-05 12:39:39):

Haha, sure — you, Spain… it’s all about complaining :-P

The truth is I do really like this version, but I think the Italian one is much tastier when it’s done right, with crispy bacon, lots of pepper, and nice juicy spaghetti. I will say a lot of Italians make a pretty lousy version and it really brings the dish down.

November 6, 2012 · 3 min · Cesmm

Chicken Pitas

After a two-week delay and a move in between, we’re kicking off this new adventure in the world of food and new technologies. Since I’m a person who loves to eat, I’ll mostly be in charge of the simple recipes — the kind that save you when dinnertime rolls around. And one of those recipes I love most is the chicken pita. Simple and really tasty.

Pics and Cakes

What do we need?

  •   1 chicken breast
    
  •   1/2 red bell pepper (if you have green, throw that in too)
    
  •   1/2 onion
    
  •   3 lettuce leaves
    
  •   Salt and pepper
    

How do we make it?

  • Slice the bell pepper and onion into julienne strips, and cut the chicken into strips.

  • Put a little oil in a frying pan.

  • When it’s hot, add the pepper and onion. Add a pinch of salt.

  • When they’re partly cooked — we like the pepper “al dente” — season the chicken with salt and pepper and add it to the pan.

  • While the chicken is cooking, wash and cut the lettuce leaves into strips.

  • Once the chicken is golden, set aside.

  • Pop two pita breads in the toaster and wait until they’re lightly toasted.

  • Cut off the top of the bread and tuck in the ingredients with the help of a spoon.

Tips:

  • Up to you whether you want to marinate the chicken with lemon or not. To do that, before frying it, put the chicken in a bowl with the juice of one squeezed lemon, salt and pepper for a few hours.
  • You can also add a sauce (mayo, ketchup, mustard thinned with mayo, etc.)

Pics and Cakes

[English version] PITA BREAD FILLED WITH CHICKEN AND PEPPERS **Ingredients:- 1 chicken breast

  • 1/2 red pepper (you can also use green pepper)

  • 1/2 onion

  • 3 lettuce leaves

  • Salt and pepper

  • Slice pepper, onion and chicken into strips.

  • Put some olive oil in a frying pan.

  • Stir fry pepper and onion. Add some salt.

  • Salt and pepper chicken strips and add to the pan.

  • Meanwhile, wash and cut lettuce.

  • When chicken is golden, put it aside.

  • Toast pita bread and fill it with lettuce, chicken and veggies.

    Tips:- You can marinate the chicken by putting it with salt, pepper and fresh lemon juice for some hours before cooking it.- You can add some sauces to your pita sandwich (mayonaise, ketchup, mustard+mayo, etc.) Pics and Cakes


Comments

ReimonStar (2012-07-17 13:20:02):

Cuz, those look great. I make them with fajita wraps instead of pita and I add some really spicy mojo picón from Carrefour and a touch of guacamole from Mercadona and yum yum yum. By the way, the photos are really cool. Keep it up! Next up TVLaElipa

Cesmm (2012-07-17 16:37:37):

Duly noted, Don Reimon.

July 15, 2012 · 3 min · Cesmm