Galletas de masa quebrada

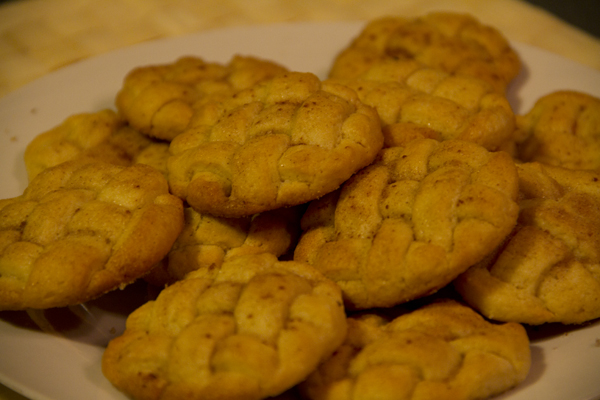
En una de mis visitas habituales al blog de La Receta de la Felicidad, encontré esta receta de galletas exprés. En mi caso no fueron tan exprés ya que decidí hacer yo misma la masa quebrada en vez de comprarla. En cualquier caso, la idea del trenzado de galletas sorprende por lo sencilla que es y lo bonita que queda, así que no tenéis excusa para no probarla.
 Pics and Cakes

¿Qué necesitamos?

-       1 lámina de masa quebrada*

  •       1 cucharada de mantequilla
  •       Azúcar y canela

*Si en vez de comprarla preferis hacer vosotros mismos la masa quebrada también necesitaréis:

  •       200 g de harina
  •       100 g de mantequilla fría
  •       1 huevo
  •       Una pizca de sal
  •       Una pizca de azúcar

  Pics and Cakes

¿Cómo lo hacemos?

Masa quebrada:

  • Ponemos todos los ingredientes en un cuenco. La mantequilla tiene que estar muy fría y cortada en trocitos.

  • Empezamos a amasar con las manos hasta tener una masa homogénea, hacemos una bola con ella y la envolvemos en papel film transparente. Dejamos reposar una hora en la nevera.

  • Pasado el tiempo de espera estiramos la masa con el rodillo hasta dejarla bastante finita (5 mm aproximadamente). Podemos hacerlo ayudándonos de un par de papeles de horno o incluso film transparente.

Galletas:

  • Precalentamos el horno a 200ºC.

  • Con la masa estirada, cortamos tiras de 1 cm con un cuchillo bien afilado.

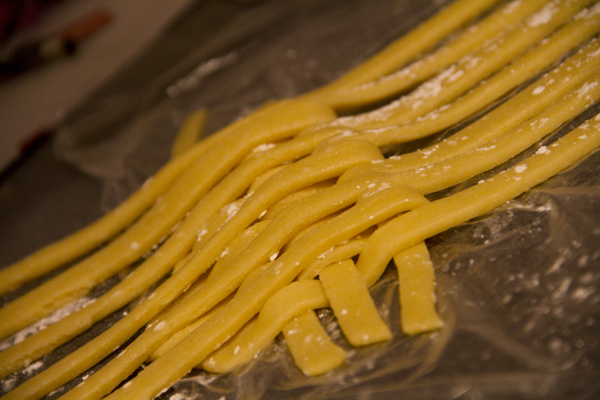
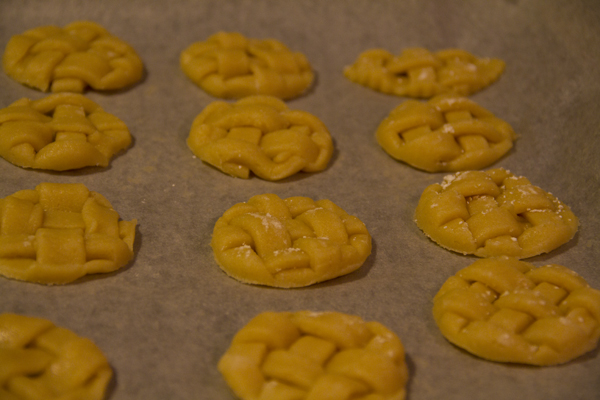
  • Procedemos a trenzar la masa. Para ello, pondremos la mitad de las tiras juntas en posición vertical. Luego iremos colocando una a una las otras tiras en horizontal haciéndolas pasar por las tiras verticales alternando arriba y abajo (como una imagen vale más que mil palabras, echadle un vistazo a la foto).

  • Con un cortapastas redondo (o de la forma deseada) vamos cortando las galletas de nuestra masa recién trenzada.

  • Las pincelamos con mantequilla derretida y añadimos azúcar y canela (sin temor a excedernos ya que la masa quebrada no es dulce).

  • Colocamos las galletas sobre una bandeja cubierta con papel de hornear y las horneamos durante 10 minutos.

Consejos:

  • Podéis echarle cualquier especia o saborizante que consideréis. En mi caso utilicé un azúcar glas aromatizada con canela y manzana.
  • Para que no pierdan demasiado su forma la masa quebrada tiene que estar muy fría y habrá que manosearla lo menos posible (en este caso, es más sencillo hacerlo con masa quebrada comprada).
  • Si las hacéis del tamaño más grande que una tacita de café podréis servirlas de la forma tan original que hace @SandeeA
Pics and Cakes

[English version] SHORTBREAD PASTRY BISCUITS *Ingredients:- 1 sheet of shortbread pastry

  • 1 tbsp of butter

  • Sugar and cinnamon  For the shortbread pastry you will need:- 200 g of white flour- 100 g of butter- 1 egg- A pinch of salt- A pinch of sugar *For the pastry

  • Place all the ingredients into a large bowl. Butter has to be very cold and cut into small pieces.

  • Mix properly until getting a uniform dough, make a bowl and cover with cling film. Leave in the fridge for 1 hour.

  • *Roll out the dough (5 mm thick). You can use a couple of baking papers or cling film to make the task easier. *

For the biscuits:

  • * Preheat oven at 200ºC*

  • Cut 1 cm-wide stripes with a sharpen knife. Create the pattern by putting half of the stripes into vertical positions. Then use the other stripes (one by one) to cross the first ones in horizontal position as shown in the picture.

  • Cut out rounds.

  • Brush tops with melt butter and sprinkle sugar and cinnamon.

  • Place into oven tray covered by baking paper sheet.

  • Bake for 10 minutes.

    Tips:- You can add any other spices or flavours. I used apple-cinnamon flavoured sugar.

  • To avoid the pastry loses its shape, keep it always very cold!
  • You can cut out rounds a bit bigger than small cups and use the same serving suggestion than @SandeeA
30 de agosto de 2012 · 3 min · Palstelera

Shortcrust Pastry Cookies

On one of my regular visits to the La Receta de la Felicidad blog, I came across this recipe for express cookies. In my case they weren’t quite so express since I decided to make the shortcrust pastry myself instead of buying it. In any case, the idea of the woven cookies is striking for how simple it is and how pretty they look, so you have no excuse not to try them.

Pics and Cakes

What do we need?

  •   1 sheet of shortcrust pastry*
    
  •   1 tablespoon of butter
    
  •   Sugar and cinnamon
    

*If instead of buying it you’d rather make the shortcrust pastry yourselves, you’ll also need:

  •   200 g (1.5 cups) of flour
    
  •   100 g (7 tbsp) of cold butter
    
  •   1 egg
    
  •   A pinch of salt
    
  •   A pinch of sugar
    

Pics and Cakes

How do we make it?

Shortcrust pastry:

  • Put all the ingredients in a bowl. The butter has to be very cold and cut into small pieces.

  • Start kneading with your hands until you have a smooth dough, shape it into a ball and wrap it in plastic wrap. Let it rest in the fridge for an hour.

  • Once the waiting time is up, roll out the dough with a rolling pin until it’s quite thin (about 5 mm / 1/4 inch). You can do this with the help of a couple of sheets of baking paper or even plastic wrap.

Cookies:

  • Preheat the oven to 200°C (390°F).

  • With the dough rolled out, cut strips of 1 cm (about 1/2 inch) with a sharp knife.

  • Now we weave the dough. To do this, place half of the strips together in a vertical position. Then place the other strips one by one horizontally, passing them through the vertical strips alternating over and under (since a picture is worth a thousand words, take a look at the photo).

  • With a round cookie cutter (or any shape you like), cut out the cookies from the freshly woven dough.

  • Brush them with melted butter and sprinkle with sugar and cinnamon (don’t be shy with the amount, since shortcrust pastry isn’t sweet).

  • Place the cookies on a tray lined with baking paper and bake them for 10 minutes.

Tips:

  • You can add any spice or flavoring you like. In my case I used a powdered sugar flavored with cinnamon and apple.
  • So they don’t lose their shape too much, the shortcrust pastry has to be very cold and you should handle it as little as possible (in this case, it’s easier with store-bought shortcrust pastry).
  • If you make them a bit bigger than a coffee cup, you can serve them in the original way that @SandeeA does.

Pics and Cakes

30 de agosto de 2012 · 3 min · Palstelera

Gelatina de fresas y azahar a la menta

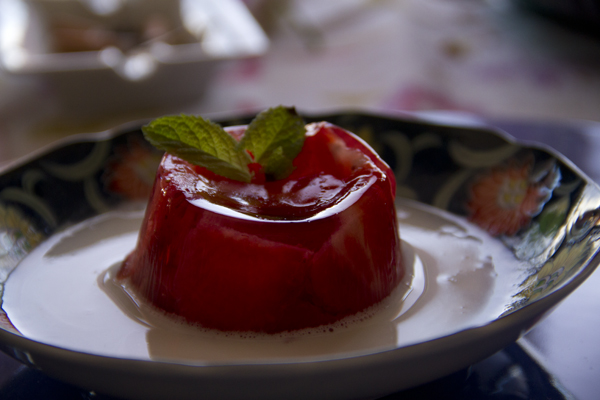
Vi este postre en un catálogo del supermercado y me pareció una idea original, bastante aparente y con un aspecto delicioso. Lo cierto es que mi último recuerdo tratando de hacer una gelatina de fresas era una especie de flan rosa extra líquido con una plancha de gelatina petrificada a la que no había quien le hincara el diente. Así que con estos antecedentes, esta sencilla receta suponía todo un reto para mí. He de confesar que el reto fue totalmente superado y el postre gustó mucho.

Pics and Cakes

¿Qué necesitamos?

(Para 10 unidades aprox.)

-       500 g de fresones -       2 dl de leche -       5 cucharadas de agua de azahar -       1 sobre de gelatina neutra -       1 yogur griego -       Azúcar -       Hojas de menta


¿Cómo lo hacemos?

  • Calentamos agua con dos cucharadas de azúcar (un poquito menos de la cantidad de agua que indique el sobre de gelatina) y por otro lado disolvemos la gelatina en polvo en el agua de azahar. Juntamos los dos líquidos.

  • Limpiamos los fresones, los cortamos en láminas y los distribuimos en los moldes individuales (en las paredes ponemos las láminas más bonitas ya que será lo que se vea después).

  • Una vez que se ha enfriado un poco el agua con la gelatina, añadimos este líquido en cada molde y lo dejamos enfriar en la nevera durante 3 horas (mínimo).

  • Mientras tanto, calentamos a fuego lento la leche con dos cucharadas de azúcar y unas hojas de menta durante cinco minutos. Lo retiramos y colamos y desechamos la menta. Una vez fría esta leche, añadimos el yogur y lo batimos.

  • Lo servimos en un platito hondo, poniendo un fondo de la mezcla de yogur, la gelatina desmoldada y unas hojitas de mentas para decorar.


Consejos:

  • Antes de echar la gelatina líquida en los moldes aseguraos de que no está muy caliente ya que esto podría ‘afear’ un poco las fresas.
  • Un curioso truco para quitarle el rabito a las fresas consiste en coger una pajita de plástico y clavarla en la fresa por debajo, justo en el lado contrario al rabito. Clavamos la pajita y atravesamos la fresa. De esta manera quitaremos el rabito verde y todo el centro blanco que suele ser más duro. (Es mejor hacerlo con pajitas un poco anchas, como las que usan en los McDonalds o Burger).
  • Para desmoldar las gelatinas podéis meter la base de los recipientes en agua caliente y así se despegará mejor. En caso de que utilicéis moldes desechables de aluminio podéis cortarlos con unas tijeras sin ningún problema.


*[English version] ORANGE BLOSSOM & STRAWBERRY JELLY WITH MINT * **Ingredients (serves 10 approx.):- 500 g strawberries

  • 2 dl milk

  • 5 tbsp orange blossom water

  • 1 package of gelatine (flavour less)

  • 1 yoghurt (Greek style)

  • Sugar- Mint leaves 

  • Heat some water (according to package instructions) with two tablespoons of sugar. Place the orange blossom water into a bowl and stir in the gelatin  until it has dissolved. Mix both liquids.

  • Prepare the strawberries, remove the green leaves and slice them. Place these slices into individual moulds.

  • Set aside until temperature decreases. Pour over the gelatin mixture into the moulds and place in the fridge to set for at least three hours.

  • Pour the milk with two tablespoons and some mint leaves in a small saucepan and heat gently. Cook for 5 minutes, strain the milk and discard mint leaves. Once cold, add the yoghurt and beat the mixture.

  • To serve, remove the jelly from the mould and place into a dish with some yoghurt-mint milk and garnish with a leave of mint.

   Tips:- Before pouring the gelatine, let it cool a bit. Otherwise, strawberries will become ‘ugly’.

  • To clean the strawberries you can use a drinking straw. Insert the straw into the opposite side of the green leaves and pierce the fruit until you remove completely the leaves and the hard white core.
  • To remove the jelly from the mould you can place the bottom of it into some hot water. It will be much easier!

2 de agosto de 2012 · 4 min · Palstelera

Strawberry and orange blossom jelly with mint

I spotted this dessert in a supermarket catalog and thought it was a really original idea — eye-catching and looking absolutely delicious. The truth is, my last memory of attempting a strawberry jelly involved a sort of extra-runny pink flan with a petrified slab of gelatin on top that nobody could sink their teeth into. So with that track record, this simple recipe was quite a challenge for me. I have to confess the challenge was completely conquered and the dessert went down a treat.

Pics and Cakes

What do we need?

(Makes about 10 servings)

  •   500 g (1.1 lb) strawberries
    
  •   200 ml (about 0.85 cups) milk
    
  •   5 tablespoons orange blossom water
    
  •   1 packet of unflavored gelatin
    
  •   1 Greek yogurt
    
  •   Sugar
    
  •   Mint leaves
    

How do we make it?

  • Heat some water with two tablespoons of sugar (a little less water than the amount indicated on the gelatin packet) and, separately, dissolve the powdered gelatin in the orange blossom water. Combine the two liquids.

  • Wash the strawberries, slice them, and arrange them in individual molds (place the prettiest slices against the walls since those will be what shows later).

  • Once the water-and-gelatin mixture has cooled a bit, pour it into each mold and chill in the fridge for at least 3 hours.

  • Meanwhile, gently heat the milk with two tablespoons of sugar and a few mint leaves for five minutes. Remove from heat, strain, and discard the mint. Once the milk is cold, add the yogurt and whisk it together.

  • Serve in a shallow dish, with a layer of the yogurt mixture on the bottom, the unmolded jelly on top, and a few mint leaves to garnish.

Tips:

  • Before pouring the liquid gelatin into the molds, make sure it isn’t too hot — otherwise it could ‘ugly up’ the strawberries a bit.
  • A neat trick for hulling strawberries: grab a plastic straw and push it into the strawberry from underneath, on the opposite side from the stem. Push the straw all the way through the fruit. This removes the green stem and the harder white core in one go. (It works better with slightly wider straws, like the ones at McDonald’s or Burger King.)
  • To unmold the jellies, you can dip the base of the molds in hot water so they release more easily. If you’re using disposable aluminum molds, you can just snip them open with scissors — no problem.

*[English version] ORANGE BLOSSOM & STRAWBERRY JELLY WITH MINT

  • **Ingredients (serves 10 approx.):- 500 g strawberries
  • 2 dl milk

  • 5 tbsp orange blossom water

  • 1 package of gelatine (flavour less)

  • 1 yoghurt (Greek style)

  • Sugar- Mint leaves

  • Heat some water (according to package instructions) with two tablespoons of sugar. Place the orange blossom water into a bowl and stir in the gelatin until it has dissolved. Mix both liquids.

  • Prepare the strawberries, remove the green leaves and slice them. Place these slices into individual moulds.

  • Set aside until temperature decreases. Pour over the gelatin mixture into the moulds and place in the fridge to set for at least three hours.

  • Pour the milk with two tablespoons and some mint leaves in a small saucepan and heat gently. Cook for 5 minutes, strain the milk and discard mint leaves. Once cold, add the yoghurt and beat the mixture.

  • To serve, remove the jelly from the mould and place into a dish with some yoghurt-mint milk and garnish with a leave of mint.

    Tips:- Before pouring the gelatine, let it cool a bit. Otherwise, strawberries will become ‘ugly’.

  • To clean the strawberries you can use a drinking straw. Insert the straw into the opposite side of the green leaves and pierce the fruit until you remove completely the leaves and the hard white core.

  • To remove the jelly from the mould you can place the bottom of it into some hot water. It will be much easier!


Comments

Marisa (2012-08-03 11:50:26):

I can confirm that, on top of being a really beautifully presented dessert, it’s absolutely delicious. I had the luck of being the guinea pig. :)

2 de agosto de 2012 · 4 min · Palstelera

Cake pops

O pop cakes. Cualquier forma vale para denominar a estos pequeños dulces con forma de chupachus y rellenos de bizcocho. La idea original es aprovechar los recortes de un bizcocho que hayamos utilizado para hacer una tarta o uno que no nos haya quedado muy bonito y por tanto no nos dé pena destrozarlo (literalmente).

Pics and Cakes

¿Qué necesitamos?

  •       Bizcocho*
  •       Queso blanco de untar
  •       Chocolate para fundir
  •       Fideos de chocolate, de colores, crocanti, azúcar coloreada…
  •       Palitos de piruleta

Crema de mantequilla:

  •       250 g mantequilla (temperatura ambiente)
  •       500 g azúcar glas
  •       1 cucharadita de esencia de vainilla
  •       1 cucharada de agua
  •       Colorantes alimenticios
  • Si no tenéis ningún bizcocho hecho podéis preparar uno bien esponjoso (sponge cake) con los siguientes ingredientes:
  •       4 huevos
  •       250 g azúcar
  •       1 cucharadita de esencia de vainilla
  •       250 ml leche
  •       55 g mantequilla
  •       250 g harina
  •       2 cucharaditas levadura
  •       1/4 cucharadita de sal


¿Cómo lo hacemos?

Preparación del bizcocho:

  • Batimos los huevos con la batidora con el accesorio de varillas (este paso es esencial para que quede esponjoso).

  • Añadimos el azúcar y seguimos batiendo durante otros 4 minutos hasta que lo veamos cremoso. Añadimos la esencia de vainilla y mezclamos bien.

  • En otro cuenco mezclamos los ingredientes secos. A continuación añadimos la crema de huevos y azúcar y lo batimos a baja velocidad hasta que se hayan incorporado todos los ingredientes.

  • Calentamos en el microondas la leche con la mantequilla hasta que ésta se derrita. Añadimos al resto de la mezcla y removemos bien.

  • Lo ponemos en una fuente de horno previamente engrasada y enharinada.

  • Lo horneamos a 170ºC hasta que al insertar un pincho (o punta del cuchillo) en el bizcocho, éste salga limpio.

Pics and Cakes

Y ahora nos ponemos con los cake pops propiamente dichos:

  • Cuando el bizcocho esté frío cortamos un trozo y separamos aproximadamente el mismo volumen de queso blanco (hacer cake pops con un bizcocho entero puede ser una locura a no ser que tengáis una fiesta multitudinaria y no os importe pasaros todo el día haciendo bolitas).

  • Cogemos nuestro trozo de bizcocho, lo desmenuzamos con las manos en un cuenco y le añadimos el queso blanco. Mezclamos bien con las manos. (La masa que obtendremos no tiene que estar ni muy seca mi muy pegajosa, si vemos que sucede alguna de las dos cosas rectificaremos con más bizcocho o con más queso).

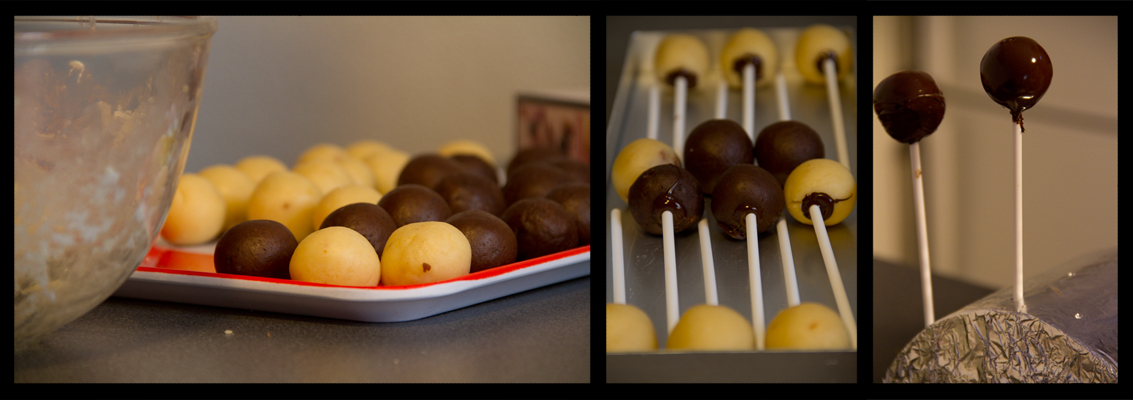
  • Ahora procedemos a hacer pequeñas bolitas con nuestra nueva masa. Es importante que nos queden muy lisas y no se vean resquebrajadas.

  • Derretimos un poquito de chocolate en el microondas.

  • Cogemos una bolita y le clavamos un palito de piruleta. A continuación, sacamos el palo lo mojamos en chocolate, dejamos caer un poco de chocolate derretido dentro del agujero y lo clavamos definitivamente en nuestra bolita. (Este procedimiento es importante para que luego la bola no se caiga del palo).

  • Repetimos estos pasos hasta acabar con toda la masa y los metemos en la nevera durante media hora, si es posible.

  • Derretimos el chocolate en el microondas con cuidado de que no se nos queme (ponemos unos segundos, sacamos y removemos. Así sucesivamente hasta obtener la textura deseada).

  • Cogemos nuestra bola ensartada y la bañamos en el chocolate. La sacamos y la hacemos girar para que quede recubierta toda la superficie.

  • La dejamos secar pinchada en un trozo de corcho blanco, una patata o una huevera (en cualquier caso hay que hacer los agujeros antes con un palo de brocheta para no destrozar el palo del cake pop). Repetimos con todas las bolas.

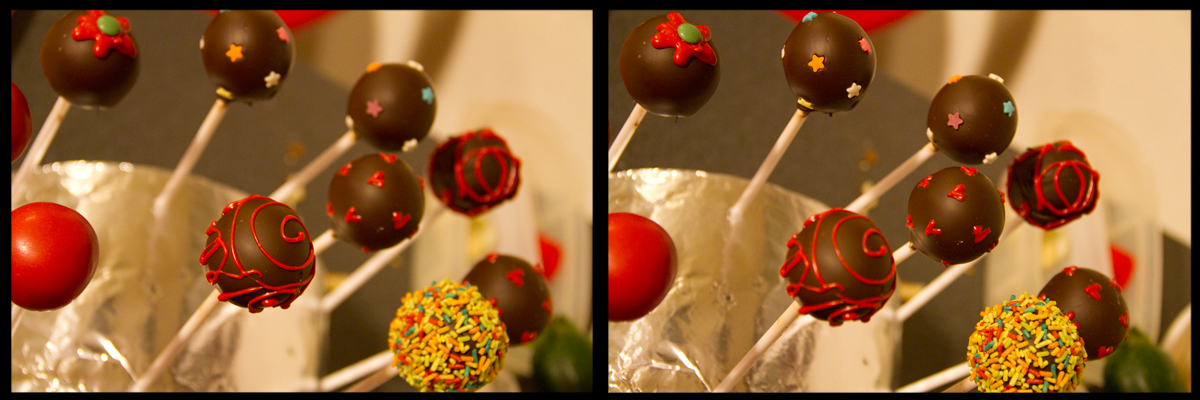
  • Una vez recubiertas de chocolate sólo queda echarle imaginación y decorarla con chocolate de otro color, pegarle virutas, azúcar de colores, fideos de chocolate, etc.

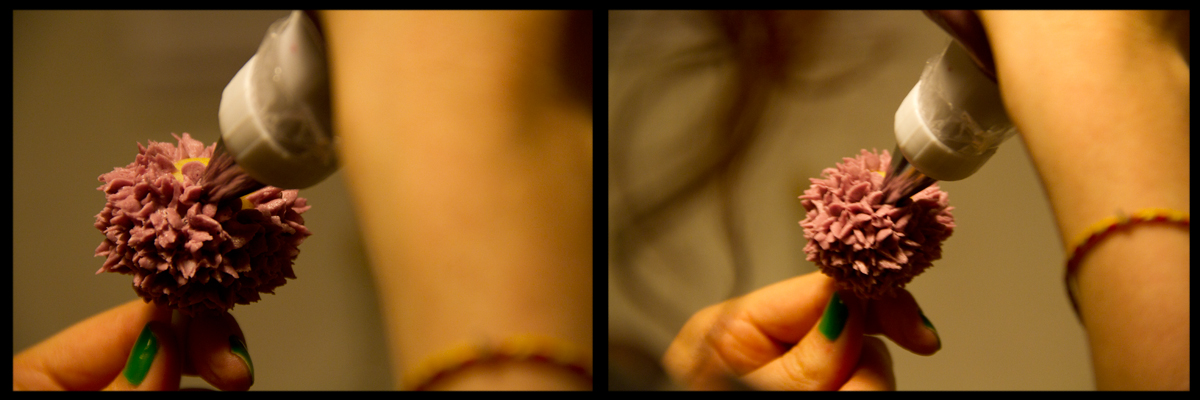
  • Otra opción es decorar nuestros cake pops con crema de mantequilla. Para ello mezclaremos con la batidora con varillas todos los ingredientes para la crema (velocidad baja si no queréis tener una ventisca de azúcar glas en vuestra cocina). Podemos teñir esta crema con colorantes alimenticios, la introducimos en la manga pastelera y sólo nos queda ir haciendo pequeños montoncitos hasta cubrir por completo la bola.


Consejos:

  • En vez de utilizar queso blanco para la masa podemos usar dulce de leche, nutella o cualquier producto untuoso.
  • Si utilizamos chocolate blanco podemos teñirlo con colorantes alimenticios pero hay que tener cuidado que no sean con base acuosa sino en gel o específicos de chocolate. También podemos utilizar unas grageas de chocolate de colores que venden en tiendas de repostería (candy melts).
  • Al derretir el chocolate si queremos que esté más líquido y que así sea más fácil bañar los cake pops, podemos añadir un poco de aceite de girasol, mantequilla o Crisco (manteca vegetal). ¡Nunca agua!
  • Si no tenéis virutas, crocanti o fideos podéis hacer azúcar coloreada muy fácilmente. Simplemente meted unas cuantas cucharadas de azúcar en una bolsa de plástico y añadid un par de gotas de colorante (éste sí puede ser líquido), cerrad la bolsa y agitad. Tendréis una bonita azúcar teñida del color que más os guste.
  • Si lo que queréis es inspiración y disfrutar de verdadero arte no dejéis de visitar la web de Bakerella.


Pics and Cakes


[English version] CAKE POPS *Ingredients:- Cake- Cream cheese- Chocolate chips or candy melts- Sprinkles for decoration- Lollipop sticks For buttercream:- 250 g butter- 500 powdered sugar- 1 tsp vanille- 1 tbsp water- Food coloring *For sponge cake:- 4 eggs -250 g sugar

  • 1 tsp vanilla

  • 250 ml whole milk

  • 55 g butter (lightly salted)

  • 250 g all-purpose flour

  • 2 tsp baking powder

  • 1/4 tsp salt Sponge cake:

  • Beat eggs in large mixing bowl with paddle attachment for 4 minutes.  Do not skip this step!

  • Add sugar, and continue beating for another 4-5 minutes until light and fluffy.  Add vanilla and stir on low until just combined.

  • In a separate bowl, sift together dry ingredients.  Add to eggs and sugar on low speed until just combined.

  • In the microwave, heat milk and butter on low heat just until butter is melted.  Add to batter, beat just until combined.

  • Pour into a greased and floured cake pan.

  • *Bake at 170ºC until the middle springs back when touched, or a toothpick inserted in the center comes out clean. *

 Cake pops:

  • After cake is cooked and cooled, cut a big portion and take the same amount of cream cheese.

  • Crumble the cake into a large bowl and mix thoroughly with cream cheese using your hands. (Mixture is not supposed to be too sticky or too dry)

  • *Roll mixture into small balls. It’s important to get a smooth surface. *

  • Melt chocolate chips or candy melts in the microwave.

  • Insert the lollipop stick into the cake ball. Then take it out and dip it in a little of melted chocolate. Then, put some chocolate into the hole you have just made and finally insert the lollipop stick again into the cake ball.

  • Repeat with the rest of mixture and place in the fridge for half an hour, if possible, to firm up.

  • *Melt the rest of chocolate in the microwave. *

  • Once firm, carefully insert the cake ball into the candy coating by holding the lollipop stick and rotating until covered.

  • Place in a styrofoam block, a potato or an egg box to dry.

  • *Then, let’s decorate with imagination! Use some sprinkles to cover your cake pop. *

  • You can also use buttercream for decoration. Mix all the ingredients with paddle attachment and place it in the piping bag. You can color the buttercream with food coloring.

  Tips:

- You can replace cream cheese by milk caramel (dulce de leche), nutella or any other cream. - You can use white chocolate and colour it or use candy melts (sold in different colours). Don’t use water-based food coloring! - When melting chocolate, you can add some butter, Crisco or sunflower oil to get a thinner texture.  Never water! - If you don’t have sprinkles at home, you can create coloured sugar. Put some sugar in a plastic bag, add some drops of food coloring and shake it. You’ll get nice coloured sugar in a few seconds! - If you want to get really inspired and enjoy real art, visit Bakerella’s website.


19 de julio de 2012 · 7 min · Palstelera

Cake Pops

Or pop cakes. Any name works for these little lollipop-shaped treats stuffed with cake. The original idea is to use up the trimmings from a cake you’ve made for something else, or one that didn’t turn out pretty enough — so you don’t feel bad destroying it (literally).

Pics and Cakes

What do we need?

  •   Cake*
    
  •   Cream cheese
    
  •   Chocolate for melting
    
  •   Chocolate sprinkles, colored sprinkles, crushed nuts, colored sugar...
    
  •   Lollipop sticks
    

Buttercream:

  •   250 g (1 cup + 2 tbsp) butter, at room temperature
    
  •   500 g (4 cups) powdered sugar
    
  •   1 tsp vanilla extract
    
  •   1 tbsp water
    
  •   Food coloring
    
  • If you don’t have any cake on hand, you can make a nice fluffy sponge cake with the following ingredients:
  •   4 eggs
    
  •   250 g (1 1/4 cups) sugar
    
  •   1 tsp vanilla extract
    
  •   250 ml (1 cup) milk
    
  •   55 g (4 tbsp) butter
    
  •   250 g (2 cups) all-purpose flour
    
  •   2 tsp baking powder
    
  •   1/4 tsp salt
    

How do we make it?

Making the sponge cake:

  • Beat the eggs with the whisk attachment of the mixer (this step is essential for getting a fluffy texture).

  • Add the sugar and keep beating for another 4 minutes until creamy. Add the vanilla extract and mix well.

  • In another bowl, mix the dry ingredients. Then add the egg-and-sugar cream and beat on low speed until everything is incorporated.

  • Heat the milk and butter in the microwave until the butter melts. Add to the rest of the mixture and stir well.

  • Pour into a greased and floured baking pan.

  • Bake at 170°C (340°F) until a skewer (or knife tip) inserted into the cake comes out clean.

Pics and Cakes

And now on to the cake pops themselves:

  • Once the cake has cooled, cut a piece and set aside roughly the same volume of cream cheese (making cake pops with a whole cake can be madness unless you’ve got a huge party and don’t mind spending the entire day rolling little balls).

  • Take your piece of cake, crumble it with your hands into a bowl and add the cream cheese. Mix well with your hands. (The mixture you get shouldn’t be too dry or too sticky — if either happens, fix it with more cake or more cream cheese.)

  • Now roll small balls with your new mixture. It’s important they come out very smooth, with no cracks visible.

  • Melt a little chocolate in the microwave.

  • Take a ball and stick a lollipop stick into it. Then pull the stick out, dip it in chocolate, drop a bit of melted chocolate inside the hole, and finally push the stick back into the ball for good. (This step matters so the ball doesn’t fall off the stick later.)

  • Repeat until you’ve used up all the mixture and put them in the fridge for half an hour, if possible.

  • Melt the chocolate in the microwave, being careful not to burn it (heat for a few seconds, take it out and stir. Repeat until you get the texture you want).

  • Take your skewered ball and dip it in the chocolate. Pull it out and rotate it so the whole surface gets coated.

  • Let it dry stuck into a piece of styrofoam, a potato or an egg carton (in any case, poke the holes ahead of time with a skewer so you don’t ruin the cake pop’s stick). Repeat with all the balls.

  • Once they’re coated in chocolate, all that’s left is to use your imagination and decorate them with chocolate of another color, sprinkles, colored sugar, chocolate jimmies, etc.

  • Another option is to decorate your cake pops with buttercream. To do that, mix all the buttercream ingredients with the whisk attachment (low speed if you don’t want a powdered-sugar blizzard in your kitchen). You can tint the buttercream with food coloring, transfer it to a piping bag, and pipe little mounds until the ball is fully covered.

Tips:

  • Instead of cream cheese for the mixture, you can use dulce de leche, Nutella, or any other spreadable filling.
  • If you use white chocolate, you can tint it with food coloring — but make sure it’s gel-based or chocolate-specific, never water-based. You can also use the colored chocolate buttons sold at baking shops (candy melts).
  • When melting the chocolate, if you want it runnier so the cake pops are easier to dip, you can add a bit of sunflower oil, butter, or Crisco (vegetable shortening). Never water!
  • If you don’t have sprinkles, jimmies or crushed nuts, you can make colored sugar very easily. Just put a few tablespoons of sugar in a plastic bag, add a couple of drops of food coloring (this one can be liquid), close the bag and shake. You’ll have lovely sugar tinted in whatever color you like.
  • If you’re after inspiration and want to enjoy some real artistry, definitely check out Bakerella’s website.

Pics and Cakes


Comments

Esther (2012-07-28 13:28:38):

Hi!

Just looking at this is making my mouth water! So much so that I think in a few days I’ll be getting to work on it, and I wanted to know where I can buy lollipop sticks in Madrid.

Thanks so much,

EPS

Palstelera (2012-07-28 15:09:13):

I’ll tell you the shops I usually buy from in Madrid, but with how popular all this stuff is getting, I’m sure you can find them in more places too: Decake, in the Estrella neighborhood, La tienda americana, near Plaza de Cristo Rey (Islas Filipinas metro stop), or Comercial Mínguez (downtown area).

I’ve seen that most of them close in August, so hurry up! And I’m waiting for the photos of the result…

Esther (2012-07-28 15:19:44):

Thanks so much!!! I promise photos if they turn out halfway decent, although yours have set the bar pretty high, hehe

19 de julio de 2012 · 5 min · Palstelera