Banana Muffins

Today we’re bringing you a muffin recipe. Muffins are similar to Spanish magdalenas but, unlike those, they usually use butter instead of oil and the batter isn’t as smooth (you just mix the ingredients without having to beat them). Also, muffins can be either sweet or savory and they take a wide variety of “chunks” inside (chocolate chips, dried fruit, nuts, etc.). Don’t confuse them with the famous cupcakes that are so trendy these days, which are always sweet and decorated with buttercream or some other kind of frosting.

Pics and Cakes

What do we need?

  • 230 g (1¾ cups) all-purpose flour

  • 150 g (¾ cup) sugar

  • 1 teaspoon baking powder

  • 1/4 teaspoon baking soda

  • 1/4 teaspoon salt

  • 1 teaspoon cinnamon (optional)

  • 2 eggs

  • 110 g (½ cup) butter (room temperature)

  • 3 ripe bananas

  • 1 teaspoon vanilla extract (optional)

How do we make it?

  • Preheat the oven to 180°C (355°F).

  • In a bowl, combine all the dry ingredients (flour, sugar, baking powder, baking soda, salt and cinnamon).

  • In another bowl, mash the bananas with a fork until you get a purée. Add the lightly beaten eggs, the softened butter and the vanilla. Mix well.

  • Fold the banana mixture into the bowl with the dry ingredients. Using a spatula, mix until the ingredients are just combined, but don’t overmix. The batter will be a bit thick and lumpy.

  • Divide the batter into muffin molds, filling each one about 3/4 of the way since they’ll rise. Bake for about 20-25 minutes or until a toothpick inserted comes out completely clean.

Tips:

  • You can add walnuts or chocolate chips to this recipe by mixing them in with the dry ingredients.

  • The riper the bananas, the better. You can even use those ones that have gone ugly and a bit brown.

  • Even if you use paper liners, I recommend placing them in a metal muffin pan. Otherwise, the paper liners might not hold the weight and the batter will spill out.

    [English version] BANANA MUFFINS* Ingredients:-*

  • 230 g all-purpose flour

  • 150 g granulated sugar

  • 1 teaspoon baking powder

  • 1/4 teaspoon baking soda

  • 1/4 teaspoon salt

  • 1 teaspoon cinnamon (optional)

  • 2 eggs

  • 110 g butter (soften)

  • 3 ripe bananas

  • 1 teaspoon vanilla extract (optional)

  • Preheat oven to 180ºC.

  • Combine all dry ingredients in a large bowl (flour, sugar, baking powder, baking soda, salt and cinnamon).

  • In a different bowl, mash the bananas with a fork. Add lightly beaten eggs, soften butter and vanilla. Mix well.

  • With a rubber spatula or wooden spoon, lightly fold he wet ingredients (banana mixture) into the dry ingredients just until combined and the batter is thick and chunky. The important thing is not to over mix the batter. You do not want it smooth.

  • Bake about 20 -25 minutes or until a toothpick inserted in the center comes out clean.

Tips:

- You can add nuts or chocolate chips when combining the dry ingredients. - The riper bananas the better. You can use even those ones that have turned brown. - When using paper liners, use a muffin pan too. Otherwise paper liners might not be strong enough to hold the butter and the muffin shape will be ruined.

2 de octubre de 2014 · 3 min · Palstelera

Muffins de plátano

Hoy os traemos una receta de muffins. Los muffins son una especie de magdalenas pero, a diferencia de estas, suelen llevar mantequilla en lugar de aceite y la mezcla que hacemos no es tan fina (bastará con mezclar los ingredientes sin tener que batirlos). Además, los muffins se caracterizan porque pueden ser tanto dulces como salados y admiten una gran variedad de ’trozos’ en su interior (pepitas de chocolate, fruta deshidratada, frutos secos, etc.). No debemos confundirlos con los famosos* cupcakes* que tan de moda están ahora y que siempre son dulces y van decorados con crema de mantequilla u otro tipo de glaseado.

Pics and Cakes


¿Qué necesitamos?

  • 230 g de harina

  • 150 g de azúcar

  • 1 cucharadita de levadura Royal

  • 1/4 cucharadita de bicarbonato

  • 1/4 cucharadita de sal

  • 1 cucharadita de canela (opcional)

  • 2 huevos

  • 110 g de mantequilla (temperatura ambiente)

  • 3 plátanos maduros

  • 1 cucharadita de esencia de vainilla (opcional)


¿Cómo lo hacemos?

  • Precalentamos el horno a 180ºC.

  • Mezclamos en un bol todos los ingredientes secos (harina, azúcar, levadura, bicarbonato, sal y canela).

  • En otro bol ponemos los plátanos y los machacamos con ayuda de un tenedor hasta obtener un puré. Añadimos los huevos ligeramente batidos, la mantequilla blanda y la vainilla. Mezclamos todo bien.

  • Incorporamos la mezcla de plátanos al bol donde teníamos los ingredientes secos. Con ayuda de una espátula, mezclamos bien hasta que se integren los ingredientes, pero no debemos batirlo en exceso. La masa será un poco espesa e irregular.

  • Repartimos la masa en moldes para magdalenas llenando solo las 3/4 partes aproximadamente de cada uno ya que luego crecerán. Horneamos unos 20-25 minutos o hasta que pinchemos con una aguja de cocina y salga completamente limpia.


Consejos:

  • Podéis añadir nueces o pepitas de chocolate a esta receta incorporándolas a los ingredientes secos.

  • Los plátanos, cuanto más maduros mejor. Incluso podéis usar esos que ya se han puesto feos y un poco marrones.

  • Aunque utilicéis moldes de papel, os recomiendo que los coloquéis en una bandeja de metal especial para magdalenas. Si no, los moldes de papel pueden no aguantar el peso y se os desparramaría la mezcla.

    [English version] BANANA MUFFINSIngredients:-*

  • 230 g all-purpose flour

  • 150 g granulated sugar

  • 1 teaspoon baking powder

  • 1/4 teaspoon baking soda

  • 1/4 teaspoon salt

  • 1 teaspoon cinnamon (optional)

  • 2 eggs

  • 110 g butter (soften)

  • 3 ripe bananas

  • 1 teaspoon vanilla extract (optional)

  • Preheat oven to 180ºC.

  • Combine all dry ingredients in a large bowl (flour, sugar, baking powder, baking soda, salt and cinnamon).

  • In a different bowl, mash the bananas with a fork. Add lightly beaten eggs, soften butter and vanilla. Mix well.

  • With a rubber spatula or wooden spoon, lightly fold he wet ingredients (banana mixture) into the dry ingredients just until combined and the batter is thick and chunky. The important thing is not to over mix the batter. You do not want it smooth.

  •  Bake about 20 -25 minutes or until a toothpick inserted in the center comes out clean.

* *

Tips:

- You can add nuts or chocolate chips when combining the dry ingredients. - The riper bananas the better. You can use even those ones that have turned brown. - When using paper liners, use a muffin pan too. Otherwise paper liners might not be strong enough to hold the butter and the muffin shape will be ruined.

2 de octubre de 2014 · 3 min · Palstelera

Estonian Kringle

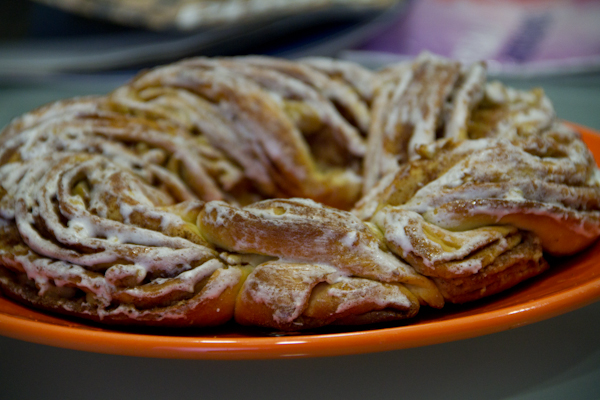
It’s not just that it seems like we haven’t published anything in ages — it’s actually true… almost three months without any blog action on PiC! The summer has been a bit hectic but here we are, back and loaded with new finger-licking recipes. Today I’m bringing you a recipe that could be considered the Nordic roscón de Reyes, and some say its shape is reminiscent of pretzels and the dough is brioche-style. In short, a sweet wonder we pulled from a Thermomix magazine but made without one to prove that any recipe is adaptable.

Pics and Cakes

What do we need?

For the dough:

  • 30 g (2 tbsp) sugar

  • The peel of 1/2 lemon (yellow part only)

  • 120 g (1/2 cup) milk

  • 30 g (2 tbsp) butter

  • 15 g fresh yeast

  • 1 egg yolk

  • 300 g (2.5 cups) bread flour

  • **1 pinch of salt

For the filling:

  • 50 g (3.5 tbsp) butter (room temperature)

  • 60 g (1/4 cup) sugar

  • 2 tablespoons cinnamon

  • 50 g (1/2 cup) chopped walnuts

For the glaze:

  • 20 g egg white

  • 50 g (1/2 cup) confectioners’ sugar

How do we make it?

  • If we have an electric coffee grinder or a food processor, we put the sugar with the lemon peel and grind it well until the lemon is incorporated into the sugar and we get a sort of paste. If we don’t have one, we can just grate the lemon peel and mix it with the sugar.

  • We heat the milk a little in the microwave and add it to the bowl with the sugar and lemon peel.

  • We add the butter and the yeast and stir until everything comes together nicely.

  • We add the egg yolk and mix well again.

  • Finally, we add the flour and the salt. We stir with a spoon or fork and then transfer the dough to a floured surface and knead by hand.

  • We form a ball with the dough and let it rest in the bowl covered with cling film until it doubles in size.

  • In the meantime, we prepare the filling. To do this, we mix the room-temperature butter with the sugar and the cinnamon.

  • We preheat the oven to 180°C (355°F).

  • Once the dough has doubled in size, we place it on a floured surface and roll it out with a rolling pin until we have a rectangle of about 40 x 50 cm (16 x 20 in).

  • We spread the filling cream over it and sprinkle the walnuts on top.

  • We roll up the dough (starting from the wider side).

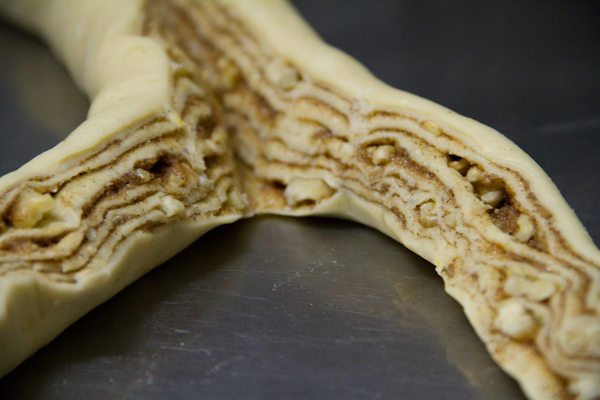
  • Once we have a sort of thin Swiss roll, we cut the log lengthwise down the middle, leaving one of the ends joined. When we cut it, we should see the alternating layers of dough and filling.

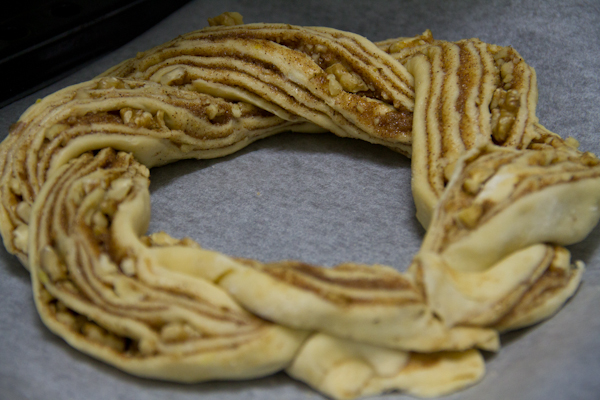
  • We cross each piece of dough to form a kind of braid (always keeping the layered side facing up).

  • Once everything is ‘braided’, we form a wreath and place it on a baking tray lined with parchment paper.

  • We bake for about 20 minutes.

  • While it’s baking, we prepare the glaze. To do this, we beat the egg whites a little with a fork and mix them with the confectioners’ sugar.

  • When we take the kringle out of the oven, we brush it with this glaze.

Pics and Cakes

Tips:

  • The lemon peel is optional. You can skip it or swap it for orange peel — for sure it’ll be delicious too.

  • If you want a whiter, thicker glaze, you can beat the egg whites with the sugar using an electric whisk. That’s how we made it, and that’s why the glaze looks like it does in the photo. If you beat it just with a fork, it’ll give the kringle a certain shine but it won’t be white and as thick.

  • Starting from this base, you can fill the dough with other nuts or even jam.

Pics and Cakes

[English version] ESTONIAN KRINGLE* *Ingredients: For the dough:

  • 30 g sugar

  • 1/2 lemon peel (only the yellow part)

  • 120 g milk

  • 30 g butter

  • 15 g fresh yeast

  • 1 egg yolk

  • 300 g strength

  • 1 pinch of salt

For the filling:

  • 50 g de butter (room temperature)

  • 60 g de sugar

  • 2 tbsp cinnamon

  • 50 g chopped walnuts

For the icing:

  • 20 g egg white

  • 50 g confectioners’ sugar

  • If you have a coffee grinder or food processor, place the sugar and the lemon peel on it and grind it until getting a sort of paste. If you don’t have a grinder, just mix sugar with grated lemon peel.

  • Heat the milk in the microwave and pour over the sugar.

  • Add the butter and yeast and stir well.

  • Add egg yolk and stir well again.

  • Then, add flour and salt. Mix with a spoon and fork and then knead the dough on a floury surface.

  • Make a dough ball and leave to rise into the bowl covered with cling film (until the dough has doubled in volume).

  • In the meanwhile, prepare the filling. Mix butter (room temperature) with sugar and cinnamon.

  • Preheat oven at 180º.

  • When the dough has doubled in volume, place on a floury surface and roll it out with a rolling pin until getting a rectangle (40 x 50 cm aprox.)

  • Spread the filling and sprinkle with chopped walnuts.

  • Roll up the dough (starting by the wider side).

  • Cut the log in half length-wise leaving one edge uncut.

  • Start braiding the two pieces, trying to keep the open layers exposed so the cut ends remain on top.

  • Pinch the ends together and form a wreath.

  • Bake for 20 minutes.

  • Prepare the icing. Whisk white eggs with a fork and add confectioners’ sugar. Mix well.

  • Out of the oven, brush the kringle with the sugar icing.

  • *Tips: - Lemon peel is optional. You can leave it out or use orange peel. For sure, it will be delicious too. - If you want a thicker and whiter sugar icing you can use an electric mixer with whisk attachment. The result will be more similar to our kringle shown in the picture. If you whisk only with fork you will have a lighter and clearer icing. - You can change the filling and use any nuts or jam you like.

24 de septiembre de 2013 · 5 min · Palstelera

Kringle Estonia

No solo es que parezca que llevamos siglos sin publicar sino que es cierto… ¡casi tres meses sin actividad bloguera en PiC! El verano ha sido un poco ajetreado pero aquí estamos de vuelta cargaditos con nuevas recetas para chuparse los dedos. Hoy os traigo una receta que podría considerarse el roscón de Reyes nórdico y que algunos dicen que su forma recuerda a los pretzels y la masa es tipo brioche. En fin, una maravilla dulce que hemos sacado de una revista de Thermomix pero que la hemos hecho sin ella para demostrar que cualquier receta es adaptable.

Pics and Cakes


¿Qué necesitamos?

Para la masa:

  • 30 g de azúcar

  • La piel de 1/2 limón (sólo la parte amarilla)

  • 120 g de leche

  • 30 g de mantequilla

  • 15 g de levadura prensada fresca

  • 1 yema de huevo

  • 300 g de harina de fuerza

  • **1 pizca de sal

Para el relleno:

  • 50 g de mantequilla (a temperatura ambiente)

  • 60 g de azúcar

  • 2 cucharadas de canela

  • 50 g de nueces picadas

Para el glaseado:

  • 20 g de clara de huevo

  • 50 g de azúcar glas


¿Cómo lo hacemos?

  • Si tenemos un molinillo eléctrico de café o una picadora, ponemos el azúcar con la piel de limón y trituramos bien hasta que el limón se integre en el azúcar y quede una especie de pasta. Si no lo tenemos podemos rallar la piel del limón y mezclarla con el azúcar.

  • Calentamos un poco la leche en el microondas y la añadimos al bol donde tenemos el azúcar con la piel de limón.

  • Añadimos la mantequilla y la levadura y removemos hasta que se integre bien.

  • Agregamos la yema de huevo y volvemos a mezclar bien.

  • Por último, incorporamos la harina y la sal. Removemos con la cuchara o tenedor y luego pasamos la masa a una superficie enharinada y amasamos con las manos.

  • Formamos una bola con la masa y la dejamos reposar en el bol tapado con film transparente haste que duplique su volumen.

  • Mientras tanto, vamos preparando el relleno. Para ello, mezclamos la mantequilla a temperatura ambiente con el azúcar y la canela.

  • Precalentamos el horno a 180º.

  • Cuando la masa ya haya duplicado su volumen, la ponemos sobre una superficie enharinada y la extendemos con un rodillo hasta obtener un rectángulo de 40 x 50 cm aprox.

  • Untamos la crema de relleno sobre ella y distribuimos las nueces por encima.

  • Enrollamos la masa (empezando por la parte más ancha).

  • Cuando tengamos una especie de brazo de gitano delgado cortamos el rollo por la mitad (de forma transversal) y dejando uno de los extremos unidos. Al cortarlo, tendremos que ver las capas de masa y relleno que se alternan.

  • Cruzamos cada parte de la masa para hacer una especie de trenza (siempre con la parte de las capas visibles hacia arriba.

  • Cuando esté todo ’trenzado’ formamos una rosca y la colocamos en una bandeja de horno con papel de hornear.

  • Horneamos durante 20 minutos aproximadamente.

  • Mientras se hornea, preparamos el glaseado. Para ello, batimos un poco las claras con un tenedor y las mezclamos con el azúcar glas.

  • Cuando saquemos el kringle del horno lo pintaremos con este glaseado.

Pics and Cakes

Consejos:

  • La piel del limón es opcional. Podéis omitirla o cambiarla por piel de naranja, seguro que también está riquísimo.

  • Si el glaseado lo queréis más blanco y consistente podéis batir las claras con el azúcar con una batidora de varillas eléctrica. Así es como lo preparamos nosotros y por eso el glaseado se ve en la foto. Si lo batimos simplemente con un tenedor le dará cierto brillo al kringle pero no será de color blanco y tan espeso.

  • Partiendo de esta base podéis rellenar la masa con otros frutos secos o incluso mermelada.

Pics and Cakes

[English version] ESTONIAN KRINGLE* *Ingredients: For the dough:

  • 30 g sugar

  • 1/2 lemon peel (only the yellow part)

  • 120 g milk

  • 30 g butter

  • 15 g fresh yeast

  • 1 egg yolk

  • 300 g strength

  • 1 pinch of salt

For the filling:

  • 50 g de butter (room temperature)

  • 60 g de sugar

  • 2 tbsp cinnamon

  • 50 g chopped walnuts

For the icing:

  • 20 g egg white

  • 50 g confectioners’ sugar

* *

  • If you have a coffee grinder or food processor, place the sugar and the lemon peel on it and grind it until getting a sort of paste. If you don’t have a grinder, just mix sugar with grated lemon peel.

  • Heat the milk in the microwave and pour over the sugar.

  • Add the butter and yeast and stir well.

  • Add egg yolk and stir well again.

  • Then, add flour and salt. Mix with a spoon and fork and then knead the dough on a floury surface.

  • Make a dough ball and leave to rise into the bowl covered with cling film (until the dough has doubled in volume).

  • In the meanwhile, prepare the filling. Mix butter (room temperature) with sugar and cinnamon.

  • Preheat oven at 180º.

  • When the dough has doubled in volume, place on a floury surface and roll it out with a rolling pin until getting a rectangle (40 x 50 cm aprox.)

  • Spread the filling and sprinkle with chopped walnuts.

  • Roll up the dough (starting by the wider side).

  • Cut the log in half length-wise leaving one edge uncut.

  • Start  braiding the two pieces, trying to keep the open layers exposed so the cut ends remain on top.

  • Pinch the ends together and form a wreath.

  • Bake for 20 minutes.

  • Prepare the icing. Whisk white eggs with a fork and add confectioners’ sugar. Mix well.

  • Out of the oven, brush the kringle with the sugar icing.

* *Tips: - Lemon peel is optional. You can leave it out or use orange peel. For sure, it will be delicious too. - If you want a thicker and whiter sugar icing you can use an electric mixer with whisk attachment. The result will be more similar to our kringle shown in the picture. If you whisk only with fork you will have a lighter and clearer icing. - You can change the filling and use any nuts or jam you like.


24 de septiembre de 2013 · 5 min · Palstelera

Chocolate and Salted Caramel Tart

Even though putting the words ‘caramel’ and ‘salted’ together in the same phrase sounds weird, it’s a delicious combination that I tried for the first time thanks to French delicatessens. So as soon as I saw this recipe on La receta de la felicidad I couldn’t resist giving it a go, and I knew it’d be a guaranteed success. Even those weird beings who aren’t crazy about chocolate end up liking it, thanks to the crunchy bite of the crust and the creaminess of the filling. So what are you waiting for to try it?

Pics and Cakes

What do we need?

For the special shortcrust pastry:

  • 250 g (2 cups) all-purpose flour

  • 30 g (1/4 cup) ground almonds

  • 150 g (2/3 cup) butter

  • 80 g (1/3 cup) sugar

  • 1 egg

  • 1 pinch of salt

  • 1 pinch of powdered vanilla

For the salted caramel sauce:

  • 70 g (1/3 cup) sugar

  • 70 ml (1/3 cup) heavy cream

  • 1 teaspoon butter

  • a pinch of salt

For the chocolate cream:

  • 500 ml (2 cups) heavy cream

  • 350 g (12 oz) dark chocolate

For the whipped cream:

  • 300 ml (1 1/4 cups) heavy whipping cream, very cold (at least 35% fat)

  • 2 heaping tablespoons of powdered sugar

  • Optional: cocoa powder for dusting on top

Pics and Cakes

How do we make it?

  • We start by preparing the crust. Mix the very cold butter, cut into small cubes, with the rest of the ingredients. You can use the dough attachment on your mixer or use a spoon and finish kneading by hand. It’ll come out crumbly and you’ll have to keep squeezing the butter with your hands to incorporate everything well, but don’t despair. Wrap in plastic wrap and chill in the fridge for half an hour.

  • Meanwhile, prepare a 24 to 26 cm (9.5 to 10 in) springform tin by lightly greasing it and placing a sheet of baking paper on the bottom.

  • Roll out the dough on a floured surface or between two sheets of baking paper or plastic wrap (so it doesn’t stick) until it’s about 3 mm (1/8 in) thick.

  • Roll the dough onto the rolling pin and unroll it over the tin. Press it well into the tin, patching any gaps with bits of dough. Trim the edges by running the rolling pin over the top of the tin and pressing down.

  • Put the tin with the dough in the fridge for 30 minutes.

  • Preheat the oven to 180°C (355°F).

  • Cover the bottom of the tart with baking paper and fill with dried chickpeas (just like when making quiches — this keeps the dough from rising in the oven). Bake the crust for about 25 minutes.

  • Take it out and once it’s cooled, unmold and place on a plate or tray.

  • Now we’ll prepare the salted caramel sauce. Have the cream and butter ready beforehand. Put the sugar in a saucepan over medium heat and wait without stirring until it turns into caramel (2 or 3 minutes). Once you have a golden caramel, lower the heat to minimum and add the butter, salt, and cream, stirring constantly until you get a smooth sauce. If any caramel lumps form, keep stirring vigorously over low-medium heat until they fully dissolve.

  • Once it’s cooled a bit, pour the caramel over the tart base and put it in the fridge for half an hour.

  • Next we make the chocolate cream. Bring the cream to a boil in a saucepan while you chop the chocolate. When it boils, remove from the heat and add the chopped chocolate. Let it sit for a few minutes and stir until you get a smooth cream. Once the chocolate cream has cooled a bit, pour it over the tart that you had reserved in the fridge and let it chill overnight.

  • Finally, whip the cream. Beat the very cold cream with the sugar using a whisk until it reaches the desired consistency (be careful not to overdo it or it’ll turn into butter).

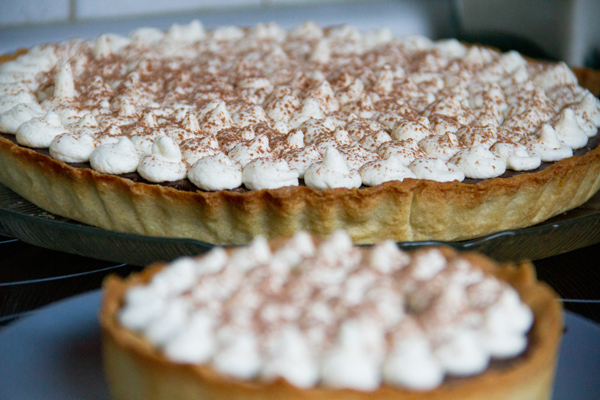
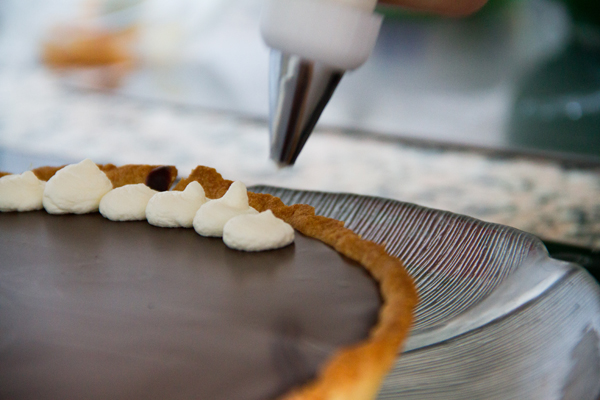
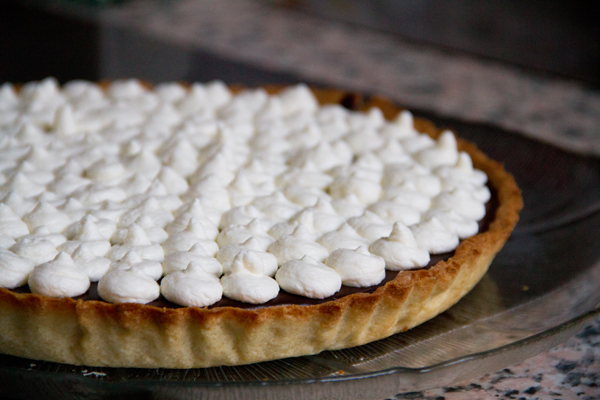
  • Put the whipped cream into a piping bag with a round tip and pipe little mounds of cream over the tart. Using a sieve, dust with cocoa powder and keep in the fridge until ready to serve.

Tips:

  • When whipping the cream you can use regular sugar, but store-bought powdered sugar will help keep the consistency longer since it usually contains a small amount of starch.

  • If you don’t want to even turn on the oven, you can swap the shortcrust base for a cookie base. Crush digestive-type cookies, for example, and mix with melted butter. Cover the tin pressing down well so it’s nice and compact, let it chill before pouring the caramel and you’re done.

  • If you don’t have a piping bag or tip, you can use a plastic bag (like a freezer bag) and snip a small hole in the corner.

Pics and Cakes

[English version] CHOCOLATE AND SALTED CARAMEL TART* *

For the crust:

  • *250 g all purpose flour *

  • *30 g powdered almonds *

  • *150 g butter, cold, cut into cubes *

  • *80 g sugar *

  • 1 egg

  • 1 pinch of salt

  • 1 pinch powdered vanilla

For the salted caramel sauce:

  • *70 g sugar *

  • *70 ml heavy cream *

  • 1 teaspoon butter

  • pinch of salt

For the chocolate cream:

  • *500 ml heavy cream *

  • *350 g dark chocolate *

For the whipped cream:

  • 300 ml heavy cream, very cold (1 cup aprox)

  • 2 tablespoons sugar

  • Optional: unsweetened cocoa powder for dusting

* *

  • Prepare the crust. Whizz all the ingredients in a food processor to a dough and finish by hand until getting a homogeneous dough. Wrap the dough and chill for 30 minutes. Roll out the pastry and line a deep 24-26 cm tart tin with it; patch any holes if crumbly. Cover and chill for at least 30 minutes.

  • Preheat oven to 180 ºC. Prick the tart shell all over with a fork or use baking beans and bake about 25 minutes.

  • Transfer to a rack and let cool.

  • Prepare the caramel sauce. Place sugar a small saucepan and bring to a boil over medium heat. Look for the caramel to turn a rich amber colour, then lower the heat and whisk in butter and cream (the mixture will bubble up, so be careful!). Pour caramel into cooled tart shell and let cool slightly; refrigerate 1/2 hour.

  • Prepare the chocolate cream. Chop the chocolate. Bring heavy cream to boil in a small saucepan over medium heat. Put chocolate into a medium bowl and pour in the hot cream. Let sit for a few minutes, then stir until smooth. Pour ganache evenly over tart and refrigerate 24 hours .

  • Before serving, prepare the whipped cream. In a bowl, using an electric mixer, beat the cream with the sugar until firm. Pipe the whipped cream on top of the pie and dust with some cocoa powdered if desired.

Tips:**- If you use confectioners’ sugar when whipping the cream, you’ll get a firmer cream.

- If you don’t want even to switch on the oven you can prepare the crust with biscuits. Just smash the biscuits and mix with melted butter. Cover the tart mold with it, pressing well with your fingers.Refrigerate before pouring the caramel sauce.

- If you don’t have piping bag, you can use a plastic bag instead.


16 de abril de 2013 · 6 min · Palstelera

Tarta de chocolate y caramelo salado

Aunque juntar las palabras ‘caramelo’ y ‘salado’ en la misma frase suene extraño, es una combinación deliciosa que probé por primera vez gracias a las delicatessen francesas. Por eso en cuanto vi esta receta en La receta de la felicidad no pude resistirme a probarla y sabía que sería un éxito asegurado. Incluso a aquellos seres extraños a los que no les apasiona el chocolate, les gusta por el toque crujiente de la base y la cremosidad del relleno. Así que no sé a qué estáis esperando para probarla.

 Pics and Cakes


¿Qué necesitamos?


Para la masa quebrada especial:

  • 250 g de harina

  • 30 g de almendra molida

  • 150 g de mantequilla

  • 80 g de azúcar

  • 1 huevo

  • 1 pizca de sal

  • 1 pizca de vainilla en polvo


Para la salsa de caramelo salado:

  • 70 g de azúcar

  • 70 ml de nata

  • una cucharadita de mantequilla

  • una pizca de sal


Para la crema de chocolate:

  • 500 ml de nata

  • 350 g de chocolate negro


Para la nata montada:

  • 300 ml de nata para montar muy fría (mínimo 35% de MG)

  • 2 cucharas colmadas de azúcar glas

  • Opcional: cacao en polvo para espolvorear por encima

 Pics and Cakes

¿Cómo lo hacemos?

  • Comenzamos preparando la base. Mezclamos la mantequilla muy fría cortada en cuadraditos con el resto de los ingredientes. Podemos utilizar un accesorio amasador de la batidora o utilizar una cuchara y terminamos de amasar con las manos. Se nos quedará desmigajado y tendremos que ir estrujando la mantequilla con las manos para poder incorporarlo bien pero no hay que desesperar. Envolvemos en film transparente y dejamos en la nevera media hora.

  • Mientras, preparamos un molde desmontable de 24 a 26 cm engrasándolo ligeramente y colocando una hoja de papel de hornear en la base.

  • Extendemos la masa con el rodillo sobre una superficie enharinada o entre dos papeles de hornear o film transparente (para que no se nos pegue) hasta dejarla de un grosor de 3 mm aproximadamente.

  • Enrollamos la masa sobre el rodillo y la vamos desenrollando sobre el molde. La colocamos presionando bien sobre el molde, cubriendo los huecos que pudieran quedar con trozos de masa. Eliminamos los bordes pasando el rodillo por encima del molde y presionando.

  • Metemos el molde con la masa 30 minutos en la nevera.

  • Precalentamos el horno a 180 º C.

  • Cubrimos el fondo de la tarta con papel de horno y rellenamos con garbanzos crudos (igual que cuando preparamos las quiches, esto es para que la masa no suba en el horno). Cocemos la base de nuestra tarta en el horno durante unos 25 minutos.

  • Sacamos y cuando esté fría, desmoldamos y ponemos sobre un plato o bandeja.

  • Ahora vamos a preparar la salsa de caramelo salado. Preparamos de antemano la nata y la mantequilla necesarias. Ponemos el azúcar en un cazo a fuego medio y esperamos sin mover a que se convierta en caramelo (2 ó 3 minutos). Cuando tengamos un caramelo dorado, bajamos el fuego al mínimo y  agregamos  la mantequilla, la sal y la nata removiendo constantemente hasta obtener una salsa homogénea. Si se nos ha hecho algún grumo de caramelo seguimos removiendo con energía a fuego bajo-medio hasta que se deshaga del todo.

  • Cuando se haya enfriado un poco, vertemos el caramelo sobre la base de la tarta y lo dejamos en la nevera media hora.

  • Seguimos preparando la crema de chocolate. Para ello, ponemos a hervir la nata en un cazo mientras que troceamos el chocolate. Cuando hierva, retiramos del fuego y agregamos el chocolate troceado. Dejamos reposar unos minutos y removemos hasta lograr una crema homogénea. Cuando la crema de chocolate se haya enfriado un poco, la vertemos sobre nuestra tarta que teníamos reservada en el frigorífico y la dejamos enfriar de un día para otro.

  • Por último, montamos la nata. Para ello, batimos con un batidor de varillas la nata muy fría con el azúcar hasta que tenga la consistencia deseada (cuidado con pasarnos o se convertirá en mantequilla).

  • Ponemos la nata en una manga con boquilla redonda y vamos depositando montoncitos de nata sobre la tarta. Con ayuda de un colador, espolvoreamos con cacao en polvo y reservamos en el frigorífico hasta el momento de servir.

Consejos:

  • Al montar la nata podéis utilizar azúcar normal pero el azúcar glas comprada ayudará a mantener la consistencia durante más tiempo ya que suele contener una pequeña cantidad de almidón.

  • Si no queréis encender ni siquiera el horno, podéis sustituir la base de masa quebrada por una base hecha con galletas. Para ello triturad galletas tipo digestive, por ejemplo, y mezclad con mantequilla derretida. Cubrid el molde presionando bien para que quede bien compacto, dejad enfriar antes de echar el caramelo y listo.

  • Si no tenéis manga pastelera ni boquilla, podéis utilizar una bolsa (por ejemplo, las de congelar) haciéndole un pequeño corte en la punta.

  Pics and Cakes

[English version] CHOCOLATE AND SALTED CARAMEL TART* *

For the crust:

  • *250 g all purpose flour *

  • *30 g powdered almonds *

  • *150 g butter, cold, cut into cubes *

  • *80 g sugar *

  • 1 egg

  • 1 pinch of salt

  • 1 pinch powdered vanilla

For the salted caramel sauce:

  • *70 g sugar *

  • *70 ml heavy cream *

  • 1 teaspoon butter

  • pinch of salt

For the chocolate cream:

  • *500 ml heavy cream *

  • *350 g dark chocolate *

For the whipped cream:

  • 300 ml heavy cream, very cold (1 cup aprox)

  • 2 tablespoons sugar

  • Optional: unsweetened cocoa powder for dusting

* *

  • Prepare the crust. Whizz all the ingredients in a food processor to a dough and finish by hand until getting a homogeneous dough. Wrap the dough and chill for 30 minutes. Roll out the pastry and line a deep 24-26 cm tart tin with it; patch any holes if crumbly. Cover and chill for at least 30 minutes.

  • Preheat oven to 180 ºC. Prick the tart shell all over with a fork or use baking beans and bake about 25 minutes.

  • Transfer to a rack and let cool.

  • Prepare the caramel sauce. Place sugar a small saucepan and bring to a boil over medium heat. Look for the caramel to turn a rich amber colour, then lower the heat and whisk in butter and cream (the mixture will bubble up, so be careful!). Pour caramel into cooled tart shell and let cool slightly; refrigerate 1/2 hour.

  • Prepare the chocolate cream. Chop the chocolate. Bring heavy cream to boil in a small saucepan over medium heat. Put chocolate into a medium bowl and pour in the hot cream. Let sit for a few minutes, then stir until smooth. Pour ganache evenly over tart and refrigerate 24 hours .

  • Before serving, prepare the whipped cream. In a bowl, using an electric mixer, beat the cream with the sugar until firm. Pipe the whipped cream on top of the pie and dust with some cocoa powdered if desired.

Tips:**- If you use confectioners’ sugar when whipping the cream, you’ll get a firmer cream.

- If you don’t want even to switch on the oven you can prepare the crust with biscuits. Just smash the biscuits and mix with melted butter. Cover the tart mold with it, pressing well with your fingers.Refrigerate before pouring the caramel sauce.

- If you don’t have piping bag, you can use a plastic bag instead.

* *


16 de abril de 2013 · 6 min · Palstelera

Custard Cream Tartlets

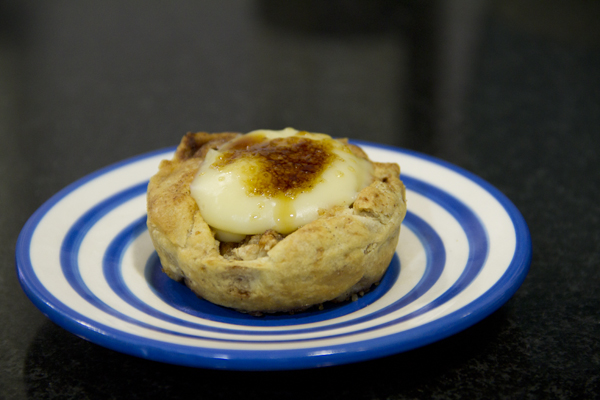
As strange as it sounds, this recipe could pass as an express one, even though we have to make a custard cream. And the secret of today’s recipe lies precisely in making that cream fast, easy, delicious, and in just 10 minutes. The trick: the microwave, that great forgotten appliance we only ever bother with to heat up the morning milk.

Pics and Cakes

What do we need?

For the cream:

  • 100 g (1/2 cup) sugar

  • 40 g (1/3 cup) cornstarch

  • 3 egg yolks

  • 1/2 liter (2 cups) milk

  • 1 tablespoon butter

For the tartlet:

  • 1 sheet of puff pastry

  • Sugar

  • Cinnamon

Pics and Cakes

How do we make it?

  • First we prepare the custard cream. Whisk the sugar and cornstarch together in one bowl, and the egg yolks with the milk in another.

  • Then mix everything together and pop it in the microwave for 8 minutes at max power, stopping every 2 minutes to stir.

  • Once the 8 minutes are up, add the butter, stir, and you’re done.

  • Next, roll the puff pastry sheet out a bit with a rolling pin and sprinkle it with sugar and cinnamon.

  • Roll the dough into a log, pressing it with your fingers so it doesn’t end up too uniform.

  • Cut it into several pieces and flatten each one to form a sort of mini-pizza.

  • Use a muffin tin (the kind with several holes, like little flan molds). Place each circle into one of the cavities and press it in to form a tartlet.

  • Pop it in the oven, preheated to 180°C (350°F), for about 12 minutes.

  • Keep an eye on it and press the dough down every now and then to keep the hollow where the cream will go.

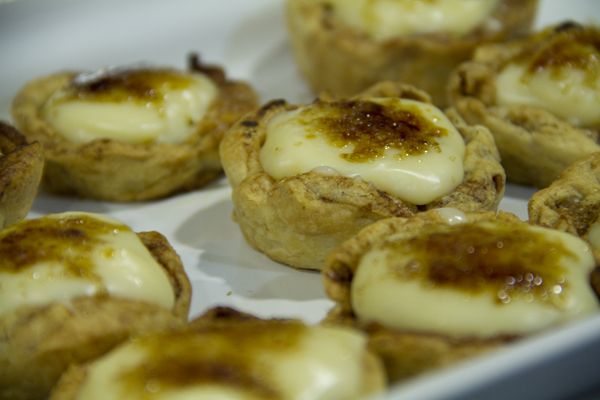
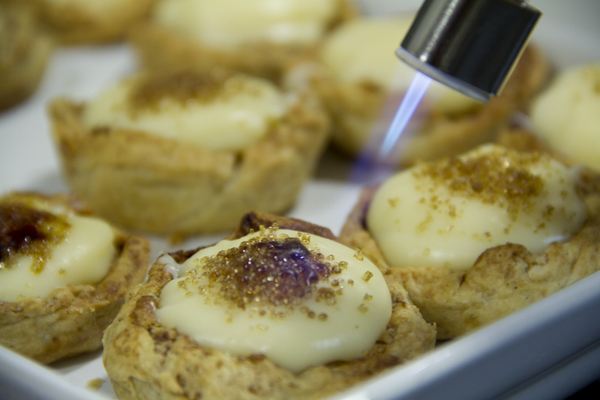
  • Once baked, fill them with the cream, sprinkle with sugar, and brown them in the oven or with a blowtorch.

Tips:

  • Microwaves come in different wattages so the cooking time may vary. As you heat the cream, you’ll see it thicken until it reaches the consistency you want.

  • If you want to use the custard cream for another recipe that calls for a thinner cream, just cut down on the amount of cornstarch.

Pics and Cakes

25 de marzo de 2013 · 2 min · Palstelera

Pasteles de crema

Por raro que parezca, esta receta podría calificarse de exprés, incluso teniendo que preparar una crema pastelera. Y es que el secreto de la receta de hoy está precisamente en preparar esta crema de forma rápida, fácil, con resultados deliciosos y en sólo 10 minutos. El truco: el microondas, ese gran olvidado al que sólo dejamos el privilegio de calentar la leche por las mañanas.

Pics and Cakes


¿Qué necesitamos?

Para la crema:

  • 100 g de azúcar

  • 40 g maizena

  • 3 yemas

  • 1/2 litro de leche

  • 1 cucharada de mantequilla

Para la tartaleta:

  • 1 plancha de hojaldre

  • Azúcar

  • Canela


Pics and Cakes


¿Cómo lo hacemos?

  • En primer lugar preparamos la crema pastelera. Batimos bien el azúcar y la maizena por un lado y por otro las yemas con la leche.

  • Después mezclamos todo y lo metemos 8 minutos en el microondas a máxima potencia parándolo cada 2 minutos para removerlo.

  • Pasados los 8 minutos añadimos la mantequilla, removemos y listo.

  • A continuación estiramos un poco la plancha de hojaldre con un rodillo y espolvoreamos con azúcar y canela.

  • Hacemos un rollo con la masa aplastándolo con los dedos para que no quede uniforme.

  • Cortamos en varios trozos y aplanamos cada uno de ellos formando una especie de minipizza.

  • Utilizamos un molde de horno para magdalenas (de esos que tienen varios agujeros como si fueran flaneras pequeñas). Colocamos cada círculo en uno de los huecos y lo acomodamos para formar una tartaleta.

  • Lo metemos al horno previamente calentado a 180 grados durante 12 minutos aproximadamente.

  • Vamos vigilándolo para ir aplastando la masa de vez en cuando y así mantener el hueco donde luego pondremos la crema.

  • Una vez horneados, rellenamos con la crema, se espolvorean con azúcar y se gratinan en el horno o con soplete.


Consejos:

  • Los microondas pueden tener distintas potencias así que tal vez el tiempo de cocción varía. A medida que vayáis calentando la crema verás que irá espesando hasta obtener la consistencia deseada.

  • Si queréis utilizar la crema pastelera para otra receta que requiera una crema menos espesa, basta con disminuir la cantidad de maizena utilizada.

 Pics and Cakes [English version]  CUSTARD CREAM TARTALETTES* *

For the cream:

  • 100 g sugar

  • 40 g corn flour

  • 3 egg yolks

  • 1/2 l milk

  • 1 tbsp butter


For the tartalette:

  • 1 sheet of puff pastry

  • Sugar

  • Cinammon

* *

  • Firt prepare the custard cream. Mix corn flour and sugar. In a different bowl, beat egg yoks with milk.

  • Mix everything and put into microwave for 8 minutes (maximum power). Stop microwave every 2 minutes to stir well the mixture and keep cooking.

  • When time is over, add butter, stir well and set aside.

  • Roll out the puff pastry with the rolling pin and sprinkle with sugar and cinammon.

  • Make a roll and press with your fingers to have irregular shapes.

  • Cut several thick slices and press with the fingers to get a flat circle.

  • Use a baking tray for muffins and place each pastry circle in a hole. Create a tartalette using your fingers.

  • Bake in the oven (preheat at 180ºC) for around 12 min.

  • Keep an eye on it to press the pastry with a spoon to keep the hole where the cream will be placed later.

  • Once baked, stuff with cream, sprinkle with some sugar and burn it with a kitchen blowtorch or in the oven.

* *

Tips:

- Microwaves have different power so time may differ. You’ll see how the cream gets thicker and thicker when cooking.

- If you want a smoother cream, reduce the amount of the corn flour used.

* *

25 de marzo de 2013 · 3 min · Palstelera

Galletas Oreo

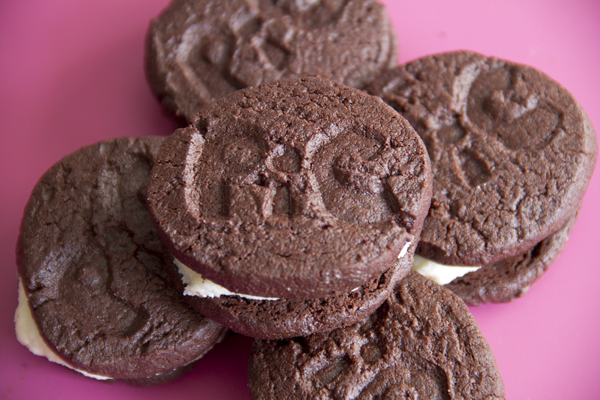
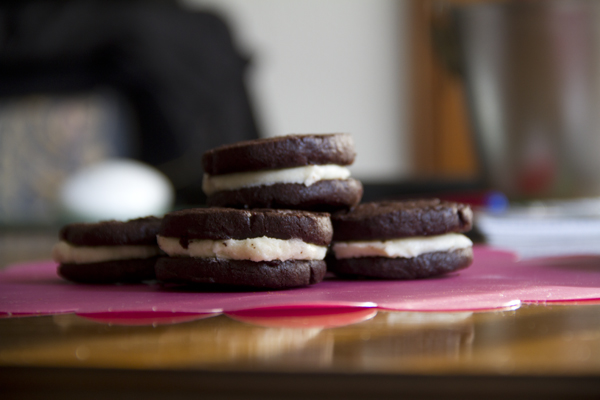
Tal vez el aspecto no es el de una Oreo comercial pero el sabor es, sencillamente, increíble. En este caso, casi me atrevería a decir que es incluso mejor que el de las originales. Puede parecer un poco laborioso pero os aseguro que ni la masa ni la crema son complicadas de hacer, así que os aconsejo que os pongáis ya mismo a hacerlas.

Pics and Cakes

¿Qué necesitamos?

Para las galletas:

  • 230 g mantequilla

  • 150 g azúcar

  • 1 cucharada de esencia de vainilla

  • 200 g de cobertura de chocolate

  • 1 huevo

  • 210 g harina

  • 90 g cacao en polvo

  • 1 cucharadita de sal

  • 1/2 cucharada de levadura

Para la crema:

  • 110 g mantequilla

  • 200 g azúcar glas

  • 1 cucharadita de esencia de vainilla

  • 1 cucharada de leche

  • 1 pizca de sal


¿Cómo lo hacemos?

  • Batimos la mantequilla con el azúcar hasta obtener una crema.

  • Añadimos el chocolate fundido y la esencia de vainilla. Añadimos el huevo y removemos bien.

  • En un cuenco aparte mezclamos el cacao con la harina, la levadura y la sal.

  • Echamos la mezcla de harina sobre la mezcla anterior de chocolate y unimos bien. Si es necesario, con las manos.

  • Hacemos un cilindro con la masa y lo envolvemos en film transparente.

  • Lo dejamos reposar en la nevera un par de horas.

  • Lo sacamos, le quitamos el film y cortamos en lonchas de medio centímetro aproximadamente.

  • Horneamos sobe una bandeja con papel de horno durante 12 minutos a 180ºC.

  • Dejamos enfriar y reservamos.

  • Para la crema batimos la mantequilla con el azúcar.

  • Luego le añadimos la leche, la vainilla y la pizca de sal.

  • Batimos bien hasta tener una crema homogénea.

  • Montamos nuestras galletas Oreo utilizando dos galletas y un poquito de crema en el centro para unirlas. Cogemos una galleta, ponemos un poco de relleno y con la otra aplastamos para que se extienda bien.


Consejos:

  • Para el chocolate también podéis utilizar una mezcla de chocolate de cobertura y chocolate negro del 70% de cacao. Esto es en función de gustos porque hay gente a la que no le gusta un sabor tan amargo.

  • Si cortáis las galletas de esta manera os quedarán un poco “rústicas”, es decir algo desiguales y más artesanales. Si preferis podéis estirar la masa con rodillo (poniéndola entre dos plásticos o dos papeles de horno), dejarla enfriar así en la nevera y luego cortarla con los cortantes de galletas como cuando hacemos galletas de mantequilla. Quedarán más uniformes y “perfectas”.

  • Al hornear estas galletas tenéis que tener cuidado para que no se os quemen ya que al ser casi negras, el color no os ayudará a saber cuándo están cocidas. Así que no queda otra que estar bien pendientes.

La receta la saqué de estos dos increíbles blogs: El Monstruo de las Galletas y Seasaltwithfood.  Pics and Cakes [English version] HOMEMADE OREO COOKIES* *Ingredients: For the cookies:

  • 230 g butter,

  • 150g granulated Sugar

  • 1 tsp Pure Vanilla Extract

  • *200g semisweet Chocolate *

  • 1 egg

  • 210g Unbleached All-Purpose Flour

  • 90g Dutch-Processed Cocoa Powder

  • 1 tsp salt

  • 1/2 tsp Baking Soda

For the cream filling:

  • 110 g unsalted butter, at room temperature

  • 200 g Confectioners’ Sugar

  • 1 tsp Pure Vanilla Extract

  • 1 Tbsp Milk

  • Pinch Salt

  • * In a medium bowl, whisk together the butter and granulated sugar until well combined. Whisk in the vanilla and chocolate. Add the egg and whisk until thoroughly incorporated.*

  • In another medium bowl, stir together the flour, cocoa powder, salt, and baking soda until well mixed. Using a wooden spoon or a fork, stir the flour mixture into the chocolate mixture. You may find it easier to switch to mixing it with your hands until the dough comes together.

  • *Transfer the dough to a 15-inch square sheet of parchment or waxed paper. Using your hands, shape the dough into a log about 10 inches long and 2 to 2 1/2 inches in diameter. Place the log at the edge of the paper and roll the paper around the log. With the log fully encased in paper, roll it into a smoother log no more than 2 1/2 inches in diameter. Refrigerate for at least 2 hours or until firm. *

  • Position a rack in the center of the oven and preheat the oven to 180°C. Butter a baking sheet or line it with parchment paper.

  • *Slice the dough log into 1/4-inch-thick slices. Place the slices about 1 inch apart on the prepared baking sheet.Bake for 12 minutes, or until the cookies are firm to the touch. *

  • * Using a stand mixer fitted with the paddle attachment or a handheld mixer or even a wooden spoon, beat the butter on low speed for about 30 seconds, or until completely smooth and soft.*

  • *Add the confectioners’ sugar and vanilla and beat until the mixture is perfectly smooth. Add the milk and salt and beat until smooth. *

  • To assemble the sandwich cookies: Scoop about 1 rounded tablespoon of the filling onto the flat side of 1 cookie. Top with a second cookie, flat side down, then press the cookies together to spread the filling toward the edges. Repeat with the remaining cookies.

 Tips: - You can use a mixture of different chocolates. I like using dark chocolate for desserts and bitter chocolate (70% cocoa). - You can use another method to shape your cookies. You can roll out the dough with the rolling pin. Place the dough between two plastic sheets or oven paper, roll it out and place in the fridge. Then use the cookie cutter to cut the shapes of your cookies. - When baking, be careful, because you can’t judge by colour given that the dough is almost black. So you’ll have to pay attention and avoid them to get burnt. Pics and Cakes


11 de marzo de 2013 · 8 min · Palstelera

Oreo Cookies

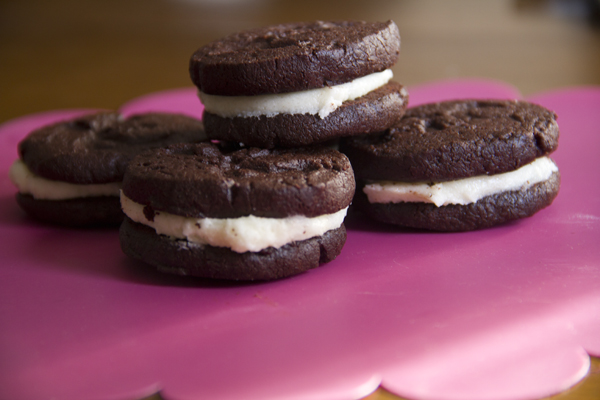
Maybe they don’t look exactly like a store-bought Oreo, but the flavor is, simply, incredible. In this case, I’d almost dare to say it’s even better than the original. It might seem a little laborious, but I promise neither the dough nor the cream is hard to make, so I’d encourage you to get started right away.
Pics and Cakes

What do we need?

For the cookies:

  • 230 g (1 cup) butter

  • 150 g (3/4 cup) sugar

  • 1 tablespoon vanilla extract

  • 200 g (7 oz) couverture chocolate

  • 1 egg

  • 210 g (1 2/3 cups) flour

  • 90 g (3/4 cup) cocoa powder

  • 1 teaspoon salt

  • 1/2 tablespoon baking powder

For the cream:

  • 110 g (1/2 cup) butter

  • 200 g (1 2/3 cups) powdered sugar

  • 1 teaspoon vanilla extract

  • 1 tablespoon milk

  • 1 pinch of salt

How do we make it?

  • Beat the butter with the sugar until you get a creamy mixture.

  • Add the melted chocolate and the vanilla extract. Add the egg and stir well.

  • In a separate bowl, mix the cocoa with the flour, the baking powder, and the salt.

  • Pour the flour mixture over the previous chocolate mixture and combine well. Use your hands if necessary.

  • Shape the dough into a cylinder and wrap it in plastic wrap.

  • Let it rest in the fridge for a couple of hours.

  • Take it out, remove the plastic wrap, and slice it into pieces about half a centimeter (1/4 inch) thick.

  • Bake on a tray lined with parchment paper for 12 minutes at 180°C (355°F).

  • Let cool and set aside.

  • For the cream, beat the butter with the sugar.

  • Then add the milk, the vanilla, and the pinch of salt.

  • Beat well until you have a smooth cream.

  • Assemble your Oreo cookies using two cookies and a little cream in the middle to stick them together. Take one cookie, add a bit of filling, and press down with the other so the filling spreads nicely.

Tips:

  • For the chocolate, you can also use a mix of couverture chocolate and 70% dark chocolate. It’s a matter of taste, since some people don’t like such a bitter flavor.

  • If you cut the cookies this way, they’ll come out a bit “rustic” — meaning slightly uneven and more handmade-looking. If you prefer, you can roll out the dough with a rolling pin (placing it between two plastic sheets or two pieces of parchment paper), let it cool that way in the fridge, and then cut it with cookie cutters like when making butter cookies. They’ll come out more uniform and “perfect”.

  • When baking these cookies, you have to be careful not to burn them, because since they’re almost black, the color won’t help you tell when they’re done. So there’s nothing to do but keep a close eye on them.

I got the recipe from these two amazing blogs: El Monstruo de las Galletas and Seasaltwithfood. Pics and Cakes [English version] HOMEMADE OREO COOKIES* *Ingredients: For the cookies:
  • 230 g butter,

  • 150g granulated Sugar

  • 1 tsp Pure Vanilla Extract

  • *200g semisweet Chocolate *

  • 1 egg

  • 210g Unbleached All-Purpose Flour

  • 90g Dutch-Processed Cocoa Powder

  • 1 tsp salt

  • 1/2 tsp Baking Soda

For the cream filling:

  • 110 g unsalted butter, at room temperature

  • 200 g Confectioners’ Sugar

  • 1 tsp Pure Vanilla Extract

  • 1 Tbsp Milk

  • Pinch Salt

    • In a medium bowl, whisk together the butter and granulated sugar until well combined. Whisk in the vanilla and chocolate. Add the egg and whisk until thoroughly incorporated.*
  • In another medium bowl, stir together the flour, cocoa powder, salt, and baking soda until well mixed. Using a wooden spoon or a fork, stir the flour mixture into the chocolate mixture. You may find it easier to switch to mixing it with your hands until the dough comes together.

  • *Transfer the dough to a 15-inch square sheet of parchment or waxed paper. Using your hands, shape the dough into a log about 10 inches long and 2 to 2 1/2 inches in diameter. Place the log at the edge of the paper and roll the paper around the log. With the log fully encased in paper, roll it into a smoother log no more than 2 1/2 inches in diameter. Refrigerate for at least 2 hours or until firm. *

  • Position a rack in the center of the oven and preheat the oven to 180°C. Butter a baking sheet or line it with parchment paper.

  • *Slice the dough log into 1/4-inch-thick slices. Place the slices about 1 inch apart on the prepared baking sheet.Bake for 12 minutes, or until the cookies are firm to the touch. *

    • Using a stand mixer fitted with the paddle attachment or a handheld mixer or even a wooden spoon, beat the butter on low speed for about 30 seconds, or until completely smooth and soft.*
  • *Add the confectioners’ sugar and vanilla and beat until the mixture is perfectly smooth. Add the milk and salt and beat until smooth. *

  • To assemble the sandwich cookies: Scoop about 1 rounded tablespoon of the filling onto the flat side of 1 cookie. Top with a second cookie, flat side down, then press the cookies together to spread the filling toward the edges. Repeat with the remaining cookies.

Tips: - You can use a mixture of different chocolates. I like using dark chocolate for desserts and bitter chocolate (70% cocoa). - You can use another method to shape your cookies. You can roll out the dough with the rolling pin. Place the dough between two plastic sheets or oven paper, roll it out and place in the fridge. Then use the cookie cutter to cut the shapes of your cookies. - When baking, be careful, because you can’t judge by colour given that the dough is almost black. So you’ll have to pay attention and avoid them to get burnt. Pics and Cakes

Comments

zordor (2013-03-12 01:25:14):

What do you mean you’d “dare to say” the flavor is better than the original? It’s infinitely better than the originals, no question whatsoever. I’ve been lucky enough to try this recipe and I have to say without a doubt these are among the best cookies I’ve ever eaten in my life! They’re absolutely amazing!

Esther (2013-03-16 15:46:02):

Hi Pics&Cakes,

I want to make the cookies but I have an existential question: how do I make or where do I get the couverture chocolate? I have Valor drinking chocolate at home, not sure if that works.

Thanks so much!

EPS

Palstelera (2013-03-16 16:14:26):

The important thing is that it’s dark chocolate, not milk. It can be the so-called fondant chocolate, dessert chocolate, or couverture. Almost any of those would work. I don’t really like drinking chocolate for these recipes because the flavor isn’t as intense, in my opinion. Hope that helped.

Esther (2013-03-16 18:29:22):

It helped a ton, yes! In a little bit I’m getting to work… Thanks so much

Palstelera (2013-06-29 13:22:37):

We’re so glad you made them and especially that you liked them. Answering your questions: if they came out a bit soft, it’s true that a little more time in the oven would have made them harder. That said, you did the right thing because since it’s a dark dough it’s hard to tell when they’re at their perfect point and when they’re starting to burn, and I think it’s better to enjoy a soft cookie than a scorched one. :-) In any case, I’m sure they’ll come out perfect the second time. As for the vanilla in the dough… Oops! I forgot to include it so I have to fix the recipe (thanks!). In principle, it goes in along with the chocolate. Lastly, your question about the mixer. Mine is a regular mixer, the kind with detachable beaters. You could even mix it by hand, but with the mixer you save time and effort and you also get a smoother, fluffier mixture.

Hugs and thanks for following us. :-D

setitapili (2013-06-29 09:09:40):

Hi!!! I wanted to write to you to tell you how the cookies turned out… Simply delicious! I took them to work and everyone was blown away… But I had a couple of problems. The cookie part came out a bit soft, maybe a little more time in the oven would have helped, but I didn’t want to leave them too long because they harden a bit more when they cool. Another problem was that I didn’t know they grew in the oven, so they came out a bit big. And one question: the vanilla for the cookie, when do you add it? I didn’t see it in the recipe so I added it in the last step. Another question: I beat the cream with a whisk, but the dough with a regular mixer. Did I do it right? Conclusion: the cookies are amazing!! They’re my first cookies and everyone asked me for the recipe!!! You can be sure I’ll be making them again!!! Spectacular!!!

Palstelera (2013-06-23 01:15:59):

I think I’m late with the answer… but cocoa powder is also easy to find, in any supermarket. I usually use the Valor brand, which is unsweetened. And as for the milk, any kind works. I used semi-skimmed because that’s what I had, and it came out perfect. Let us know how it goes. :-)

setitapili (2013-06-22 09:52:57):

Hi!!! I’m going to get started in the cookie world and this afternoon I want to make this recipe, but I have a couple of questions:

  • what cocoa powder could I use for the dough? The couverture is easier because they sell it as is, but powder, no idea… Another question, for the cream you use a tablespoon of milk, what type of milk? Sure they’re silly questions, but I hope you’ll let me know… I’ll let you know how it went!! Thanks!!!
11 de marzo de 2013 · 8 min · Palstelera