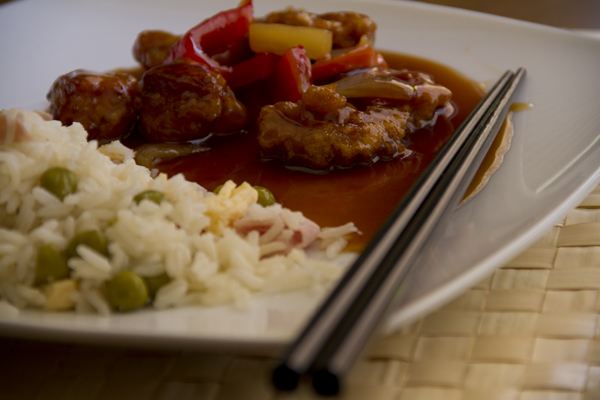
Cerdo agridulce

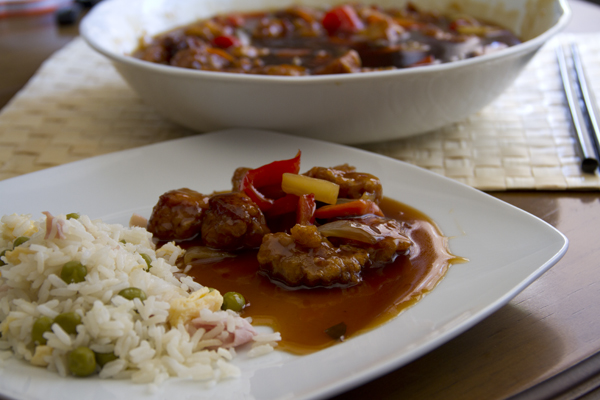
Whole Kitchen en su Propuesta Salada para el mes de enero nos invita a preparar un clásico de la cocina china: cerdo agridulce.

** **Para nosotros es el plato por excelencia cuando tomamos comida china así que no podía faltar en nuestro blog. La receta, a decir verdad, no sé ni siquiera de dónde la saqué porque hice una fusión de diversas páginas de internet y ahora no recuerdo la fuente exacta. Pero bueno, como cualquier plato, lo suyo es probar a hacerlo y si hay algo que no nos convence, lo rectificamos a nuestro gusto, que para eso es nuestra cocina.
Pics and Cakes

¿Qué necesitamos?

  • 400 g magra de cerdo

  • 1 cebolla grande

  • 1 pimiento rojo

  • 1 zanahoria

  • 4 rodajas de piña

  • Aceite

  • Sal

Para el rebozado:

  • 3 cucharadas de harina de trigo

  • 2 cucharadas de maizena

  • 1 huevo

  • 1 cucharadita de levadura en polvo

  • Agua

Para la salsa agridulce:

  • 3/4 taza de azúcar

  • 1/3 taza de vinagre de manzana

  • 2/3 taza de agua

  • 1/4 taza de salsa de soja

  • 2 cucharadas de ketchup

  • 2 cucharadas de salsa Worcester

  • 2 cucharadas de maizena

Pics and Cakes  

¿Cómo lo hacemos?

  • En primer lugar, preparamos la salsa agridulce. Para ello ponemos todos los ingredientes en una cazuela mediana excepto la maizena y cocinamos a fuego fuerte para que se mezclen y disuelvan bien todos los ingredientes.

  • Dejamos que hierva y cocinamos a fuego medio unos minutos para que la salsa se reduzca y espese. Disolvemos la maizena en una taza con un poquito de agua y se la añadimos a la salsa. Cuando tenga la consistencia deseada, la retiramos del fuego.

  • Cortamos la cebolla y los pimientos en cuadrados de un tamaño mediano (1,5 cm aprox.)

  • Cortamos la zanahoria en rodajas finas en diagonal.

  • Cortamos la piña en trozos.

  • En una sartén con un poco de aceite salteamos toda nuestra verdura (lo último que añadiremos es la piña). No hay que cocinarla mucho ya que queremos que quede crujiente.

  • Cuando esté lista la sacamos y la incorporamos a la cazuela donde teníamos la salsa agridulce ya lista.

  • Cortamos la carne de cerdo en cubitos (del tamaño de un bocado, similar al tamaño de las verduras) y la sazonamos.

  • En un bol mezclamos bien las dos harinas y la levadura, y a continuación añadiremos el huevo y el agua muy fría. La cantidad de agua es variable. Así que es mejor ir echándola poco a poco hasta tener la textura de una bechamel suave.

  • Mientras se calienta el aceite para freír en una sartén, echamos los trozos de carne en el bol con la mezcla para el rebozado.

  • Cuando el aceite esté bien caliente, vamos echando de uno en uno los trozos de carne embadurnados. Cuando estén dorados los sacamos en un plato con papel absorbente.

  • Por último añadimos el cerdo ya frito a la cazuela con la salsa agridulce con verduras. Si en este tiempo, la salsa se ha enfriado, podemos calentarla antes de agregar la carne.

  • Servimos acompañado de arroz blanco, arroz basmati o arroz tres delicias.


Consejos:

  • Al hacer la salsa agridulce, recomiendo que no echéis todo el vinagre de golpe ya que puede resultaros muy fuerte. Es mejor ir añadiendo poco a poco en función de nuestro gusto.

  • Si la piña que habéis utilizado es de lata (en su jugo natural) podéis añadir este jugo a la salsa agridulce.

  • La carne rebozada la añadimos justo al final para que el rebozado siga crujiente. Por eso recomiendo servir y comer inmediatamente.

* [English version] SWEET&SOUR PORK** *

  • 400 g pork meat

  • 1 large onion

  • 1 red bell pepper

  • 1 carrot

  • 4 pineapple slices

  • Olive oil

  • Salt

For the coating:

  • 3 tbsp flour

  • 2 tbsp corn flour

  • 1 egg

  • 1 tsp baking powder

  • Water

For the sweet&sour sauce:

  • 3/4 cup of sugar

  • 1/3 cup of apple vinegar

  • 2/3 cup of water

  • 1/4 cup of soya sauce

  • 2 tbsp of ketchup

  • 2 tbsp of Worcester sauce

  • 2 tbsp of corn flour

  • First, prepare the sauce. Place all the ingredients (except from corn flour) into a sauce pan and cook (high heat) until all ingredients are melted and all together.

  • Simmer for several minutes to reduce the amount of sauce (the liquid will evaporate). Dissolve the corn flour in a bit of cold water and add to the sauce. When the sauce has the desired thickness, it will be ready. Set aside.

  • Cut onion and pepper in medium squares  (1,5 cm aprox.)

  • Cut the carrot into thin slices (diagonally).

  • Cut pineapple into medium pieces.

  • In a frying pan, put some olive oil and stir-fry all the veggies (the last ingredient to add will be the pineapple). No need to over cook the veggies because we want them hard and fresh).

  • Then we add all these vegetables to the sauce and mix well.

  • Now, prepare the meat. Cut the pork meat into squares (mouthful size, similar to vegetables size) and add salt.

  • In a bowl, mix both kinds of flour and baking powder. Then add the egg and very cold water. The amount of water may vary. So, add it bit by bit until having the consistency of light bechamel sauce.

  • Heat a frying pan full of oil. Put all the meat pieces into the flour-egg mix.

  • When the oil is hot, introduce the meat pieces coated with the flour-egg mix. Take them out when golden brown and place them into a plate covered by kitchen paper. .

  • Add the fried pork to the sauce and ready to eat. If the sauce is a bit cold, you can warm it before adding the meat.

  • Serve with regular rice, basmati rice or fried rice (Chinese style).

Tips: *- When preparing the sauce, you can add bit by bit the vinegar and taste it to avoid too strong flavour.*- If you have used canned pineapple, you can use the natural juice inside the can for the sauce.*

- We add the coated meat at the very end to enjoy it really crispy. So, serve and eat immediately.
18 de enero de 2013 · 5 min · Palstelera

Sweet and Sour Pork

Whole Kitchen, in their Savory Proposal for January, invites us to make a Chinese classic: sweet and sour pork.

**For us, this is THE go-to dish whenever we have Chinese food, so it couldn’t be missing from our blog. To be honest, I don’t even know exactly where I got the recipe from, because I ended up mashing together a bunch of different websites and now I can’t recall the exact source. But hey, like with any dish, the trick is to give it a go, and if there’s something you don’t love, tweak it to your taste — that’s what your own kitchen is for.

Pics and Cakes

What do we need?

  • 400 g (14 oz) lean pork

  • 1 large onion

  • 1 red bell pepper

  • 1 carrot

  • 4 pineapple slices

  • Oil

  • Salt

For the batter:

  • 3 tablespoons all-purpose flour

  • 2 tablespoons cornstarch

  • 1 egg

  • 1 teaspoon baking powder

  • Water

For the sweet and sour sauce:

  • 3/4 cup sugar

  • 1/3 cup apple cider vinegar

  • 2/3 cup water

  • 1/4 cup soy sauce

  • 2 tablespoons ketchup

  • 2 tablespoons Worcestershire sauce

  • 2 tablespoons cornstarch

Pics and Cakes

How do we make it?

  • First, we make the sweet and sour sauce. Put all the ingredients except the cornstarch into a medium saucepan and cook over high heat so that everything mixes and dissolves well.

  • Let it come to a boil and then simmer over medium heat for a few minutes so the sauce reduces and thickens. Dissolve the cornstarch in a cup with a little water and add it to the sauce. Once it has the consistency you want, take it off the heat.

  • Cut the onion and bell pepper into medium-sized squares (about 1.5 cm / 1/2 inch).

  • Slice the carrot thinly on the diagonal.

  • Cut the pineapple into chunks.

  • In a pan with a little oil, stir-fry all the veggies (add the pineapple last). Don’t overcook them — we want them to stay crunchy.

  • Once they’re ready, take them out and add them to the saucepan with the sweet and sour sauce.

  • Cut the pork into bite-sized cubes (similar in size to the veggies) and season with salt.

  • In a bowl, mix the two flours and the baking powder, then add the egg and very cold water. The amount of water varies, so it’s better to add it little by little until you get the texture of a light béchamel.

  • While the oil heats up in a frying pan, drop the pieces of pork into the bowl with the batter.

  • Once the oil is good and hot, fry the coated pieces one by one. When they’re golden, take them out onto a plate lined with paper towels.

  • Finally, add the fried pork to the saucepan with the sweet and sour sauce and veggies. If the sauce has cooled down by now, warm it back up before adding the meat.

  • Serve with white rice, basmati rice, or three delights fried rice.

Tips:

  • When making the sweet and sour sauce, I’d recommend not pouring in all the vinegar at once, as it can come out really strong. Better to add it bit by bit, to taste.

  • If the pineapple you used is canned (in its own juice), you can add that juice to the sweet and sour sauce.

  • The battered meat goes in right at the end so the coating stays crispy. That’s why I recommend serving and eating it right away.

18 de enero de 2013 · 3 min · Palstelera

Patatas rellenas

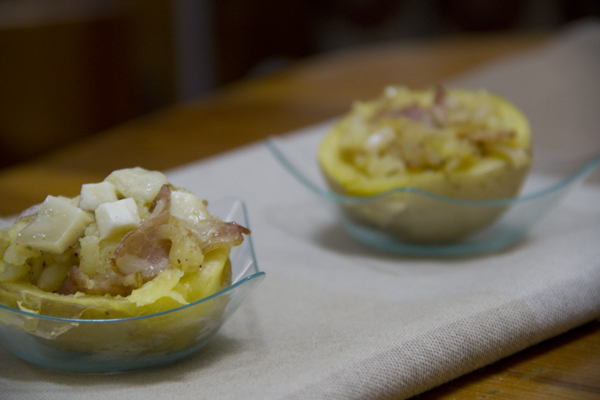
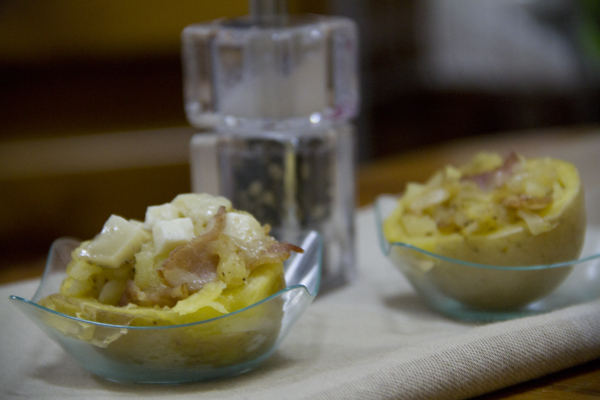
He de reconocer que somos un poco esponjas y todo lo que vemos que nos gusta intentamos hacerlo en casa. Este es el caso de la receta de hoy. Hace ya algunos años nos fuimos los amigos a pasar una Semana Santa a Camposancos, un pueblito bueno de Pontevedra, y allí Ana (con la ayuda de Germán) nos prepararon unas riquísimas patatas rellenas para el regimiento que éramos (bueno, igual no éramos tantos…) El caso es que nos encantó la idea y desde entonces la hemos incorporado a nuestro recetario.

Pics and Cakes


¿Qué necesitamos?

  • 4 patatas medianas

  • 5 lonchas de beicon

  • 1 cebolla

  • Queso

  • Sal

  • Pimienta


¿Cómo lo hacemos?

  • Asamos las patatas en el horno. (Podéis mirarlo aquí si no sabéis cómo hacerlo).

  • Mientras tanto cortamos el beicon y la cebolla y la pochamos en la sartén con un poco de aceite.

  • Cuando las patatas estés listas, podemos comprobar con un pincho de cocina, las sacamos del horno y las partimos por la mitad.

  • Con cuidado y con ayuda de una cuchara, vaciamos las mitades, dejando la piel con una capa fina de patata.

  • Mezclamos la patata extraída con el beicon y la cebolla pochados. Salpimentamos.

  • Rellenamos las mitades de patata con la mezcla, añadimos un poco de queso y ponemos en el horno a gratinar.


Consejos:

  • Acepta cualquier tipo de queso. A nosotros nos gusta con emmental (querido Watson).

  • Si no queréis hacer las patatas asadas, podéis cocerlas pero recomendamos que al menos gratinéis con el queso en el horno.

  • Esta es nuestra propuesta para el relleno. Podéis adaptarla a vuestros gustos.

Pics and Cakes

*[English version] STUFFED POTATOES * Ingredients:

  • *4 medium potatoes *

  • *5 bacon slices *

  • *1 onion *

  • Cheese

  • Salt

  • Pepper

* ** *

  • *Bake the potatoes in the oven. *

  • *Chop bacon and onion and stirfry in a frying pan with a bit of olive oil. *

  • *Check if the potatoes are ready and cut them into halves. *

  • *With a spoon empty the potatoes leaving the skin with a thin layer of potato. *

  • *Mix this potato with the onion and bacon. Add salt and pepper. *

  • *Fill the potato halves with this mix, add some cheese and enter into the oven. *


Tips:*- You can use any kind of cheese you like. We usually like to add emmental cheese. **- If you prefer, you can boil the potatoes instead of baking them. But for the final step we advice to keep using the oven. *- This is just a proposal, you can modify the ingredients for the filling according to your preferences.

27 de diciembre de 2012 · 2 min · Cesmm

Stuffed Potatoes

I have to admit we’re a bit like sponges — anything we see and like, we try to make at home. That’s exactly what happened with today’s recipe. A few years ago we went with friends to spend Easter week in Camposancos, a lovely little village in Pontevedra, and there Ana (with Germán’s help) made us some delicious stuffed potatoes that could have fed a regiment (well, maybe we weren’t quite that many…). The thing is, we loved the idea and ever since it’s been part of our recipe book.

Pics and Cakes

What do we need?

  • 4 medium potatoes

  • 5 slices of bacon

  • 1 onion

  • Cheese

  • Salt

  • Pepper

How do we make it?

  • Bake the potatoes in the oven. (You can check here if you’re not sure how to do it.)

  • Meanwhile, chop the bacon and onion and sauté them in a pan with a little olive oil.

  • When the potatoes are ready — you can check by poking them with a kitchen skewer — take them out of the oven and cut them in half.

  • Carefully, with the help of a spoon, scoop out the halves, leaving the skin with a thin layer of potato.

  • Mix the scooped-out potato with the sautéed bacon and onion. Season with salt and pepper.

  • Fill the potato halves with the mixture, add a bit of cheese on top, and put them in the oven to broil.

Tips:

  • Any kind of cheese works. We like it with Emmental (elementary, my dear Watson).

  • If you don’t feel like baking the potatoes, you can boil them instead, but we recommend at least broiling them with the cheese in the oven.

  • This is just our take on the filling. Feel free to adapt it to your taste.

Pics and Cakes

27 de diciembre de 2012 · 2 min · Cesmm

Blue Cheese Burger

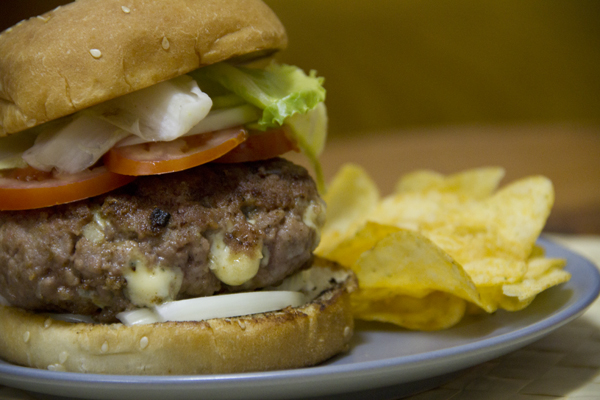
Good and freezing morning. Today we’re bringing you a really simple recipe, the kind that even Jesús will be able to pull off without having to call twenty times :p The thing is, I’m a huge fan of making burgers at home. They’re usually way better than the ones you eat out, plus you make them to your own taste and load them with the ingredients you like best. This time we made the burger with blue cheese mixed right into the patty.

Pics and Cakes

What do we need?

(For each big-eater burger)

  • 200 g (7 oz) ground beef

  • 25-30 g (1 oz) blue cheese

  • 1 egg

  • Pepper

  • Salt

  • Breadcrumbs

  • Tomato

  • Lettuce

  • Onion

  • Burger bun

How do we make it?

  • Take the ground beef and dump it into a large bowl, since you’re going to be getting your hands in there.

  • Add the egg, a bit of freshly ground pepper, salt to taste, and a little breadcrumbs to give the meat some consistency.

  • Mix everything together with your hands.

  • Once all the ingredients are well combined, add the blue cheese cut into cubes. Try to work it into the meat but without pressing too hard so the cheese doesn’t break apart.

  • Wrap in cling film and shape into a burger.

  • Let the burger rest in the fridge for a couple of hours.

  • When you’re ready to eat, put a frying pan with a splash of oil over the heat and, while it’s warming up, start chopping the rest of the ingredients.

  • Cut the onion into rings, the lettuce into fairly large leaves (that way it’s easier to eat), and the tomato into slices.

  • Once the oil is hot, lower the heat a bit so the burger doesn’t burn on the outside while staying raw inside. Cook it to your liking (I like mine rare).

  • When it’s done, set it aside, wipe the pan clean with kitchen paper, and toast the bun for about half a minute.

  • Build your burger and enjoy.

Tips:

  • If you’re not going to use all the ground beef you bought, you can keep the formed patties in the freezer.

  • For me, as I said, I really enjoy a good burger, so 150 to 200 grams (5-7 oz) of ground beef is the “standard” size. Yes, that’s on the generous side, but hey, it’s a burger. Obviously you can make it with less.

  • If you want, you can dust the patty in flour before cooking it.

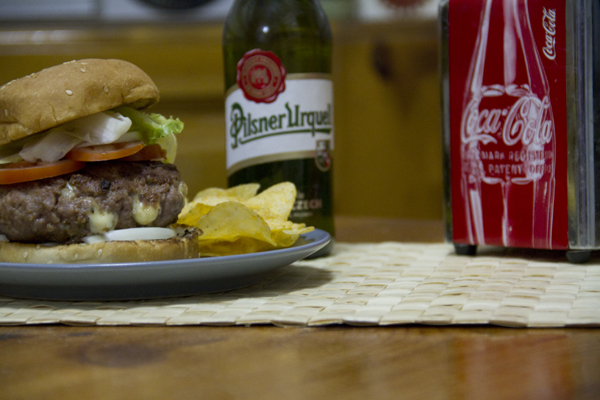
  • As my dad says when we play tute, “side dish requested.” A good beer or a cold Coke with fries (homemade or store-bought) is a must.

Pics and Cakes

[English version] **Ingredients:

(For each big hamburger)

  • 200 g de minced meat

  • 25-30 g de blue cheese

  • 1 egg

  • Pepper

  • Salt

  • Bread crumbs

  • Tomato

  • Salad

  • Onion

  • Hamburger bun

  • Place minced meat into a large bowl and mix well with your hands.

  • Add the egg, a bit of salt and pepper and some bread crumbs.

  • Mix well all ingredients.

  • Then chop blue cheese into small squares and add to the meat mix. Try to ‘knead’ the mix integrating the cheese but keeping it into pieces.

  • Make a ball, wrap in cling film and and flatten it with your hand to have hamburger shape.

  • Leave for a couple of hours in fridge.

  • Then, pour a bit of olive oil in the frying pan. Let it get warm and start preparing your fresh ingredients (onion, tomato and salad).

  • Cut onion into rings, tomato into slices and salad (lettuce) into big parts (it will be easier to eat).

  • Cook the hamburger according to your preferences (well done, medium or rare).

  • When it’s ready take it out from the pan, clean the frying pan with kitchen paper and toat the bread bun.

  • Prepare you hamburger sandwich with all the ingredients and enjoy it.

Tips:

  • You can freeze the prepared raw hamburgers and you will only need to defrost and cook in the pan whenever you need it.

  • This amount of minced meat is for a big hamburger but it’s up to you the size of your hamburger.

  • You can coat in flour the raw hamburger before cooking it.

  • It’s a must to serve the hamburger with a cold beer and chips or fries.


11 de diciembre de 2012 · 4 min · Cesmm

Hamburguesa con queso azul

Buenos y gélidos días. Hoy os presentamos una receta bien sencilla, de esas que hasta Jesús será capaz de hacer sin necesidad de llamar veinte veces :p El caso es que yo soy muy fan de hacer las hamburguesas en casa. Normalmente están mucho mejor que las que comes por ahí y encima las haces a tu gusto y le pones los ingredientes que más te gustan. En esta ocasión nosotros hicimos la hamburguesa integrando queso azul en ella.

Pics and Cakes

**¿Qué necesitamos? **

(Para cada hamburguesa de buen comedor)

  • 200 g de carne picada

  • 25-30 g de queso azul

  • 1 huevo

  • Pimienta

  • Sal

  • Pan rallado

  • Tomate

  • Lechuga

  • Cebolla

  • Pan de hamburguesa

¿Cómo lo hacemos?

  • Cogemos la carne picada la pasamos a un bol grande, ya que hay que manosear.

  • Añadimos el huevo, un poco de pimienta recién molida, sal al gusto y un poco de pan rallado para dar consistencia a la carne.

  • Mezclamos todo con las manos.

  • Cuando esté bien mezclado todos los ingredientes añadimos el queso azul cortado en cuadrados. Intentaremos integrarlo en la carne pero sin hacer mucha fuerza para que el queso no se rompa.

  • Envolvemos en film transparente y damos forma de hamburguesa.

  • Dejamos que la hamburguesa repose en la nevera un par de horas.

  • Cuando la vayamos a comer, ponemos una sartén con un chorrito de aceite en el fuego y mientras coge temperatura vamos cortando el resto de ingredientes.

  • Partimos la cebolla en aros, la lechuga en hojas más o menos grandes (así será más fácil de comer) y el tomate en rodajas.

  • Cuando el aceite esté caliente bajamos un poco la temperatura  para que no se nos queme mucho por fuera y se quede muy cruda por dentro. La hacemos a nuestro gusto (a mí me gusta poco hecha).

  • Cuando esté lista reservamos y limpiamos la sartén con papel de cocina y ponemos el pan medio minuto para tostarlo un poco.

  • Montamos la hamburguesa y a disfrutar.

Consejos:

  • Si no vais a consumir toda la carne picada que habéis comprado podéis conservar la hamburguesa ya hecha en el congelador.

  • Para mí, que como he dicho antes disfruto de las hamburguesas, de 150 a 200 gramos de carne picada es la medida “estándar” . Sí, es bastante tirando a mucho pero es que es una hamburguesa. Evidentemente podéis hacerla con menos cantidad.

  • Si queréis podéis pasar la hamburguesa por harina antes de hacerla en la sartén.

  • Como dice mi padre cuando jugamos al tute “se ruega acompañamiento”. Una buena cerveza o una coca-cola fría con patatas (hechas o compradas) son imprescindibles.

Pics and Cakes

[English version] **Ingredients:

(For each big hamburger)

  • 200 g de minced meat

  • 25-30 g de blue cheese

  • 1 egg

  • Pepper

  • Salt

  • Bread crumbs

  • Tomato

  • Salad

  • Onion

  • Hamburger bun

  • Place minced meat into a large bowl and mix well with your hands.

  • Add the egg, a bit of salt and pepper and some bread crumbs.

  • Mix well all ingredients.

  • Then chop blue cheese into small squares and add to the meat mix. Try to ‘knead’ the mix integrating the cheese but keeping it into pieces.

  • Make a ball, wrap in cling film and and flatten it with your hand to have hamburger shape.

  • Leave for a couple of hours in fridge.

  • Then, pour a bit of olive oil in the frying pan. Let it get warm and start preparing your fresh ingredients (onion, tomato and salad).

  • Cut onion into rings, tomato into slices and salad (lettuce) into big parts (it will be easier to eat).

  • Cook the hamburger according to your preferences (well done, medium or rare).

  • When it’s ready take it out from the pan, clean the frying pan with kitchen paper and toat the bread bun.

  • Prepare you hamburger sandwich with all the ingredients and enjoy it.

Tips:

  • You can freeze the prepared raw hamburgers and you will only need to defrost and cook in the pan whenever you need it.

  • This amount of minced meat is for a big hamburger but it’s up to you the size of your hamburger.

  • You can coat in flour the raw hamburger before cooking it.

  • It’s a must to serve the hamburger with a cold beer and chips or fries.


11 de diciembre de 2012 · 4 min · Cesmm

Cherry tomato and cheese quiche

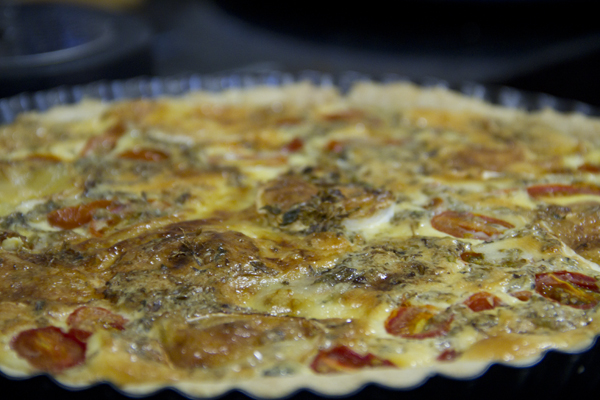
I’m sure you’ve all tried — and many of you have made — the classic quiche lorraine (we’ve got ours ready and we’ll be posting it soon). Today we’re sharing a variation we absolutely loved, easy to make and seriously tasty.

Pics and Cakes

What do we need?

For the shortcrust pastry:

  • 200 g (1 ⅔ cups) flour

  • 100 g (7 tbsp) cold butter

  • 1 egg

  • A pinch of salt

  • A pinch of sugar

For the filling:

  • A dozen cherry tomatoes

  • 100 g (3.5 oz) emmental cheese

  • 50 g (1.75 oz) goat cheese log

  • 200 ml (¾ cup + 1 tbsp) heavy cream

  • 4 medium eggs

  • Oregano, salt and pepper.

How do we make it?

  • First, make the shortcrust pastry. Here you can see how we did it.

  • While the pastry is resting, preheat the oven to 180-200°C (355-390°F).

  • Once the dough is ready, roll it out, place it in a tart pan and bake for about 15 minutes. We do this before adding the filling so the base doesn’t end up raw. To stop it from puffing up, prick it with a fork or weigh it down with dried chickpeas.

  • Cut the tomatoes in half, chop the emmental and slice the goat cheese log into rounds.

  • Beat the eggs and mix with the cream. Add salt and pepper.

  • Stir in the emmental and the oregano.

  • When the pastry is partly baked, take it out of the oven and pour in the mixture. Spread it evenly across the pan.

  • Add the halved cherry tomatoes and the goat cheese on top.

  • Put it back in the oven and bake for another 30 minutes or so.

Tips:

  • You can use any kind of cheese for the filling.

  • If you’re feeling lazy and don’t fancy making the shortcrust pastry, you can buy it at any supermarket, either refrigerated or frozen. If you go for frozen, take it out about 15 minutes before you want to use it so you can work with it — otherwise it’ll crack.

Pics and Cakes


Comments

silvia (2012-11-29 22:13:25):

man… I wish I had an oven so I could follow these recipes… well, the no-bake ones except for the sweet ones, you already know I’m a fan, like that pineapple salad… yum yum

16 de noviembre de 2012 · 2 min · Cesmm

Quiche de quesos y tomates cherry

Seguro que todos habéis probado, y más de uno habrá preparado, la quiche lorraine (nosotros la tenemos lista para publicar próximamente). Hoy os presentamos una variante que nos encantó y que además de fácil de preparar está bien rica.

  Pics and Cakes

¿Qué necesitamos?

Para la masa quebrada:

  • 200 gr de harina

  • 1oo gr de mantequilla fría

  • 1 huevo

  • Una pizca de sal

  • Una pizca de azúcar

Para el relleno:

  • Una docena de tomates cherrys

  • 100 gr de queso emmental

  • 50 gr de rulo de queso de cabra

  • 200 ml de nata

  • 4 huevos medianos

  • Orégano, sal y pimienta.

¿Cómo lo hacemos?

  • Lo primero es hacer la masa quebrada. Aquí podéis ver cómo la hicimos nosotros.

  • Mientras preparamos la masa vamos precalentando el horno a 180-200º C.

  • Cuando la masa esté lista, la estiramos, la ponemos en un molde y horneamos unos 15 minutos. Esto lo hacemos, antes de poner el relleno para que al hornear el conjunto la masa no se quede cruda. Para que no se levante, pinchamos con un tenedor o ponemos garbanzos para que hagan peso.

  •  Vamos partiendo los tomates a la mitad, picando el queso emmental y cortando el rulo de queso de cabra en rodajas.

  • Batimos los huevos y mezclamos con la nata. Añadimos la sal y la pimienta.

  • Incorporamos el queso emmental y el orégano.

  • Cuando la masa esté un poco cocida la retiramos del horno e incorporamos la mezcla. Distribuimos bien por todo el molde.

  • Añadimos los tomates cherry partidos por la mitad y el queso de cabra.

  • Volvemos a poner en el horno y dejamos hornear otra vez en torno a media hora.

Consejos:

  • Puedes utilizar cualquier tipo de queso para el relleno.

  • Si estáis perezosos y no os apetece hacer la masa quebrada se puede comprar en cualquier supermercado refrigerada y congelada. Si la compráis congelada sacad del congelador unos 15 minutos antes de querer utilizarla para poder trabajar con ella, sino se romperá.

Pics and Cakes

[English version] QUICHE OF CHERRY TOMATOES AND CHEESE* *Shortbread pastry:

  • 200 g flour

  • 1oo g cold butter

  • 1 egg

  • A pinch of salt

  • A pinch of sugar

* * Filling:

  • A dozen of cherry tomatoes

  • 100 g emmental cheese

  • 50 g goat cheese

  • 200 ml cream

  • 4 eggs

  • Oregano, salt and pepper

*  *

* *

  • *Prepare the shortbread pastry. You can see here our recipe. *

  • Preheat oven at 180-200º C.

  • Roll out the pastry and place into a baking pan. Bake for 15 minutes. If we bake directly with the filling on it, the pastry will be underdone. To avoid the pastry to ‘grow’ in the oven, you can place a baking paper and fill up with baking beans. You can also pierce the pastry with a fork.

  • * Cut tomatoes into halves. Chop emmental cheese and slice goat cheese. *

  • *Whisk eggs and cream. Add salt and pepper. *

  • *Add emmental cheese and oregano. *

  • Take out the baked pastry from oven and fill evenly with the mix.

  • *Add cherry tomatoes and goat cheese. *

  • Bake in oven around 30 minutes until the cream is firm but smooth.

* *

* *

Tips:

- You can use any cheese you like.

*- If you are lazy or have no time to prepare your own shortbread pastry, you can buy it ready to roll in the supermarket. *


16 de noviembre de 2012 · 3 min · Cesmm

Caramelised Garlic Tart

And then we say the poor Brits have nothing in their cuisine beyond fish & chips and porridge… I tried this recipe at my aunt’s house in Edinburgh and it was honestly a surprise. A savoury tart whose main ingredient is garlic but which, contrary to what you might think, isn’t sharp or strong-tasting at all. It’s creamy, smooth and light on the palate. Hope you enjoy it…

Pics and Cakes

What do we need?

  • 1 sheet of puff pastry

  • 3 heads of garlic (cloves separated and peeled)

  • 1 tablespoon olive oil

  • 1 tablespoon balsamic vinegar of Modena

  • 220 ml (¾ cup + 2 tbsp) water

  • 1 teaspoon icing sugar

  • 1 tablespoon chopped rosemary

  • 1 tablespoon chopped thyme, plus a few whole leaves for garnish

  • 120 g (4 oz) soft goat’s cheese

  • 120 g (4 oz) hard, mature goat’s cheese

  • 2 eggs

  • 100 ml (scant ½ cup) heavy cream

  • 100 ml (scant ½ cup) crème fraîche (can be replaced with heavy cream)

  • Salt and pepper

How do we make it?

  • Roll out the sheet of puff pastry over a round, shallow tart tin so it covers the bottom and the sides. Prick the dough with a fork, place a sheet of baking paper on top and add two handfuls of raw chickpeas (this stops the dough from puffing up while baking). Let it rest in the fridge.

  • Preheat the oven to 180°C (355°F). Bake the pastry case for about 20 minutes. Remove the paper and chickpeas and bake for another 5-10 minutes. Take it out of the oven and set aside. Leave the oven on.

  • While the pastry is baking, make the caramelised garlic. Put the garlic cloves in a pan and cover with water. Bring to a boil and blanch for 3 minutes. Drain well.

  • Dry the pan and put the garlic cloves back in with the olive oil. Fry over high heat for 2 minutes. Add the balsamic vinegar and water and bring to a boil. Let it simmer gently for 10 minutes.

  • Add the sugar, rosemary, thyme and salt. Keep cooking over medium heat for another 10 minutes, or until almost all the liquid has evaporated and the garlic cloves are coated in a kind of dark syrup.

  • To assemble the tart, break up both types of cheese and scatter them over the baked pastry case. Then spoon the caramelised garlic and syrup over the whole surface.

  • In a bowl, whisk the eggs, creams, salt and pepper. Pour this mixture into the tart, trying to fill the gaps left between the cheese and the garlic but without completely covering the ingredients (you should still be able to see them).

  • Lower the temperature to 160°C (320°F). Bake for 35-45 minutes or until you see the filling has set and the top has turned golden.

  • Remove from the tin and serve with a little thyme sprinkled on top.

Tips:

  • To unmould the tart easily once it’s done, you can use a loose-bottomed tin, or otherwise place baking paper before lining it with the puff pastry to prevent sticking.

  • It’s delicious served with a salad. Why not with a rocket and mango salad?

The recipe is from this website: http://britishfood.about.com/od/adrecipes/r/caramelisedgarlictart.htm

*[English version] CARAMELISED GARLIC TART

  • **Ingredients:
  • 1 puff pastry sheet

  • 3 medium heads of garlic (cloves separated and peeled)

  • 1 tbsp olive oil

  • 1 tsp balsamic vinegar

  • 220ml water

  • ¾ tbsp fine sugar

  • 1 tsp chopped rosemary

  • 1 tsp chopped thyme, plus a few whole sprigs to finish

  • 120g soft, creamy goat’s cheese

  • 120g hard, mature goat’s cheese

  • 2 free-range eggs

  • 100ml heavy/double cream

  • 100ml crème fraîche

  • salt and black pepper

  • Have ready a shallow, loose-bottomed, 28cm fluted tart tin. Roll out the puff pastry into a circle that will line the bottom and sides of the tin, plus a little extra. Line the tin with the pastry. Place a large circle of greaseproof paper on the bottom and fill up with baking beans. Leave to rest in the fridge.

  • Preheat the oven to 180°C. Place the tart case in the oven and bake blind for 20 minutes. Remove the beans and paper, then bake for a further 5-10 minutes, or until the pastry is golden. Set aside. Leave the oven on.

  • While the tart case is baking, make the caramelized garlic. Put the cloves in a small saucepan and cover with plenty of water. Bring to a simmer and blanch for 3 minutes, then drain well.

  • Dry the saucepan, return the cloves to it and add the olive oil. Fry the garlic cloves on a high heat for 2 minutes. Add the balsamic vinegar and water and bring to the boil, then simmer gently for 10 minutes.

  • Add the sugar, rosemary, chopped thyme and ¼ teaspoon salt. Continue simmering on a medium flame for 10 minutes, or until most of the liquid has evaporated and the garlic cloves are coated in a dark caramel syrup. Set aside.

  • To assemble the tart, break both types of goat’s cheese into pieces and scatter in the pastry case. Spoon the garlic cloves and syrup evenly over the cheese.

  • In a jug whisk together the eggs, creams, ½ teaspoon salt and some black pepper. Pour this custard over the tart filling to fill the gaps, making sure that you can still see the garlic and cheese over the surface.

  • Reduce the oven temperature to 160°C and place the tart inside. Bake for 35-45 minutes, or until the tart filling has set and the top is golden brown. Remove from the oven and leave to cool a little.

  • Then take out of tin, trim the pastry edge if needed, lay a few sprigs of thyme on top and serve warm.

    Tips:- To take it out of tin in an easy way you can use a quiche pan with the bottom removable or you can just place some oven paper on the tin before rolling out the pastry. - Serve with salad. Why not with mango and rocket salad? Recipe from this website: http://britishfood.about.com/od/adrecipes/r/caramelisedgarlictart.htm


Comments

Sergio (2012-11-16 00:32:29):

Wow!!

This looks incredible. Who would have thought — what a surprise from the Brits.

Palstelera (2012-11-22 19:05:14):

Poor things, we really do underestimate them on the food front…

9 de noviembre de 2012 · 5 min · Palstelera

Tarta de ajos caramelizados

Para que luego digamos que los pobres británicos no tienen nada en su gastronomía aparte de los fish&chips y el porridge… Esta receta la probé en casa de mi tía, en Edimburgo y la verdad es que fue sorprendente. Una tarta salada cuyo ingrediente principal es el ajo pero que, lejos de lo que podáis pensar, ni pica ni tiene un sabor fuerte. Es cremosa, suave y ligera al gusto. Espero que la disfrutéis…

 Pics and Cakes

¿Qué necesitamos?

  • 1 lámina de hojaldre

  • 3 cabezas de ajo (los dientes separados y pelados)

  • 1 cucharada de aceite de oliva

  • 1 cucharada de vinagre balsámico de Módena

  • 220 ml agua

  • 1 cucharadita de azúcar glas

  • 1 cucharada de romero picado

  • 1 cucharada de tomillo picado y unas cuantas hojitas para decorar

  • 120 g queso cremoso de cabra

  • 120 g queso curado de cabra

  • 2 huevos

  • 100 ml nata

  • 100ml crème fraîche (se puede sustituir por nata)

  • Sal y pimienta

¿Cómo lo hacemos?

  • Extendemos la lámina de hojaldre sobre un molde redondo y bajo para que cubra el fondo y las paredes. Pinchamos la masa con un tenedor y ponemos sobre ella una hoja de papel de horno y dos puñados de garbanzos crudos encima (esto ayudará a que al hornear la masa no se infle). Dejamos reposar en la nevera.

  • Precaletnamos el horno a 180ºC. Horneamos la masa unos 20 minutos. Quitamos el papel y los garbanzos y horneamos otros 5-10 minutos. Lo sacamos del horno y reservamos. Dejamos el horno encendido.

  • Mientras el hojaldre se hornea, vamos haciendo los ajos caramelizados. Ponemos los dientes de ajo en una sartén y los cubrimos con agua. Los llevamos a ebullición y los escaldamos durante 3 minutos. Escurrimos bien.

  • Secamos la sartén y volvemos a poner los dientes de ajo con el aceite de oliva. Los freímos a fuego fuerte durante 2 minutos. Añadimos el vinagre balsámico y el agua y lo llevamos a ebullición. Dejamos cocer suavemente durante 10 minutos.

  • Añadimos el azúcar, romero, tomillo y la sal. Seguimos cocinando a fuego medio durante otros 10 minutos o hasta que se haya evaporado prácticamente todo el líquido y los dientes de ajo estén recubiertos por una especie de sirope oscuro.

  • Para montar lo tarta, troceamos los dos tipos de queso y los esparcimos sobre el hojaldre horneado. Después, echamos con una cuchara nuestros ajos caramelizados y el sirope por toda la superficie.

  • En un bol batimos los huevos, las natas, sal y pimienta. Añadimos esta creama a la tarta, tratando de rellenar los huecos que quedan entre el queso y los ajos pero sin cubrir del todo los ingredientes (que se sigan viendo).

  • Bajamos la temperatura a 160ºC. Horneamos durante 35-45 minutos o hasta que veamos que el relleno esta firme y que la parte superior se ha dorado.

  • Lo sacamos del molde y servimos con un poquito de tomillo espolvoreado por encima.

Consejos:

  • Para poder desmoldar la tarta sin problema una vez hecha, podéis utilizar un molde desmoldable o si no poner papel de horno antes de cubrirlo con la lámina de hojaldre para evitar que se pegue.

  • Si lo servis acompañado de una ensalada, estará riquísimo. ¿Y por qué no con una ensalada de rúcula y mango?

La receta es de esta web: http://britishfood.about.com/od/adrecipes/r/caramelisedgarlictart.htm

*[English version] CARAMELISED GARLIC TART * **Ingredients:

  • 1 puff pastry sheet

  • 3 medium heads of garlic (cloves separated and peeled)

  • 1 tbsp olive oil

  • 1 tsp balsamic vinegar

  • 220ml water

  • ¾ tbsp fine sugar

  • 1 tsp chopped rosemary

  • 1 tsp chopped thyme, plus a few whole sprigs to finish

  • 120g soft, creamy goat’s cheese

  • 120g hard, mature goat’s cheese

  • 2 free-range eggs

  • 100ml heavy/double cream

  • 100ml crème fraîche

  • salt and black pepper


  • Have ready a shallow, loose-bottomed, 28cm fluted tart tin. Roll out the puff pastry into a circle that will line the bottom and sides of the tin, plus a little extra. Line the tin with the pastry. Place a large circle of greaseproof paper on the bottom and fill up with baking beans. Leave to rest in the fridge.

  • Preheat the oven to 180°C. Place the tart case in the oven and bake blind for 20 minutes. Remove the beans and paper, then bake for a further 5-10 minutes, or until the pastry is golden. Set aside. Leave the oven on.

  • While the tart case is baking, make the caramelized garlic. Put the cloves in a small saucepan and cover with plenty of water. Bring to a simmer and blanch for 3 minutes, then drain well.

  • Dry the saucepan, return the cloves to it and add the olive oil. Fry the garlic cloves on a high heat for 2 minutes. Add the balsamic vinegar and water and bring to the boil, then simmer gently for 10 minutes.

  • Add the sugar, rosemary, chopped thyme and ¼ teaspoon salt. Continue simmering on a medium flame for 10 minutes, or until most of the liquid has evaporated and the garlic cloves are coated in a dark caramel syrup. Set aside.

  • To assemble the tart, break both types of goat’s cheese into pieces and scatter in the pastry case. Spoon the garlic cloves and syrup evenly over the cheese.

  • In a jug whisk together the eggs, creams, ½ teaspoon salt and some black pepper. Pour this custard over the tart filling to fill the gaps, making sure that you can still see the garlic and cheese over the surface.

  • Reduce the oven temperature to 160°C and place the tart inside. Bake for 35-45 minutes, or until the tart filling has set and the top is golden brown. Remove from the oven and leave to cool a little.

  • Then take out of tin, trim the pastry edge if needed, lay a few sprigs of thyme on top and serve warm.

  Tips:- To take it out of tin in an easy way you can use a quiche pan with the bottom removable or you can just place some oven paper on the tin before rolling out the pastry. - Serve with salad. Why not with mango and rocket salad? Recipe from this website: http://britishfood.about.com/od/adrecipes/r/caramelisedgarlictart.htm


9 de noviembre de 2012 · 5 min · Palstelera