Chickpea Salad with Mustard Vinaigrette

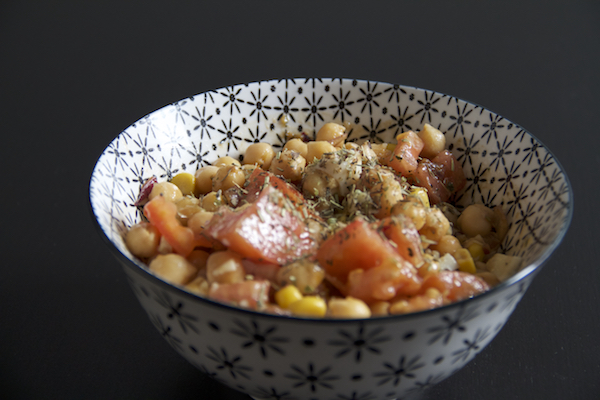
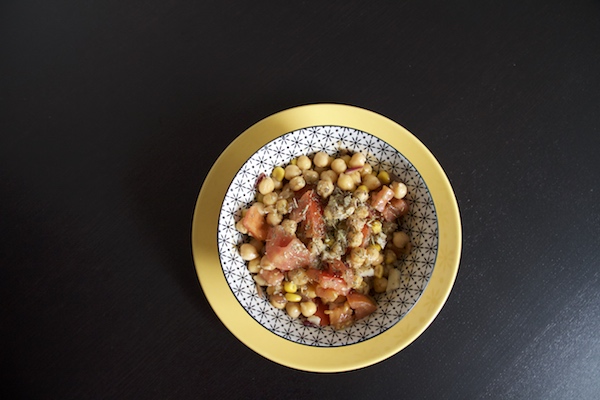
Just because summer is over doesn't mean we have to say goodbye to salads. Today, a super simple and quick recipe for a tasty, healthy chickpea salad. Since we're using pre-cooked chickpeas, it takes no more than 5 minutes to put together, so there's no excuse. Enjoy!
ensalada garbanzos

What do we need?

  • 1 can of cooked chickpeas
  • 2 tomatoes
  • 1/2 onion
  • 1 small can of corn
  • Mustard
  • Herbes de Provence
  • Salt and pepper
  • Oil and vinegar

How do we make it?

  1. First, drain the canned chickpeas and rinse them with cold water to get rid of that characteristic canned taste. Place them in a large bowl.
  2. Dice the tomatoes and onion and add them to the bowl with the chickpeas.
  3. Add the corn.
  4. In a glass jar, make a vinaigrette. The usual ratio is three parts oil to one part vinegar. For this salad, you can pour about two finger-widths of oil into the jar, a third of that in vinegar, 1 teaspoon of mustard, 1 teaspoon of herbes de Provence, and a pinch of salt. Close the jar tightly and shake vigorously until the mixture has emulsified. Taste and adjust with whatever ingredient suits your liking.

Tips:

– As with all salads, more than a recipe, this is a suggestion. Feel free to add other ingredients or seasonings you have in the fridge.
img_7702

23 de septiembre de 2016 · 2 min · Palstelera

Ensalada de garbanzos con vinagreta de mostaza

Que el verano se haya acabado no significa que tengamos que despedirnos de las ensaladas. Hoy una receta muy sencilla y rápida para preparar una rica y sana ensalada de garbanzos. Como usamos garbanzos ya cocidos no se tarda más de 5 minutos en hacerla así que no hay excusa. ¡Que aproveche!

ensalada garbanzos

¿Qué necesitamos?

  • 1 bote de garbanzos cocidos
  • 2 tomates
  • 1/2 cebolla
  • 1 lata pequeña de maíz
  • Mostaza
  • Hierbas provenzales
  • Sal y pimienta
  • Aceite y vinagre

 ¿Cómo lo hacemos?

  1. En primer lugar, escurrimos los garbanzos de bote y los aclaramos con agua fría para quitarle ese sabor característico a conserva. Colocamos en un bol amplio.
  2. Cortamos los tomates y la cebolla en dados y los añadimos al bol de los garbanzos.
  3. Añadimos el maíz.
  4. En un bote de cristal hacemos una vinagreta. La proporción habitual es tres medidas de aceite por cada una de vinagre. Para esta ensalada, podemos poner dos dedos de aceite en el bote, una tercera parte de vinagre, 1 cucharadita de mostaza, 1 cucharadita de hierbas provenzales y una pizca de sal. Cerramos el bote bien y agitamos enérgicamente hasta que se haya emulsionado la mezcla. Probamos y rectificamos con algún ingrediente según nuestro gusto.

Consejos:

– Como en todas las ensaladas, más que una receta, esto es una sugerencia. Podéis añadir otros ingredientes o condimentos que tengáis por la nevera.

img_7702

 
23 de septiembre de 2016 · 2 min · Palstelera

Ensalada de espinacas, feta y semillas de amapola

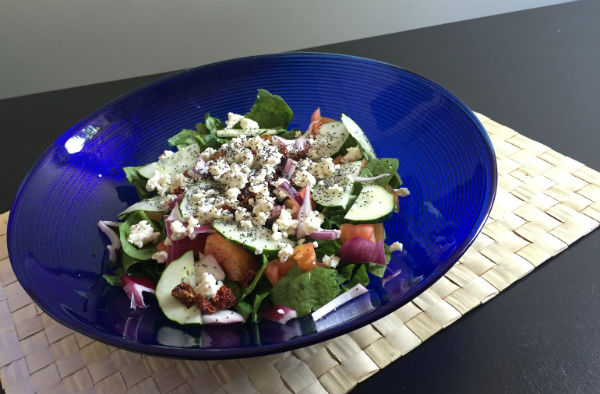
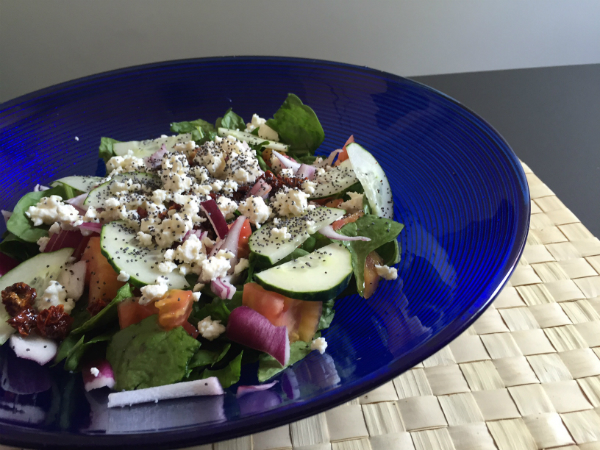
Las chicharras cantando, coger el coche a 46°C, sudar como un pollo y no abrir más ventanas por la noche porque tu casa no las tiene son claros síntomas de que el verano ha llegado y con mucha fuerza. Así que, ante estos calores, vamos a contraatacar con comidas fresquitas para resistir a la época estival. Inaugurando la temporada de ensaladas, hoy os traemos una ensalada de espinacas. Se trata de una receta tan sencilla que no podría ni denominarse receta, simplemente sugerencia de combinación de ingredientes para que os sirvan de inspiración en vuestras próximas ensaladas.

Pics and Cakes


¿Qué necesitamos?

  • 1 bol de espinacas frescas y lavadas
  • 1/2 cebolla morada
  • 1 tomate
  • 1/2 pepino
  • 4 tomates secos
  • Semillas de amapola
  • Queso tipo feta
  • Aceite
  • Vinagre
  • Sal


 ¿Cómo lo hacemos?

  1. Cortamos el pepino en rodajas, la cebolla en juliana, los tomates en cuadraditos y lo ponemos sobre las hojas de espinacas frescas (si son muy grandes, las cortamos con las manos), añadimos queso feta al gusto desmenuzado con las manos.
  2. Por último, añadimos semillas de amapola y aliñamos al gusto.


Consejos:

– Se puede preparar una vinagreta mezclando 1 parte de vinagre con 3 de aceite y un poquito de sal. Se mete en un bote que cierre bien, agitamos con energía para emulsionarlo y listo para aliñar. A las vinagretas se le puede añadir cualquier especia, hierba, mostaza o lo que se os ocurra.

– Cuidado con los tomates secos porque tienen tanto sabor que a veces podemos prescindir de la sal.

Pics and Cakes

28 de julio de 2016 · 2 min · Palstelera

Spinach, Feta and Poppy Seed Salad

Cicadas singing, getting into a car that's 46°C (115°F), sweating like a pig, and not being able to open more windows at night because your house simply doesn't have any — clear signs that summer has arrived and with a vengeance. So, faced with this heat, we're going to fight back with cool, refreshing meals to survive the summer season. Kicking off salad season, today we're bringing you a spinach salad. It's such a simple recipe that you couldn't even call it a recipe — just a suggested combination of ingredients to inspire your next salads.

Pics and Cakes


What do we need?

  • 1 bowl of fresh, washed spinach
  • 1/2 red onion
  • 1 tomato
  • 1/2 cucumber
  • 4 sun-dried tomatoes
  • Poppy seeds
  • Feta-style cheese
  • Oil
  • Vinegar
  • Salt


How do we make it?

  1. Slice the cucumber into rounds, julienne the onion, dice the tomatoes, and pile everything on top of the fresh spinach leaves (if they're very large, tear them with your hands). Add as much feta cheese as you like, crumbled by hand.
  2. Finally, sprinkle on the poppy seeds and dress to taste.


Tips:

– You can whip up a vinaigrette by mixing 1 part vinegar with 3 parts oil and a pinch of salt. Pop it into a jar that seals tightly, shake it vigorously to emulsify, and it's ready to dress your salad. You can add any spice, herb, mustard, or whatever else you can think of to a vinaigrette.

– Watch out with the sun-dried tomatoes because they pack so much flavor that sometimes you can skip the salt altogether.

Pics and Cakes

28 de julio de 2016 · 2 min · Palstelera

Chicken and Lamb Kebab

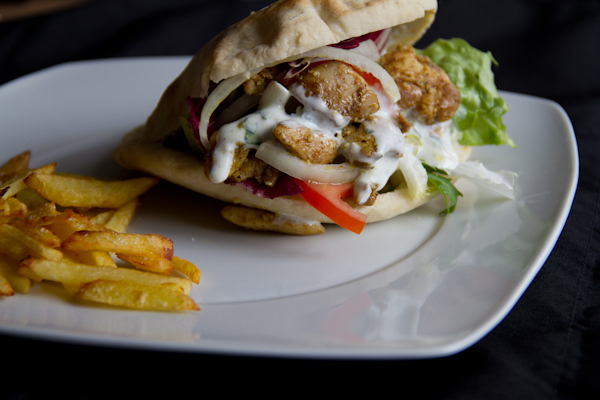
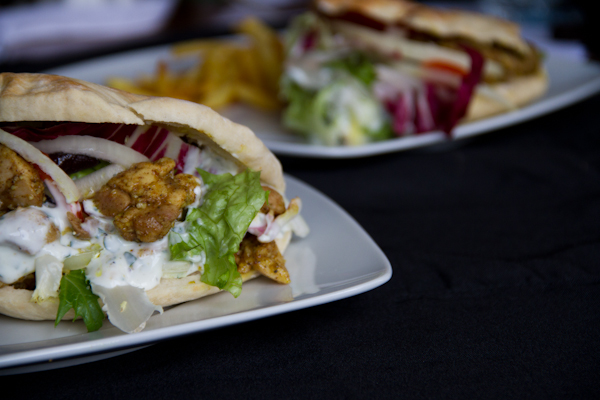
Everyone who visits Turkey says that the kebab there is nothing like the ones we eat in Spain, so at this point I'm not entirely sure what to call this. In any case, what I can promise you is that it's delicious and the preparation couldn't be simpler. We discovered this recipe thanks to the YouTube channel Recetas de Cocina, which is always worth a visit. Give these kebabs a try and let us know how it goes.

Pics and Cakes

What do we need?

  • 400 g (14 oz) lamb leg chops
  • 400 g (14 oz) chicken thighs
  • 4 teaspoons garlic powder
  • 4 tablespoons Ras el Hanout (a North African spice blend)
  • Salt and pepper
  • Lettuce (chopped or julienned)
  • Sliced tomato
  • Sliced or finely julienned onion
  • Pita breads


For the yogurt sauce:

  • 2 Greek yogurts
  • 2 tablespoons mayonnaise
  • Juice of 1/2 lemon
  • 1 or 2 garlic cloves
  • 3 teaspoons sugar
  • 1 pinch of cumin
  • Salt, pepper and fresh parsley


How do we make it?

  1. Cut the lamb chops and chicken into bite-sized pieces.
  2. In a bowl, combine 6 tablespoons of olive oil and 2 tablespoons of Ras el Hanout and mix well. Add the chopped chicken, season with salt and pepper, and sprinkle in two teaspoons of garlic powder.
  3. Mix well so all the meat is fully coated and let it marinate for at least 1 hour in the fridge (the longer it sits, the more flavor it will pick up).
  4. Repeat steps 2 and 3 with the chopped lamb.
  5. While the meat rests, let's prepare the yogurt sauce. Mix the yogurt with the mayonnaise. Then add the crushed garlic, the sugar, the cumin, salt, pepper, and finally the lemon juice and chopped fresh parsley. Mix everything thoroughly (no blender needed) and keep it in the fridge until you're ready to use it.
  6. Once the meat has had enough time to marinate, you have two options: cook it in the oven, or in a frying pan or on a griddle.
    a) For the first option, line a baking tray with parchment paper and spread the pieces of meat out separately. Bake at 200°C (390°F) until they look golden. When you take the meat off the tray, drain off any excess oil.
    b) If you prefer, you can sauté them in a pan or cook them on a griddle. There's no need to add oil since the marinade is enough. This option is faster since there's no oven preheating and the cooking time is shorter.
  7. All that's left is to assemble the kebabs. In a pita bread, layer meat, lettuce, tomato, onion and yogurt sauce to taste.

Pics and Cakes

Tips:

– You can adjust the yogurt sauce to taste, but it's better to go light than to overdo any one ingredient, especially garlic and salt, which are hard to fix once you've added too much. I recommend adding little by little and tasting as you go.

– It's better to cook the meats separately so people can choose whether they want their kebab with just one type of meat or mixed. Lamb tends to have a much stronger flavor than chicken, which not everyone enjoys.

– The meat quantities are just a guide. Adjust them depending on how many kebabs you want to make.

11 de junio de 2015 · 3 min · Palstelera

Kebab de pollo y cordero

Todo el mundo que visita Turquía dice que el kebab de allí no tiene nada que ver con los que comemos en España así que, llegados a este punto, no sé exactamente cómo llamar a esto. En cualquier caso lo que os puedo asegurar es que está delicioso y su elaboración no podía ser más sencilla. La receta en este caso la descubrimos gracias al canal de Youtube Recetas de Cocina por el que siempre merece darse una vueltecita. Animaos a preparar estos kebab y nos contáis qué tal la experiencia.

Pics and Cakes

¿Qué necesitamos?

  • 400 gr de chuletas de pierna de cordero
  • 400 g de contramuslos de pollo
  • 4 cucharaditas de ajo en polvo
  • 4 cucharadas de Ras el hanout (mezcla de especias originaria del Magreb)
  • Sal y pimienta
  • Lechuga (en trozos o en juliana)
  • Tomate en rodajas
  • Cebolla en rodajas o juliana fina
  • Panes de pita


Para la salsa de yogur:

  • 2 yogures griegos
  • 2 cucharadas de mayonesa
  • zumo de 1/2 limón
  • 1 o 2 dientes de ajo
  • 3 cucharaditas de azúcar
  • 1 pizca de comino
  • Sal, pimienta y perejil fresco


 ¿Cómo lo hacemos?

  1. Cortamos las chuletas de cordero y el pollo en trocitos del tamaño de un bocado.
  2. En un bol ponemos 6 cucharadas de aceite de oliva y 2 cucharadas de Ras el Hanout y mezclamos bien. Añadimos el pollo cortado, lo salpimentamos y espolvoreamos dos cucharaditas de ajo en polvo.
  3. Mezclamos bien para que toda la carne quede bien impregnada y dejamos marinar al menos 1 hora en la nevera (cuanto más tiempo lo dejemos más sabor cogerá la carne).
  4. Repetimos los pasos 2 y 3 con la carne troceada de cordero.
  5. Aprovechando el tiempo de reposo de la carne vamos a preparar la salsa de yogur. Para ello, mezclamos el yogur con la mayonesa. Después añadimos el ajo previamente machacado, el azúcar, el comino, la sal, la pimienta y, por último, el limón y el perejil fresco picado. Mezclamos todo muy bien (no es necesaria la batidora) y reservamos en la nevera hasta que la utilicemos.
  6. Después de haber dejado el tiempo suficiente para marinar la carne, tenemos dos opciones: bien cocinarla en el horno o bien en la sartén o plancha.
    a) Para la primera opción, ponemos papel de horno sobre la bandeja del horno y extendemos los trozos de carne separados. Los horneamos a 200º hasta que los veamos dorados. Al sacar la carne de la bandeja, retiramos el exceso de aceite.
    b) Si preferimos podemos saltearlos en una sartén o hacerlos a la plancha. No es necesario añadir aceite ya que con el marinado tiene suficiente. Esta opción es más rápida ya que no requiere precalentado del horno y la cocción es más rápida.
  7. Ya solo nos queda montar nuestros kebabs. En un pan de pita alternamos carne, lechuga, tomate, cebolla y salsa de yogur al gusto.

Pics and Cakes

Consejos:

– La salsa de yogur podéis rectificarla al gusto pero es preferible quedarnos cortos que excedernos en el uso de algún ingrediente, especialmente con el ajo y la sal que tienen difícil arreglo. Os recomiendo que lo echéis poco a poco y lo vayáis probando.

– Es preferible que hagáis las carnes por separado para que la gente pueda elegir si quiere su kebab solo de un tipo de carne o mixto. Además la carne de cordero suele tener un sabor bastante fuerte comparado con el pollo, que puede no gustar a todo el mundo.

– Las cantidades de la carne son orientativas. Las podéis adaptar según el número de kebabs que queráis preparar.

 
11 de junio de 2015 · 3 min · Palstelera

Crispy Chicken Burger

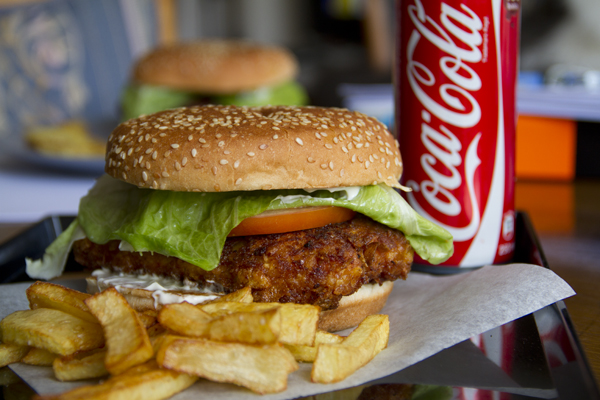
Believe it or not: we’re back! After months (literally) with our blog in some kind of hibernation, we’re back at it and hoping that this time our willpower won’t fade so fast. We’re returning with that recipe that’s been sitting at the top of the blog for so many days now, the one we know plenty of you have been dying to make: the Crispy Chicken. For lovers (or at least, frequenters) of fast food joints, the Crispy Chicken is a Burger King staple, a chicken burger with a spicy kick. But here we’re sharing the upgraded version. Meaning, the one we make with an actual chicken fillet and not some suspicious mystery patty pretending to be one.

Pics and Cakes

What do we need?

  • 4 tablespoons of flour

  • 1 tablespoon of onion powder

  • 1 tablespoon of garlic powder

  • 1/2 tablespoon of paprika

  • Salt

  • Black pepper

  • 2 eggs

  • Cornflakes

  • A splash of white wine

  • 2 chicken breast fillets (not too thin)

  • 2 burger buns

  • 2 tomato slices

  • 2 lettuce leaves

  • Mayonnaise

How do we make it?

  • First, we’ll prep the breading for the chicken. Mix the flour with the onion and garlic powder, paprika, salt and pepper.

  • In another bowl, beat the eggs with a splash of white wine.

  • In a third bowl, add the cornflakes and crush them with your hand. Grab fistfuls and squeeze them little by little. We don’t want the pieces too small, so it won’t take much time.

  • Take your chicken fillets and bread them in the same order as the bowls you prepared: flour, egg, and cornflakes. Let them rest while the oil heats up in a frying pan (or deep fryer).

  • Fry the breaded fillets until golden and transfer them to a plate lined with paper towels to soak up the excess oil.

  • Now all that’s left is to assemble our ‘burger’. Spread a bit of mayo on each half of the bun, add a fillet, a tomato slice, and a lettuce leaf. Ready to eat.

Pics and Cakes

Tips:

  • Instead of onion powder, we used a packet of onion soup mix. A pretty curious ingredient that we’ll use in other recipes like COCA-COLA CHICKEN.

  • The fillets should be a bit thick so they stay juicy, but you have to be careful when frying them to nail the perfect point: golden on the outside and fully cooked on the inside. We recommend cranking up the heat at first and then turning it down a bit to make sure they cook through properly.

3 de septiembre de 2014 · 2 min · Palstelera

Hamburguesa crispy chicken

Increíble pero cierto: ¡hemos vuelto! Después de meses (literalmente hablando) con nuestro blog en una especie de hibernación, volvemos a la carga y esperamos que esta vez las fuerzas no nos flaqueen tan rápido.  Volvemos con esa receta que lleva ocupando la cabecera del blog tantos días y que sabemos que más de uno estáis deseando hacer: la Crispy Chicken. Para los amantes (o al menos, conocedores) de los restaurantes de comida rápida, la Crispy Chicken es un básico del Burger King, una hamburguesa de pollo con un toque picante. Sin embargo os revelamos la versión mejorada. Es decir, la que hacemos con un filete de pollo de verdad y no con un sospechoso conglomerado que finge serlo.

Pics and Cakes


¿Qué necesitamos?

  • 4 cucharadas de harina

  • 1 cucharada de cebolla en polvo

  • 1 cucharada de ajo en polvo

  • 1/2 cucharada de pimentón

  • Sal

  • Pimienta negra

  • **2 huevos

  • Copos de maíz (cereales tipo cornflakes)

  • 1 chorrito de vino blanco

  • 2 filetes de pechuga de pollo (no muy finos)

  • 2 panes de hamburguesa

  • 2 rodajas de tomate

  • 2 hojas de lechuga

  • Mayonesa


¿Cómo lo hacemos?

  • En primer lugar, vamos a preparar el rebozado del pollo. Para ello, mezclamos la harina con la cebolla y el ajo en polvo, el pimentón, sal y pimienta.

  • En otro bol, batimos los huevos con un chorrito de vino blanco.

  • En un tercer bol, pondremos los cereales y con la mano los trituraremos. Podemos ir cogiendo puñados y estrujándolos poco a poco. No queremos que queden trozos demasiado pequeños, así que no nos llevará apenas tiempo.

  • Cogemos nuestros filetes de pollo y los rebozamos en el mismo orden en el que hemos preparado los tres boles: harina, huevo y cereales. Los dejamos reposar mientras se calienta el aceite en una sartén (o freidora).

  • Freímos los filetes rebozados hasta que estén dorados y los sacamos sobre un plato con papel de cocina para absorber el exceso de aceite.

  • Ahora sólo nos queda montar nuestra ‘hamburguesa’. Untamos un poquito de mayonesa en cada una de las mitades del pan de hamburguesa, ponemos un filete, una rodaja de tomate y una hoja de lechuga. Y listo para comer.

Pics and Cakes

Consejos:

  • En vez de cebolla en polvo, nosotros hemos utilizado sopa de cebolla en sobre. Un ingrediente muy curioso que utilizaremos en otras recetas como el POLLO A LA COCA-COLA.

  • Los filetes tienen que ser un poco gruesos para que estén jugosos pero hay que tener cuidado a la hora de freírlos para encontrar el punto perfecto: dorado por fuera y bien hecho por dentro. Os aconsejamos poner el fuego fuerte al principio y bajarlo un poquito después para asegurarnos de que quedan bien cocinados.

3 de septiembre de 2014 · 3 min · Palstelera

Camembert con caramelo y nueces

Dicen que todo lo bueno se hace esperar y parece que esto es lo que hemos querido hacer con esta nueva receta. Pero bueno, por fin, volvemos a publicar y traemos una sugerencia de aperitivo fácil, rápida y exquisita, una vez más sacada de La Receta de la Felicidad, quien nos invita a utilizarlo como regalo navideño. Pero vamos, que para disfrutar un buen queso nos da igual que sea Navidad, Semana Santa o pleno mes de agosto, ¿verdad?

Pics and Cakes


¿Qué necesitamos?

  • 1 queso camembert

  • Varias nueces peladas

  • 100 g de azúcar

  • 2 cucharadas de mantequilla


¿Cómo lo hacemos?

  • Ponemos el queso camembert entero sobre un plato y colocamos las nueces encima.

  • Ponemos en un cazo o sartén el azúcar a fuego medio y dejamos que se vaya derritiendo poco a poco sin remover (aunque sintamos la tentación de hacerlo).

  • Cuando veamos que se ha derretido el azúcar y que tenemos una especie de sirope muy espeso y claro, podemos remover y lo dejaremos cocinar un poco más hasta que alcance el tono dorado del caramelo.

  • Apagamos el fuego, añadimos las dos cucharadas de mantequilla y removemos bien.

  • Vertemos inmediatamente el caramelo sobre el camembert con nueces, intentando hacer una capa fina o incluso hilos con el caramelo.


Consejos:

  • Hay que tener cuidado y evitar dejar demasiado tiempo el caramelo en el fuego ya que se nos podría quemar y el resultado sería un caramelo muy oscuro y amargo.

  • Se pueden cortar las porciones de queso en cuanto hayamos echado el caramelo. Si no, al solidificarse podría resultarnos muy complicado (por eso también es importante que la capa de caramelo sea fina).

________________ [English version] CAMEMBERT CHEESE WITH NUTS AND CARAMEL* *Ingredients: 

  • 1 Camembert cheese

  • Several nuts

  • 100 g sugar

  • 2 tbsp butter

* *

  • Place the cheese into a dish and put the nuts over it.

  • Place the sugar into a sauce pan and cook over medium low heat. Let it melt slowly.

  • When the sugar is totally melt you can use a spoon to stir.

  • Keep cooking until golden brown. Add the butter and stir well.

  • Pour immediately over the cheese with the nuts. Try to create a thin layer.

Tips:- Do not overcook the sugar or you’ll get a dark and bitter caramel.* - Cut the cheese into portions right after pouring the caramel. Otherwise, when caramel is hard it could be very difficult (that’s why you have to try to make a thin layer).


20 de junio de 2013 · 3 min · Palstelera

Camembert with Caramel and Walnuts

They say good things come to those who wait, and it seems that’s exactly what we’ve been trying to do with this new recipe. But anyway, we’re finally back to posting, and we’re bringing you an easy, quick, and delicious appetizer suggestion, once again borrowed from La Receta de la Felicidad, who recommends it as a Christmas gift. But hey, when it comes to enjoying a good cheese, who cares if it’s Christmas, Easter, or the middle of August, right?

Pics and Cakes

What do we need?

  • 1 Camembert cheese

  • A handful of shelled walnuts

  • 100 g (1/2 cup) sugar

  • 2 tablespoons butter

How do we make it?

  • Place the whole Camembert cheese on a plate and arrange the walnuts on top.

  • In a small saucepan or skillet, heat the sugar over medium heat and let it melt slowly without stirring (even if you feel tempted to).

  • Once the sugar has melted into a kind of thick, pale syrup, you can stir it and let it cook a little longer until it reaches a golden caramel color.

  • Turn off the heat, add the two tablespoons of butter, and stir well.

  • Immediately pour the caramel over the Camembert with walnuts, trying to make a thin layer or even caramel threads.

Tips:

  • Be careful not to leave the caramel on the heat for too long, as it could burn and result in a very dark, bitter caramel.

  • You can cut the cheese into portions right after pouring on the caramel. Otherwise, once it solidifies it can get tricky (that’s another reason why the caramel layer should be thin).

________________ [English version] CAMEMBERT CHEESE WITH NUTS AND CARAMEL* *Ingredients:

  • 1 Camembert cheese

  • Several nuts

  • 100 g sugar

  • 2 tbsp butter

  • Place the cheese into a dish and put the nuts over it.

  • Place the sugar into a sauce pan and cook over medium low heat. Let it melt slowly.

  • When the sugar is totally melt you can use a spoon to stir.

  • Keep cooking until golden brown. Add the butter and stir well.

  • Pour immediately over the cheese with the nuts. Try to create a thin layer.

  • Tips:- Do not overcook the sugar or you’ll get a dark and bitter caramel.* - Cut the cheese into portions right after pouring the caramel. Otherwise, when caramel is hard it could be very difficult (that’s why you have to try to make a thin layer).

20 de junio de 2013 · 3 min · Palstelera